Customers are faced with increasing security threats and vulnerabilities across infrastructure and application resources as their digital footprint has expanded and the business impact of those digital assets has grown. A common cybersecurity challenge has been two-fold:
- Consuming logs from digital resources that come in different formats and schemas and automating the analysis of threat findings based on those logs.
- Whether logs are coming from Amazon Web Services (AWS), other cloud providers, on-premises, or edge devices, customers need to centralize and standardize security data.
Furthermore, the analytics for identifying security threats must be capable of scaling and evolving to meet a changing landscape of threat actors, security vectors, and digital assets.
A novel approach to solve this complex security analytics scenario combines the ingestion and storage of security data using Amazon Security Lake and analyzing the security data with machine learning (ML) using Amazon SageMaker. Amazon Security Lake is a purpose-built service that automatically centralizes an organization’s security data from cloud and on-premises sources into a purpose-built data lake stored in your AWS account. Amazon Security Lake automates the central management of security data, normalizes logs from integrated AWS services and third-party services and manages the lifecycle of data with customizable retention and also automates storage tiering. Amazon Security Lake ingests log files in the Open Cybersecurity Schema Framework (OCSF) format, with support for partners such as Cisco Security, CrowdStrike, Palo Alto Networks, and OCSF logs from resources outside your AWS environment. This unified schema streamlines downstream consumption and analytics because the data follows a standardized schema and new sources can be added with minimal data pipeline changes. After the security log data is stored in Amazon Security Lake, the question becomes how to analyze it. An effective approach to analyzing the security log data is using ML; specifically, anomaly detection, which examines activity and traffic data and compares it against a baseline. The baseline defines what activity is statistically normal for that environment. Anomaly detection scales beyond an individual event signature, and it can evolve with periodic retraining; traffic classified as abnormal or anomalous can then be acted upon with prioritized focus and urgency. Amazon SageMaker is a fully managed service that enables customers to prepare data and build, train, and deploy ML models for any use case with fully managed infrastructure, tools, and workflows, including no-code offerings for business analysts. SageMaker supports two built-in anomaly detection algorithms: IP Insights and Random Cut Forest. You can also use SageMaker to create your own custom outlier detection model using algorithms sourced from multiple ML frameworks.
In this post, you learn how to prepare data sourced from Amazon Security Lake, and then train and deploy an ML model using an IP Insights algorithm in SageMaker. This model identifies anomalous network traffic or behavior which can then be composed as part of a larger end-to-end security solution. Such a solution could invoke a multi-factor authentication (MFA) check if a user is signing in from an unusual server or at an unusual time, notify staff if there is a suspicious network scan coming from new IP addresses, alert administrators if unusual network protocols or ports are used, or enrich the IP insights classification result with other data sources such as Amazon GuardDuty and IP reputation scores to rank threat findings.
Solution overview
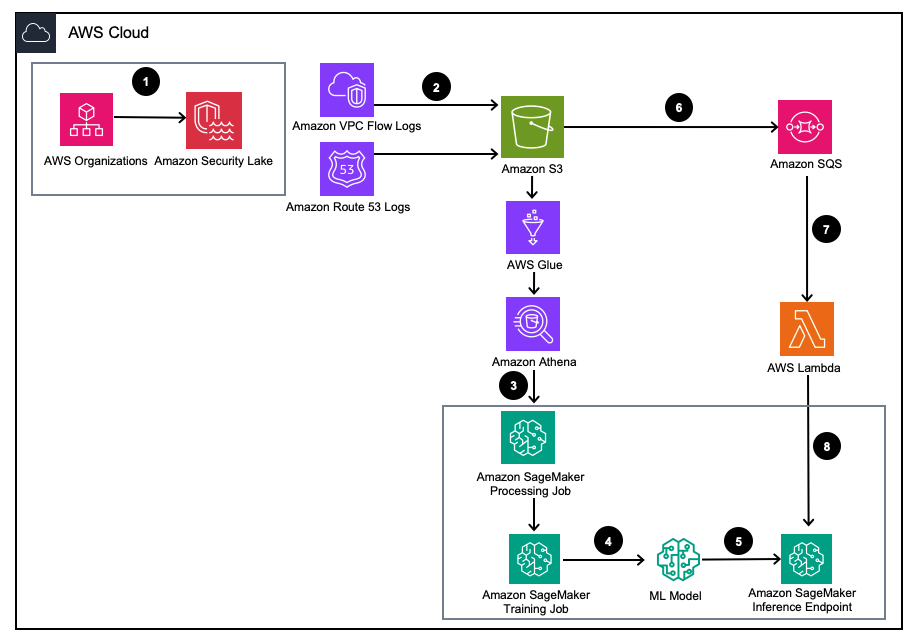
Figure 1 – Solution Architecture
- Enable Amazon Security Lake with AWS Organizations for AWS accounts, AWS Regions, and external IT environments.
- Set up Security Lake sources from Amazon Virtual Private Cloud (Amazon VPC) Flow Logs and Amazon Route53 DNS logs to the Amazon Security Lake S3 bucket.
- Process Amazon Security Lake log data using a SageMaker Processing job to engineer features. Use Amazon Athena to query structured OCSF log data from Amazon Simple Storage Service (Amazon S3) through AWS Glue tables managed by AWS LakeFormation.
- Train a SageMaker ML model using a SageMaker Training job that consumes the processed Amazon Security Lake logs.
- Deploy the trained ML model to a SageMaker inference endpoint.
- Store new security logs in an S3 bucket and queue events in Amazon Simple Queue Service (Amazon SQS).
- Subscribe an AWS Lambda function to the SQS queue.
- Invoke the SageMaker inference endpoint using a Lambda function to classify security logs as anomalies in real time.
Prerequisites
To deploy the solution, you must first complete the following prerequisites:
- Enable Amazon Security Lake within your organization or a single account with both VPC Flow Logs and Route 53 resolver logs enabled.
- Ensure that the AWS Identity and Access Management (IAM) role used by SageMaker processing jobs and notebooks has been granted an IAM policy including the Amazon Security Lake subscriber query access permission for the managed Amazon Security lake database and tables managed by AWS Lake Formation. This processing job should be run from within an analytics or security tooling account to remain compliant with AWS Security Reference Architecture (AWS SRA).
- Ensure that the IAM role used by the Lambda function has been granted an IAM policy including the Amazon Security Lake subscriber data access permission.
Deploy the solution
To set up the environment, complete the following steps:
- Launch a SageMaker Studio or SageMaker Jupyter notebook with a
ml.m5.largeinstance. Note: Instance size is dependent on the datasets you use. - Clone the GitHub repository.
- Open the notebook
01_ipinsights/01-01.amazon-securitylake-sagemaker-ipinsights.ipy. - Implement the provided IAM policy and corresponding IAM trust policy for your SageMaker Studio Notebook instance to access all the necessary data in S3, Lake Formation, and Athena.
This blog walks through the relevant portion of code within the notebook after it’s deployed in your environment.
Install the dependencies and import the required library
Use the following code to install dependencies, import the required libraries, and create the SageMaker S3 bucket needed for data processing and model training. One of the required libraries, awswrangler, is an AWS SDK for pandas dataframe that is used to query the relevant tables within the AWS Glue Data Catalog and store the results locally in a dataframe.
Query the Amazon Security Lake VPC flow log table
This portion of code uses the AWS SDK for pandas to query the AWS Glue table related to VPC Flow Logs. As mentioned in the prerequisites, Amazon Security Lake tables are managed by AWS Lake Formation, so all proper permissions must be granted to the role used by the SageMaker notebook. This query will pull multiple days of VPC flow log traffic. The dataset used during development of this blog was small. Depending on the scale of your use case, you should be aware of the limits of the AWS SDK for pandas. When considering terabyte scale, you should consider AWS SDK for pandas support for Modin.
When you view the data frame, you will see an output of a single column with common fields that can be found in the Network Activity (4001) class of the OCSF.
Normalize the Amazon Security Lake VPC flow log data into the required training format for IP Insights.
The IP Insights algorithm requires that the training data be in CSV format and contain two columns. The first column must be an opaque string that corresponds to an entity’s unique identifier. The second column must be the IPv4 address of the entity’s access event in decimal-dot notation. In the sample dataset for this blog, the unique identifier is the Instance IDs of EC2 instances associated to the instance_id value within the dataframe. The IPv4 address will be derived from the src_endpoint. Based on the way the Amazon Athena query was created, the imported data is already in the correct format for training an IP Insights model, so no additional feature engineering is required. If you modify the query in another way, you may need to incorporate additional feature engineering.
Query and normalize the Amazon Security Lake Route 53 resolver log table
Just as you did above, the next step of the notebook runs a similar query against the Amazon Security Lake Route 53 resolver table. Since you will be using all OCSF compliant data within this notebook, any feature engineering tasks remain the same for Route 53 resolver logs as they were for VPC Flow Logs. You then combine the two data frames into a single data frame that is used for training. Since the Amazon Athena query loads the data locally in the correct format, no further feature engineering is required.
Get IP Insights training image and train the model with the OCSF data
In this next portion of the notebook, you train an ML model based on the IP Insights algorithm and use the consolidated dataframe of OCSF from different types of logs. A list of the IP Insights hyperparmeters can be found here. In the example below we selected hyperparameters that outputted the best performing model, for example, 5 for epoch and 128 for vector_dim. Since the training dataset for our sample was relatively small, we utilized a ml.m5.large instance. Hyperparameters and your training configurations such as instance count and instance type should be chosen based on your objective metrics and your training data size. One capability that you can utilize within Amazon SageMaker to find the best version of your model is Amazon SageMaker automatic model tuning that searches for the best model across a range of hyperparameter values.
Deploy the trained model and test with valid and anomalous traffic
After the model has been trained, you deploy the model to a SageMaker endpoint and send a series of unique identifier and IPv4 address combinations to test your model. This portion of code assumes you have test data saved in your S3 bucket. The test data is a .csv file, where the first column is instance ids and the second column is IPs. It is recommended to test valid and invalid data to see the results of the model. The following code deploys your endpoint.
Now that your endpoint is deployed, you can now submit inference requests to identify if traffic is potentially anomalous. Below is a sample of what your formatted data should look like. In this case, the first column identifier is an instance id and the second column is an associated IP address as shown in the following:
After you have your data in CSV format, you can submit the data for inference using the code by reading your .csv file from an S3 bucket.:
The output for an IP Insights model provides a measure of how statistically expected an IP address and online resource are. The range for this address and resource is unbounded however, so there are considerations on how you would determine if an instance ID and IP address combination should be considered anomalous.
In the preceding example, four different identifier and IP combinations were submitted to the model. The first two combinations were valid instance ID and IP address combinations that are expected based on the training set. The third combination has the correct unique identifier but a different IP address within the same subnet. The model should determine there is a modest anomaly as the embedding is slightly different from the training data. The fourth combination has a valid unique identifier but an IP address of a nonexistent subnet within any VPC in the environment.
Note: Normal and abnormal traffic data will change based on your specific use case, for example: if you want to monitor external and internal traffic you would need a unique identifier aligned to each IP address and a scheme to generate the external identifiers.
To determine what your threshold should be to determine whether traffic is anomalous can be done using known normal and abnormal traffic. The steps outlined in this sample notebook are as follows:
- Construct a test set to represent normal traffic.
- Add abnormal traffic into the dataset.
- Plot the distribution of
dot_productscores for the model on normal traffic and the abnormal traffic. - Select a threshold value which distinguishes the normal subset from the abnormal subset. This value is based on your false-positive tolerance
Set up continuous monitoring of new VPC flow log traffic.
To demonstrate how this new ML model could be use with Amazon Security Lake in a proactive manner, we will configure a Lambda function to be invoked on each PutObject event within the Amazon Security Lake managed bucket, specifically the VPC flow log data. Within Amazon Security Lake there is the concept of a subscriber, that consumes logs and events from Amazon Security Lake. The Lambda function that responds to new events must be granted a data access subscription. Data access subscribers are notified of new Amazon S3 objects for a source as the objects are written to the Security Lake bucket. Subscribers can directly access the S3 objects and receive notifications of new objects through a subscription endpoint or by polling an Amazon SQS queue.
- Open the Security Lake console.
- In the navigation pane, select Subscribers.
- On the Subscribers page, choose Create subscriber.
- For Subscriber details, enter
inferencelambdafor Subscriber name and an optional Description. - The Region is automatically set as your currently selected AWS Region and can’t be modified.
- For Log and event sources, choose Specific log and event sources and choose VPC Flow Logs and Route 53 logs
- For Data access method, choose S3.
- For Subscriber credentials, provide your AWS account ID of the account where the Lambda function will reside and a user-specified external ID.
Note: If doing this locally within an account, you don’t need to have an external ID. - Choose Create.
Create the Lambda function
To create and deploy the Lambda function you can either complete the following steps or deploy the prebuilt SAM template 01_ipinsights/01.02-ipcheck.yaml in the GitHub repo. The SAM template requires you provide the SQS ARN and the SageMaker endpoint name.
- On the Lambda console, choose Create function.
- Choose Author from scratch.
- For Function Name, enter
ipcheck. - For Runtime, choose Python 3.10.
- For Architecture, select x86_64.
- For Execution role, select Create a new role with Lambda permissions.
- After you create the function, enter the contents of the ipcheck.py file from the GitHub repo.
- In the navigation pane, choose Environment Variables.
- Choose Edit.
- Choose Add environment variable.
- For the new environment variable, enter
ENDPOINT_NAMEand for value enter the endpoint ARN that was outputted during deployment of the SageMaker endpoint. - Select Save.
- Choose Deploy.
- In the navigation pane, choose Configuration.
- Select Triggers.
- Select Add trigger.
- Under Select a source, choose SQS.
- Under SQS queue, enter the ARN of the main SQS queue created by Security Lake.
- Select the checkbox for Activate trigger.
- Select Add.
Validate Lambda findings
- Open the Amazon CloudWatch console.
- In the left side pane, select Log groups.
- In the search bar, enter ipcheck, and then select the log group with the name
/aws/lambda/ipcheck. - Select the most recent log stream under Log streams.
- Within the logs, you should see results that look like the following for each new Amazon Security Lake log:
{'predictions': [{'dot_product': 0.018832731992006302}, {'dot_product': 0.018832731992006302}]}
This Lambda function continually analyzes the network traffic being ingested by Amazon Security Lake. This allows you to build mechanisms to notify your security teams when a specified threshold is violated, which would indicate an anomalous traffic in your environment.
Cleanup
When you’re finished experimenting with this solution and to avoid charges to your account, clean up your resources by deleting the S3 bucket, SageMaker endpoint, shutting down the compute attached to the SageMaker Jupyter notebook, deleting the Lambda function, and disabling Amazon Security Lake in your account.
Conclusion
In this post you learned how to prepare network traffic data sourced from Amazon Security Lake for machine learning, and then trained and deployed an ML model using the IP Insights algorithm in Amazon SageMaker. All of the steps outlined in the Jupyter notebook can be replicated in an end-to-end ML pipeline. You also implemented an AWS Lambda function that consumed new Amazon Security Lake logs and submitted inferences based on the trained anomaly detection model. The ML model responses received by AWS Lambda could proactively notify security teams of anomalous traffic when certain thresholds are met. Continuous improvement of the model can be enabled by including your security team in the loop reviews to label whether traffic identified as anomalous was a false positive or not. This could then be added to your training set and also added to your normal traffic dataset when determining an empirical threshold. This model can identify potentially anomalous network traffic or behavior whereby it can be included as part of a larger security solution to initiate an MFA check if a user is signing in from an unusual server or at an unusual time, alert staff if there is a suspicious network scan coming from new IP addresses, or combine the IP insights score with other sources such as Amazon Guard Duty to rank threat findings. This model can include custom log sources such as Azure Flow Logs or on-premises logs by adding in custom sources to your Amazon Security Lake deployment.
In part 2 of this blog post series, you will learn how to build an anomaly detection model using the Random Cut Forest algorithm trained with additional Amazon Security Lake sources that integrate network and host security log data and apply the security anomaly classification as part of an automated, comprehensive security monitoring solution.
About the authors
 Joe Morotti is a Solutions Architect at Amazon Web Services (AWS), helping Enterprise customers across the Midwest US. He has held a wide range of technical roles and enjoy showing customer’s art of the possible. In his free time, he enjoys spending quality time with his family exploring new places and overanalyzing his sports team’s performance
 Bishr Tabbaa is a solutions architect at Amazon Web Services. Bishr specializes in helping customers with machine learning, security, and observability applications. Outside of work, he enjoys playing tennis, cooking, and spending time with family.
 Sriharsh Adari is a Senior Solutions Architect at Amazon Web Services (AWS), where he helps customers work backwards from business outcomes to develop innovative solutions on AWS. Over the years, he has helped multiple customers on data platform transformations across industry verticals. His core area of expertise include Technology Strategy, Data Analytics, and Data Science. In his spare time, he enjoys playing Tennis, binge-watching TV shows, and playing Tabla.
- SEO Powered Content & PR Distribution. Get Amplified Today.
- PlatoData.Network Vertical Generative Ai. Empower Yourself. Access Here.
- PlatoAiStream. Web3 Intelligence. Knowledge Amplified. Access Here.
- PlatoESG. Carbon, CleanTech, Energy, Environment, Solar, Waste Management. Access Here.
- PlatoHealth. Biotech and Clinical Trials Intelligence. Access Here.
- Source: https://aws.amazon.com/blogs/machine-learning/identify-cybersecurity-anomalies-in-your-amazon-security-lake-data-using-amazon-sagemaker/