Searching for insights in a repository of free-form text documents can be like finding a needle in a haystack. A traditional approach might be to use word counting or other basic analysis to parse documents, but with the power of Amazon AI and machine learning (ML) tools, we can gather deeper understanding of the content.
Amazon Comprehend is a fully, managed service that uses natural language processing (NLP) to extract insights about the content of documents. Amazon Comprehend develops insights by recognizing the entities, key phrases, sentiment, themes, and custom elements in a document. Amazon Comprehend can create new insights based on understanding the document structure and entity relationships. For example, with Amazon Comprehend, you can scan an entire document repository for key phrases.
Amazon Comprehend lets non-ML experts easily do tasks that normally take hours of time. Amazon Comprehend eliminates much of the time needed to clean, build, and train your own model. For building deeper custom models in NLP or any other domain, Amazon SageMaker enables you to build, train, and deploy models in a much more conventional ML workflow if desired.
In this post, we use Amazon Comprehend and other AWS services to analyze and extract new insights from a repository of documents. Then, we use Amazon QuickSight to generate a simple yet powerful word cloud visual to easily spot themes or trends.
Overview of solution
The following diagram illustrates the solution architecture.

To begin, we gather the data to be analyzed and load it into an Amazon Simple Storage Service (Amazon S3) bucket in an AWS account. In this example, we use text formatted files. The data is then analyzed by Amazon Comprehend. Amazon Comprehend creates a JSON formatted output that needs to be transformed and processed into a database format using AWS Glue. We verify the data and extract specific formatted data tables using Amazon Athena for a QuickSight analysis using a word cloud. For more information about visualizations, refer to Visualizing data in Amazon QuickSight.
Prerequisites
For this walkthrough, you should have the following prerequisites:
Upload data to an S3 bucket
Upload your data to an S3 bucket. For this post, we use UTF-8 formatted text of the US Constitution as the input file. Then you’re ready to analyze the data and create visualizations.
Analyze data using Amazon Comprehend
There are many types of text-based and image information that can be processed using Amazon Comprehend. In addition to text files, you can use Amazon Comprehend for one-step classification and entity recognition to to accept image files, PDF files, and Microsoft Word files as input, which are not discussed in this post.
To analyze your data, complete the following steps:
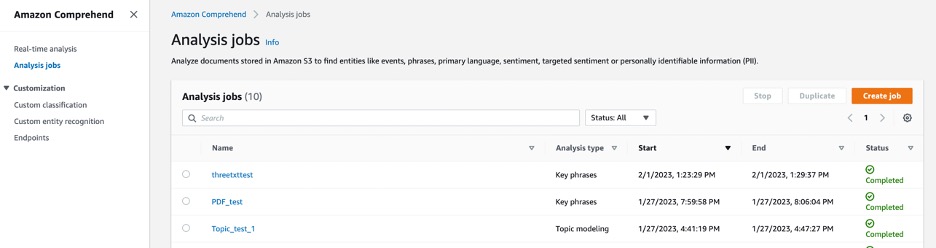
- On the Amazon Comprehend console, choose Analysis jobs in the navigation pane.
- Choose Create analysis job.
- Enter a name for your job.
- For Analysis type, choose Key phrases.
- For Language¸ choose English.
- For Input data location, specify the folder you created as a prerequisite.
- For Output data location, specify the folder you created as a prerequisite.
- Choose Create an IAM role.
- Enter a suffix for the role name.
- Choose Create job.
The job will run and the status will be displayed on the Analysis jobs page.
Wait for the analysis job to complete. Amazon Comprehend will create a file and place it in the output data folder you provided. The file is in .gz or GZIP format.
This file needs to be download and converted to a non-compressed format. You can download an object from the data folder or S3 bucket using the Amazon S3 console.
- On the Amazon S3 console, select the object and choose Download. If you want to download the object to a specific folder, choose Download on the Actions menu.
- After you download the file to your local computer, open the zipped file and save it as an uncompressed file.
The uncompressed file must be uploaded to the output folder before the AWS Glue crawler can process it. For this example, we upload the uncompressed file into the same output folder that we use in later steps.
- On the Amazon S3 console, navigate to your S3 bucket and choose Upload.
- Choose Add files.
- Choose the uncompressed files from your local computer.
- Choose Upload.
After you upload the file, delete the original zipped file.
- On the Amazon S3 console, select the bucket and choose Delete.
- Confirm the file name to permanently delete the file by entering the file name in the text box.
- Choose Delete objects.
This will leave one file remaining in the output folder: the uncompressed file.
Convert JSON data to table format using AWS Glue
In this step, you prepare the Amazon Comprehend output to be used as input into Athena. The Amazon Comprehend output is in JSON format. You can use AWS Glue to convert JSON into a database structure to ultimately be read by QuickSight.
- On the AWS Glue console, choose Crawlers in the navigation pane.
- Choose Create crawler.
- Enter a name for your crawler.
- Choose Next.
- For Is your data already mapped to Glue tables, select Not yet.
- Add a data source.
- For S3 path, enter the location of the Amazon Comprehend output data folder.
Be sure to add the trailing / to the path name. AWS Glue will search the folder path for all files.
- Select Crawl all sub-folders.
- Choose Add an S3 data source.

- Create a new AWS Identity and Access Management (IAM) role for the crawler.
- Enter a name for the IAM role.
- Choose Update chosen IAM role to be sure the new role is assigned to the crawler.
- Choose Next to enter the output (database) information.
- Choose Add database.
- Enter a database name.
- Choose Next.
- Choose Create crawler.
- Choose Run crawler to run the crawler.
You can monitor the crawler status on the AWS Glue console.
Use Athena to prepare tables for QuickSight
Athena will extract data from the database tables the AWS Glue crawler created to provide a format that QuickSight will use to create the word cloud.
- On the Athena console, choose Query editor in the navigation pane.
- For Data source, choose AwsDataCatalog.
- For Database, choose the database the crawler created.

To create a table compatible for QuickSight, the data must be unnested from the arrays.
- The first step is to create a temporary database with the relevant Amazon Comprehend data:
- The following statement limits to phrases of at least three words and groups by frequency of the phrases:
Use QuickSight to visualize output
Finally, you can create the visual output from the analysis.
- On the QuickSight console, choose New analysis.
- Choose New dataset.
- For Create a dataset, choose From new data sources.
- Choose Athena as the data source.
- Enter a name for the data source and choose Create data source.

- Choose Visualize.

Make sure QuickSight has access to the S3 buckets where the Athena tables are stored.
- On the QuickSight console, choose the user profile icon and choose Manage QuickSight.
![]()
- Choose Security & permissions.

- Look for the section QuickSight access to AWS services.
By configuring access to AWS services, QuickSight can access the data in those services. Access by users and groups can be controlled through the options.
- Verify Amazon S3 is granted access.
Now you can create the word cloud.
- Choose the word cloud under Visual types.
- Drag text to Group by and count to Size.

Choose the options menu (three dots) in the visualization to access the edit options. For example, you might want to hide the term “other” from the display. You can also edit items such as the title and subtitle for your visual. To download the word cloud as a PDF, choose Download on the QuickSight toolbar.
Clean up
To avoid incurring ongoing charges, delete any unused data and processes or resources provisioned on their respective service console.
Conclusion
Amazon Comprehend uses NLP to extract insights about the content of documents. It develops insights by recognizing the entities, key phrases, language, sentiments, and other common elements in a document. You can use Amazon Comprehend to create new products based on understanding the structure of documents. For example, with Amazon Comprehend, you can scan an entire document repository for key phrases.
This post described the steps to build a word cloud to visualize a text content analysis from Amazon Comprehend using AWS tools and QuickSight to visualize the data.
Let’s stay in touch via the comments section!
About the Authors
 Kris Gedman is the US East sales leader for Retail & CPG at Amazon Web Services. When not working, he enjoys spending time with his friends and family, especially summers on Cape Cod. Kris is a temporarily retired Ninja Warrior but he loves watching and coaching his two sons for now.
 Clark Lefavour is a Solutions Architect leader at Amazon Web Services, supporting enterprise customers in the East region. Clark is based in New England and enjoys spending time architecting recipes in the kitchen.
- SEO Powered Content & PR Distribution. Get Amplified Today.
- PlatoData.Network Vertical Generative Ai. Empower Yourself. Access Here.
- PlatoAiStream. Web3 Intelligence. Knowledge Amplified. Access Here.
- PlatoESG. Automotive / EVs, Carbon, CleanTech, Energy, Environment, Solar, Waste Management. Access Here.
- PlatoHealth. Biotech and Clinical Trials Intelligence. Access Here.
- ChartPrime. Elevate your Trading Game with ChartPrime. Access Here.
- BlockOffsets. Modernizing Environmental Offset Ownership. Access Here.
- Source: https://aws.amazon.com/blogs/machine-learning/visualize-an-amazon-comprehend-analysis-with-a-word-cloud-in-amazon-quicksight/