This is a guest post co-written with Meta’s PyTorch team and is a continuation of Part 1 of this series, where we demonstrate the performance and ease of running PyTorch 2.0 on AWS.
Machine learning (ML) research has proven that large language models (LLMs) trained with significantly large datasets result in better model quality. In the last few years, the size of current generation models has increased significantly, and they require modern tools and infrastructure to be trained efficiently and at scale. PyTorch Distributed Data Parallelism (DDP) helps process data at scale in a simple and robust manner, but it requires the model to fit on one GPU. The PyTorch Fully Sharded Data Parallel (FSDP) library breaks this barrier by enabling model sharding to train large models across data parallel workers.
Distributed model training requires a cluster of worker nodes that can scale. Amazon Elastic Kubernetes Service (Amazon EKS) is a popular Kubernetes-conformant service that greatly simplifies the process of running AI/ML workloads, making it more manageable and less time-consuming.
In this blog post, AWS collaborates with Meta’s PyTorch team to discuss how to use the PyTorch FSDP library to achieve linear scaling of deep learning models on AWS seamlessly using Amazon EKS and AWS Deep Learning Containers (DLCs). We demonstrate this through a step-by-step implementation of training 7B, 13B, and 70B Llama2 models using Amazon EKS with 16 Amazon Elastic Compute Cloud (Amazon EC2) p4de.24xlarge instances (each with 8 NVIDIA A100 Tensor Core GPUs and each GPU with 80 GB HBM2e memory) or 16 EC2 p5.48xlarge instances (each with 8 NVIDIA H100 Tensor Core GPUs and each GPU with 80 GB HBM3 memory), achieving near linear scaling in throughput and ultimately enabling faster training time.
The following scaling chart shows that the p5.48xlarge instances offer 87% scaling efficiency with FSDP Llama2 fine-tuning in a 16-node cluster configuration.

Challenges of training LLMs
Businesses are increasingly adopting LLMs for a range of tasks, including virtual assistants, translation, content creation, and computer vision, to enhance the efficiency and accuracy in a variety of applications.
However, training or fine-tuning these large models for a custom use case requires a large amount of data and compute power, which adds to the overall engineering complexity of the ML stack. This is also due to limited memory available on a single GPU, which restricts the size of the model that can be trained, and also limits the per-GPU batch size used during training.
To address this challenge, various model parallelism techniques such as DeepSpeed ZeRO and PyTorch FSDP were created to allow you to overcome this barrier of limited GPU memory. This is done by adopting a sharded data parallel technique, where each accelerator holds just a slice (a shard) of a model replica instead of the entire model replica, which dramatically reduces the memory footprint of the training job.
This post demonstrates how you can use PyTorch FSDP to fine-tune the Llama2 model using Amazon EKS. We achieve this by scaling out compute and GPU capacity to address the model requirements.
FSDP overview
In PyTorch DDP training, each GPU (referred to as a worker in the context of PyTorch) holds a complete copy of the model, including the model weights, gradients, and optimizer states. Each worker processes a batch of data and, at the end of the backward pass, uses an all-reduce operation to synchronize gradients across different workers.
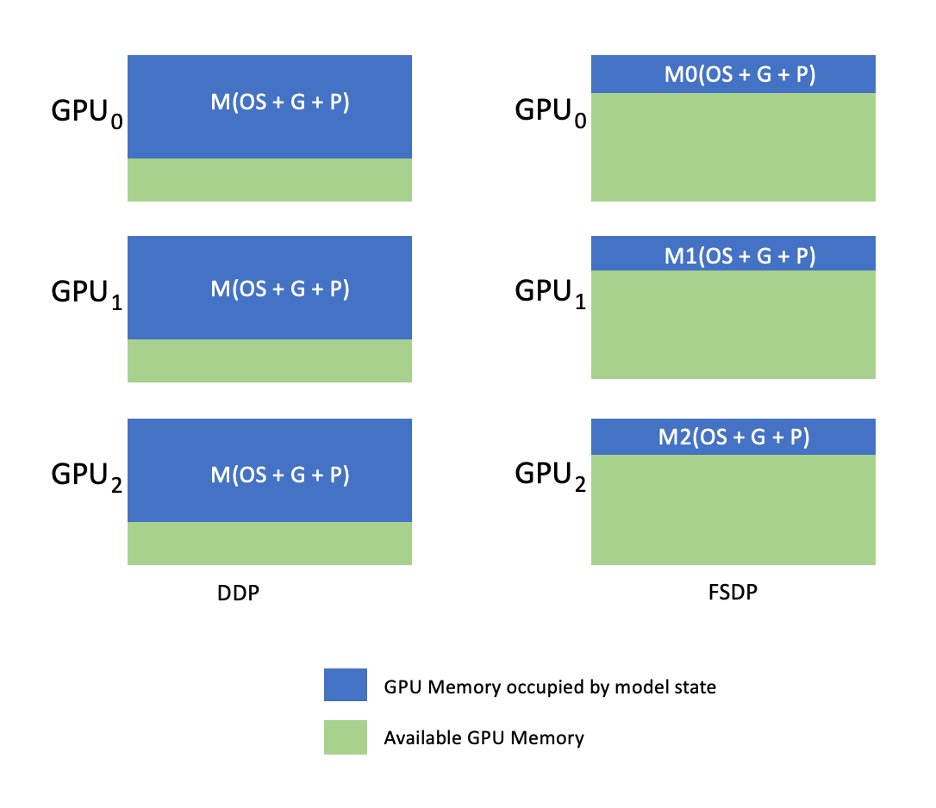
Having a replica of the model on each GPU restricts the size of the model that can be accommodated in a DDP workflow. FSDP helps overcome this limitation by sharding model parameters, optimizer states, and gradients across data parallel workers while still preserving the simplicity of data parallelism.
This is demonstrated in the following diagram, where in the case of DDP, each GPU holds a complete copy of the model state, including the optimizer state (OS), gradients (G), and parameters (P): M(OS + G + P). In FSDP, each GPU holds only a slice of the model state, including the optimizer state (OS), gradients (G), and parameters (P): M<partition number>(OS + G + P). Using FSDP results in a significantly smaller GPU memory footprint compared to DDP across all workers, enabling the training of very large models or using larger batch sizes for training jobs.
This, however, comes at the cost of increased communication overhead, which is mitigated through FSDP optimizations such as overlapping communication and computation processes with features like pre-fetching. For more detailed information, refer to Getting Started with Fully Sharded Data Parallel (FSDP).
FSDP offers various parameters that allow you to tune the performance and efficiency of your training jobs. Some of the key features and capabilities of FSDP include:
- Transformer wrapping policy
- Flexible mixed precision
- Activation checkpointing
- Various sharding strategies to suit different network speeds and cluster topologies:
- FULL_SHARD – Shard model parameters, gradients, and optimizer states
- HYBRID_SHARD – Full shard within a node DDP across nodes; supports a flexible sharding group for a full replica of the model (HSDP)
- SHARD_GRAD_OP – Shard only gradients and optimizer states
- NO_SHARD – Similar to DDP
For more information about FSDP, refer to Efficient Large-Scale Training with Pytorch FSDP and AWS.
The following figure shows how FSDP works for two data parallel processes.

Solution overview
In this post, we set up a compute cluster using Amazon EKS, which is a managed service to run Kubernetes in the AWS Cloud and on-premises data centers. Many customers are embracing Amazon EKS to run Kubernetes-based AI/ML workloads, taking advantage of its performance, scalability, reliability, and availability, as well as its integrations with AWS networking, security and other services.
For our FSDP use case, we use the Kubeflow Training Operator on Amazon EKS, which is a Kubernetes-native project that facilitates fine-tuning and scalable distributed training for ML models. It supports various ML frameworks, including PyTorch, which you can use to deploy and manage PyTorch training jobs at scale.
Utilizing the PyTorchJob custom resource of Kubeflow Training Operator, we run training jobs on Kubernetes with a configurable number of worker replicas which allows us to optimize resource utilization.
The following are a few components of the training operator that play a role in our Llama2 fine-tuning use case:
- A centralized Kubernetes controller that orchestrates distributed training jobs for PyTorch.
- PyTorchJob, a Kubernetes custom resource for PyTorch, provided by the Kubeflow Training Operator, to define and deploy Llama2 training jobs on Kubernetes.
- etcd, which is related to the implementation of the rendezvous mechanism for coordinating the distributed training of PyTorch models. This
etcdserver, as part of the rendezvous process, facilitates the coordination and synchronization of the participating workers during distributed training.
The following diagram illustrates the solution architecture.

Most of the details will be abstracted by the automation scripts that we use to run the Llama2 example.
We use the following code references in this use case:
What is Llama2?
Llama2 is a LLM pre-trained on 2 trillion tokens of text and code. It is one of the largest and most powerful LLMs available today You can use Llama2 for a variety of tasks, including natural language processing (NLP), text generation, and translation. For more information, refer to Getting started with Llama.
Llama2 is available in three different model sizes:
- Llama2-70b – This is the largest Llama2 model, with 70 billion parameters. It is the most powerful Llama2 model and can be used for the most demanding tasks.
- Llama2-13b – This is a medium-sized Llama2 model, with 13 billion parameters. It is a good balance between performance and efficiency, and can be used for a variety of tasks.
- Llama2-7b – This is the smallest Llama2 model, with 7 billion parameters. It is the most efficient Llama2 model, and can be used for tasks that don’t require the highest level of performance.
This post enables you to fine-tune all of these models on Amazon EKS. To provide a simple and reproducible experience of creating an EKS cluster and running FSDP jobs on it, we use the aws-do-eks project. The example will also work with a pre-existing EKS cluster.
A scripted walkthrough is available on GitHub for an out-of-the-box experience. In the following sections, we explain the end-to-end process in more detail.
Provision the solution infrastructure
For the experiments described in this post, we use clusters with p4de (A100 GPU) and p5 (H100 GPU) nodes.
Cluster with p4de.24xlarge nodes
For our cluster with p4de nodes, we use the following eks-gpu-p4de-odcr.yaml script:
Using eksctl and the preceding cluster manifest, we create a cluster with p4de nodes:
Cluster with p5.48xlarge nodes
A terraform template for an EKS cluster with P5 nodes is located in the following GitHub repo.
You can customize the cluster via the variables.tf file and then create it via the Terraform CLI:
You can verify the cluster availability by running a simple kubectl command:
The cluster is healthy if the output of this command shows the expected number of nodes in Ready status.
Deploy prerequisites
To run FSDP on Amazon EKS, we use the PyTorchJob custom resource. It requires etcd and Kubeflow Training Operator as prerequisites.
Deploy etcd with the following code:
Deploy Kubeflow Training Operator with the following code:
Build and push an FSDP container image to Amazon ECR
Use the following code to build an FSDP container image and push it to Amazon Elastic Container Registry (Amazon ECR):
Create the FSDP PyTorchJob manifest
Insert your Hugging Face token in the following snippet prior to running it:
Configure your PyTorchJob with .env file or directly in your environment variables as below:
Generate the PyTorchJob manifest using the fsdp template and generate.sh script or create it directly using the script below:
Run the PyTorchJob
Run the PyTorchJob with the following code:
You will see the specified number of FDSP worker pods created and, after pulling the image, they will enter into a Running state.
To see the status of the PyTorchJob, use the following code:
To stop the PyTorchJob, use the following code:
After a job is complete, it needs to be deleted before initiating a new run. We’ve also observed that deleting theetcdpod and letting it restart prior to launching a new job helps avoid a RendezvousClosedError.
Scale the cluster
You can repeat the preceding steps of creating and running jobs while varying the number and instance type of worker nodes in the cluster. This enables you to produce scaling charts like the one shown earlier. In general, you should see a reduction in GPU memory footprint, reduction in epoch time, and increase in throughput when more nodes are added to the cluster. The previous chart was produced by conducting several experiments using a p5 node group varying from 1–16 nodes in size.
Observe the FSDP training workload
Observability of generative artificial intelligence workloads is important to allow visibility into your running jobs as well as aid in maximizing the utilization of your compute resources. In this post, we use a few Kubernetes-native and open source observability tools for this purpose. These tools enable you to track errors, statistics, and model behavior, making AI observability a crucial part of any business use case. In this section, we show various approaches for observing FSDP training jobs.
Worker pod logs
At the most basic level, you need to be able to see the logs of your training pods. This can easily be done by using Kubernetes-native commands.
First, retrieve a list of pods and locate the name of the one that you want to see logs for:
Then view the logs for the selected pod:
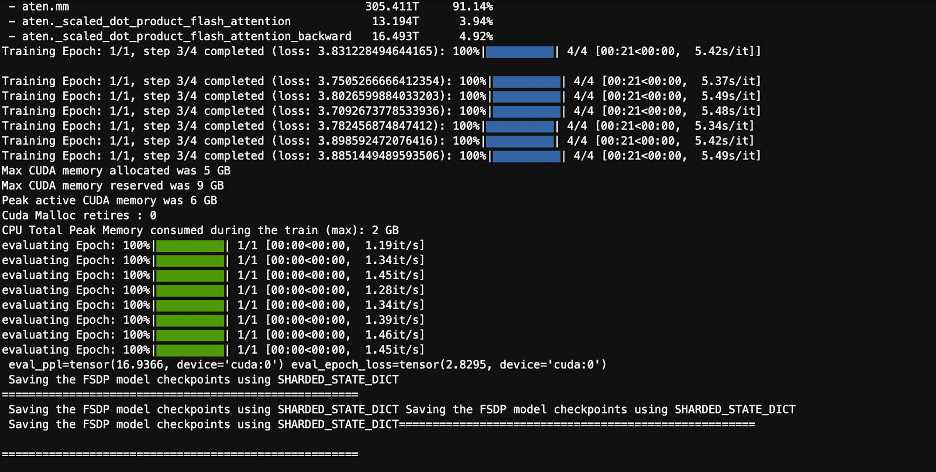
Only one worker (elected leader) pod log will list the overall job statistics. The name of the elected leader pod is available at the beginning of each worker pod log, identified by the key master_addr=.
CPU utilization
Distributed training workloads require both CPU and GPU resources. To optimize these workloads, it’s important to understand how these resources are utilized. Fortunately, some great open source utilities are available that help visualize CPU and GPU utilization. For viewing CPU utilization, you can usehtop. If your worker pods contain this utility, you can use the below command to open a shell into a pod and then runhtop.
Alternatively, you can deploy an htopdaemonsetlike the one provided in the following GitHub repo.
Thedaemonsetwill run a lightweight htop pod on each node. You can exec into any of these pods and run thehtopcommand:
The following screenshot shows the CPU utilization on one of the nodes in the cluster. In this case, we are looking at a P5.48xlarge instance, which has 192 vCPUs. The processor cores are idle while the model weights are downloaded, and we see rising utilization while the model weights are being loaded to GPU memory.

GPU utilization
If thenvtoputility is available in your pod, you may exec into it using below and then runnvtop.
Alternatively, you can deploy a nvtopdaemonsetlike the one provided in the following GitHub repo.
This will run anvtoppod on each node. You can exec into any of those pods and runnvtop:
The following screenshot shows the GPU utilization on one of the nodes in the training cluster. In this case, we are looking at a P5.48xlarge instance, which has 8 NVIDIA H100 GPUs. The GPUs are idle while the model weights are downloaded, then GPU memory utilization increases as the model weights are loaded onto the GPU, and GPU utilization spikes to 100% while the training iterations are underway.

Grafana dashboard
Now that you understand how your system works on the pod and node level, it’s also important to look at metrics at the cluster level. Aggregated utilization metrics can be collected by NVIDIA DCGM Exporter and Prometheus and visualized in Grafana.
An example Prometheus-Grafana deployment is available in the following GitHub repo.
An example DCGM exporter deployment is available in the following GitHub repo.
A simple Grafana dashboard is shown in the following screenshot. It was built by selecting the following DCGM metrics: DCGM_FI_DEV_GPU_UTIL, DCGM_FI_MEM_COPY_UTIL, DCGM_FI_DEV_XID_ERRORS, DCGM_FI_DEV_SM_CLOCK, DCGM_FI_DEV_GPU_TEMP, and DCGM_FI_DEV_POWER_USAGE. The dashboard can be imported into Prometheus from GitHub.
The following dashboard shows one run of a Llama2 7b single epoch training job. The graphs show that as the streaming multiprocessor (SM) clock increases, the power draw and temperature of the GPUs increase as well, together with GPU and memory utilization. You can also see that there were no XID errors and the GPUs were healthy during this run.

Since March 2024 GPU observability for EKS is supported natively in CloudWatch Container Insights. To enable this functionality just deploy the CloudWatch Observability Add-on in your EKS cluster. Then you will be able to browse pod, node, and cluster level metrics through pre-configured and customizable dashboards in Container Insights.
Clean up
If you created your cluster using the examples provided in this blog, you can execute the following code to delete the cluster and any resources associated with it, including the VPC:
For eksctl:
For terraform:
Upcoming features
FSDP is expected to include a per-parameter sharding feature, aiming to further improve its memory footprint per GPU. Additionally, the ongoing development of FP8 support aims to improve FSDP performance on H100 GPUs. Finally, when FSDP is integrated withtorch.compile, we hope to see additional performance improvements and enablement of features like selective activation checkpointing.
Conclusion
In this post, we discussed how FSDP reduces the memory footprint on each GPU, enabling the training of larger models more efficiently and achieving near linear scaling in throughput. We demonstrated this through a step-by-step implementation of training a Llama2 model using Amazon EKS on P4de and P5 instances and used observability tools like kubectl, htop, nvtop, and dcgm to monitor logs, as well as CPU and GPU utilization.
We encourage you to take advantage of PyTorch FSDP for your own LLM training jobs. Get started at aws-do-fsdp.
About the Authors
 Kanwaljit Khurmi is a Principal AI/ML Solutions Architect at Amazon Web Services. He works with AWS customers to provide guidance and technical assistance, helping them improve the value of their machine learning solutions on AWS. Kanwaljit specializes in helping customers with containerized, distributed computing and deep learning applications.
 Alex Iankoulski is a Principal Solutions Architect, Self-managed Machine Learning at AWS. He’s a full-stack software and infrastructure engineer who likes to do deep, hands-on work. In his role, he focuses on helping customers with containerization and orchestration of ML and AI workloads on container-powered AWS services. He is also the author of the open source do framework and a Docker captain who loves applying container technologies to accelerate the pace of innovation while solving the world’s biggest challenges.
 Ana Simoes is a Principal Machine Learning Specialist, ML Frameworks at AWS. She supports customers deploying AI, ML, and generative AI at a large scale on HPC infrastructure in the cloud. Ana focuses on supporting customers to achieve price-performance for new workloads and use cases for generative AI and machine learning.
 Hamid Shojanazeri is a Partner Engineer at PyTorch working on open source, high-performance model optimization, distributed training (FSDP), and inference. He is the co-creator of llama-recipe and contributor to TorchServe. His main interest is to improve cost-efficiency, making AI more accessible to the broader community.
 Less Wright is an AI/Partner Engineer in PyTorch. He works on Triton/CUDA kernels (Accelerating Dequant with SplitK work decomposition); paged, streaming, and quantized optimizers; and PyTorch Distributed (PyTorch FSDP).
- SEO Powered Content & PR Distribution. Get Amplified Today.
- PlatoData.Network Vertical Generative Ai. Empower Yourself. Access Here.
- PlatoAiStream. Web3 Intelligence. Knowledge Amplified. Access Here.
- PlatoESG. Carbon, CleanTech, Energy, Environment, Solar, Waste Management. Access Here.
- PlatoHealth. Biotech and Clinical Trials Intelligence. Access Here.
- Source: https://aws.amazon.com/blogs/machine-learning/scale-llms-with-pytorch-2-0-fsdp-on-amazon-eks-part-2/