Digital is the new normal, and there’s no going back. Every year, consumers visit, on average, 191 websites or services requiring a user name and password, and the digital footprint is expected to grow exponentially. So much exposure naturally brings added risks like account takeover (ATO).
Each year, bad actors compromise billions of accounts through stolen credentials, phishing, social engineering, and multiple forms of ATO. To put it into perspective: account takeover fraud increased by 90% to an estimated $11.4 billion in 2021 compared with 2020. Beyond the financial impact, ATOs damage the customer experience, threaten brand loyalty and reputation, and strain fraud teams as they manage chargebacks and customer claims.
Many companies, even those with sophisticated fraud teams, use rules-based solutions to detect compromised accounts because they’re simple to create. To bolster their defenses and reduce friction for legitimate users, businesses are increasingly investing in AI and machine learning (ML) to detect account takeovers.
AWS can help you improve your fraud mitigation with solutions like Amazon Fraud Detector. This fully managed AI service allows you to identify potentially fraudulent online activities by enabling you to train custom ML fraud detection models without ML expertise.
This post discusses how to create a real-time detector endpoint using the new Account Takeover Insights (ATI) model in Amazon Fraud Detector.
Overview of solution
Amazon Fraud Detector relies on specific models with tailored algorithms, enrichments, and feature transformations to detect fraudulent events across multiple use cases. The newly launched ATI model is a low-latency fraud detection ML model designed to detect potentially compromised accounts and ATO fraud. The ATI model detects up to four times more ATO fraud than traditional rules-based account takeover solutions while minimizing the level of friction for legitimate users.
The ATI model is trained using a dataset containing your business’s historical login events. Event labels are optional for model training because the ATI model uses an innovative approach to unsupervised learning. The model differentiates events generated by the actual account owner (legit events) from those generated by bad actors (anomalous events).
Amazon Fraud Detector derives the user’s past behavior by continuously aggregating the data provided. Examples of user behavior include the number of times the user signed in from a specific IP address. With these additional enrichments and aggregates, Amazon Fraud Detector can generate strong model performance from a small set of inputs from your login events.
For a real-time prediction, you call the GetEventPrediction API after a user presents valid login credentials to quantify the risk of ATO. In response, you receive a model score between 0–1000, where 0 shows low fraud risk and 1000 shows high fraud risk, and an outcome based on a set of business rules you define. You can then take the appropriate action on your end: approve the login, deny the login, or challenge the user by enforcing an additional identity verification.
You can also use the ATI model to asynchronously evaluate account logins and take action based on the outcome, such as adding the account to an investigation queue so a human reviewer can determine if further action should be taken.
The following steps outline the process of training an ATI model and publishing a detector endpoint to generate fraud predictions:
- Prepare and validate the data.
- Define the entity, event and event variables, and event label (optional).
- Upload event data.
- Initiate model training.
- Evaluate the model.
- Create a detector endpoint and define business rules.
- Get real-time predictions.
Prerequisites
Before getting started, complete the following prerequisite steps:
Prepare and validate the data
Amazon Fraud Detector requires that you provide your user account login data in a CSV file encoded in the UTF-8 format. For the ATI, you must provide certain event metadata and event variables in the header line of your CSV file.
The required event metadata is as follows:
- EVENT_ID – A unique identifier for the login event.
- ENTITY_TYPE – The entity that performs the login event, such as a merchant or a customer.
- ENTITY_ID – An identifier for the entity performing the login event.
- EVENT_TIMESTAMP – The timestamp when the login event occurred. The timestamp format must be in ISO 8601 standard in UTC.
- EVENT_LABEL (optional) – A label that classifies the event as fraudulent or legitimate. You can use any labels, such as fraud, legit, 1, or 0.
Event metadata must be in uppercase letters. Labels aren’t required for login events. However, we recommend including EVENT_LABEL metadata and providing labels for your login events if available. If you provide labels, Amazon Fraud Detector uses them to automatically calculate an Account Takeover Discovery Rate and display it in the model performance metrics.
The ATI model has both required and optional variables. Event variable names must be in lowercase letters.
The following table summarizes the mandatory variables.
| Category | Variable type | Description |
|---|---|---|
| IP address | IP_ADDRESS |
The IP address used in the login event |
| Browser and device | USERAGENT |
The browser, device, and OS used in the login event |
| Valid credentials | VALIDCRED |
Indicates if the credentials that were used for login are valid |
The following table summarizes the optional variables.
| Category | Type | Description |
|---|---|---|
| Browser and device | FINGERPRINT |
The unique identifier for a browser or device fingerprint |
| Session ID | SESSION_ID |
The identifier for an authentication session |
| Label | EVENT_LABEL |
A label that classifies the event as fraudulent or legitimate (such as fraud, legit, 1, or 0) |
| Timestamp | LABEL_TIMESTAMP |
The timestamp when the label was last updated; this is required if EVENT_LABEL is provided |
You can provide additional variables. However, Amazon Fraud Detector won’t include these variables for training an ATI model.
Dataset preparation
As you start to prepare your login data, you must meet the following requirements:
- Provide at least 1,500 entities (individual user accounts), each with at least two associated login events
- Your dataset must cover at least 30 days of login events
The following configurations are optional:
- Your dataset can include examples of unsuccessful login events
- You can optionally label these unsuccessful logins as
fraudulentorlegitimate - You can prepare historical data with login events spanning more than 6 months and include 100,000 entities
We provide a sample dataset for testing purposes that you can use to get started.
Data validation
Before creating your ATI model, Amazon Fraud Detector checks if the metadata and variables you included in your dataset for training the model meet the size and format requirements. For more information, see Dataset validation. If the dataset doesn’t pass validation, a model isn’t created. For details on common dataset errors, see Common event dataset errors.
Define the entity, event type, and event variables
In this section, we walk through the steps to create an entity, event type, and event variables. Optionally, you can also define event labels.
Define the entity
The entity defines who is performing the event. To create an entity, complete the following steps:
- On the Amazon Fraud Detector console, in the navigation pane, choose Entities.
- Choose Create.
- Enter an entity name and optional description.
- Choose Create entity.
Define the event and event variables
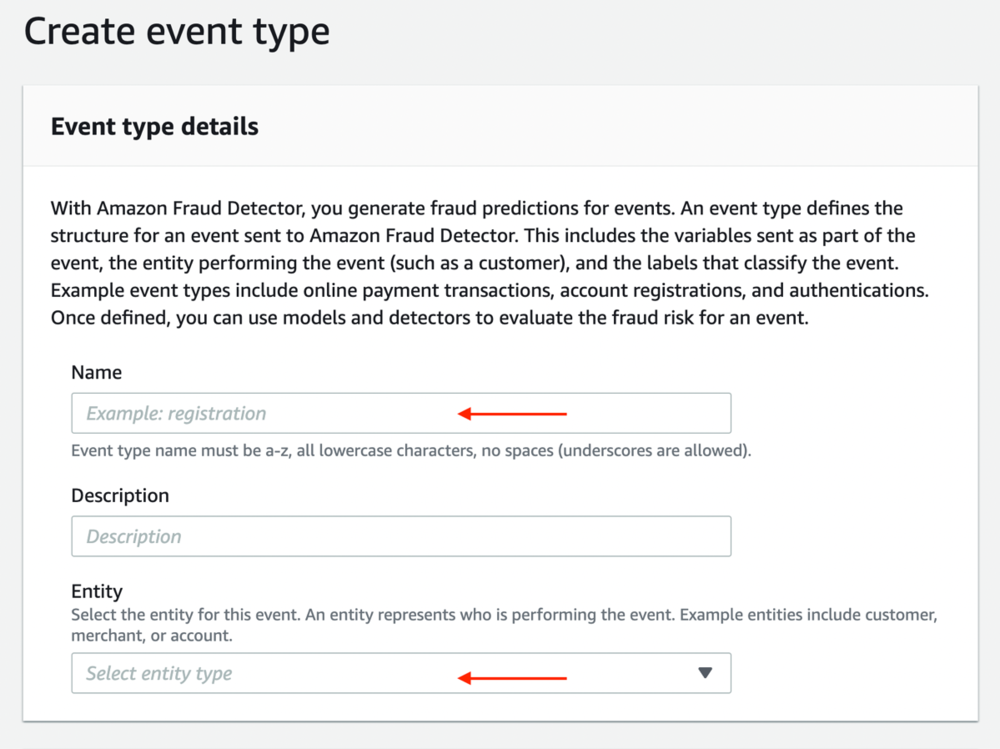
An event is a business activity evaluated for fraud risk; this event is performed by the entity we just created. The event type defines the structure for an event sent to Amazon Fraud Detector, including variables of the event, the entity performing the event, and, if available, the labels that classify the event.
To create an event, complete the following steps:
- On the Amazon Fraud Detector console, in the navigation pane, choose Events.
- Choose Create.
- For Name, enter a name for your event type.
- For Entity, choose the entity created in the previous step.
Define the event variables
For event variables, complete the following steps:
- In the Create IAM role section, enter the specific bucket name where you uploaded your training data.
The name of the S3 bucket must be the name where you uploaded your dataset. Otherwise, you get an access denied exception error. - Choose Create role.

- For Data location, enter the path to your training data, the path is the S3 URI you copied during the prerequisite steps, and choose Upload.
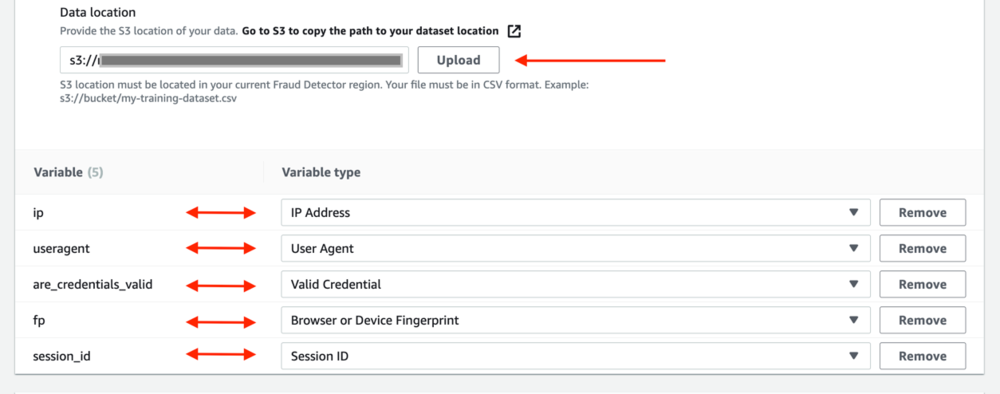
Amazon Fraud Detector extracts the headers from your training dataset and creates a variable for each header. Make sure to assign the variable to the correct variable type. As part of the model training process, Amazon Fraud Detector uses the variable type associated with the variable to perform variable enrichment and feature engineering. For more details about variable types, see Variable types.
Define event labels (optional)
Labels are used to categorize individual events as either fraud or legitimate. Event labels are optional for model training because the ATI model uses an innovative approach to unsupervised learning. The model differentiates events generated by the actual account owner (legit events) from those generated by abusive actors (anomalous events). We recommend you include EVENT_LABEL metadata and provide labels for your login events if available. If you provide labels, Amazon Fraud Detector uses them to automatically calculate an Account Takeover Discovery Rate and display it in the model performance metrics.
To create an event, complete the following steps:
- Define two labels (for this post, 1 and 0).
- Choose Create event type.

Upload event data
In this session, we walk through the steps to upload events data to the service for model training.
ATI models are trained on a dataset stored internally in Amazon Fraud Detector. By storing event data in Amazon Fraud Detector, you can train models that use auto-computed variables to improve performance, simplify model retraining, and update fraud labels to close the machine learning feedback loop. See Stored events for more information on storing your event dataset with Amazon Fraud Detector.
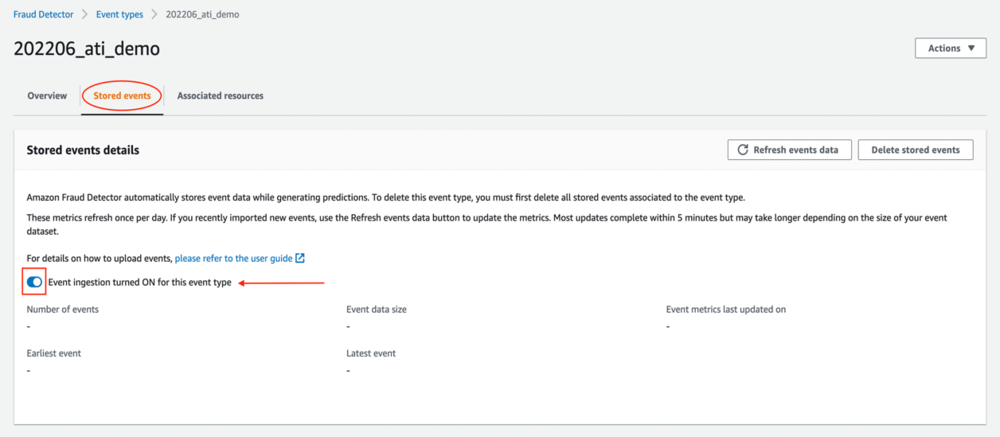
After you define your event, navigate to the Stored events tab. On the Stored events tab, you can see information about your dataset, such as the number of events stored and the total size of the dataset in MB. Because you just created this event type, there are no stored events yet. On this page, you can turn event ingestion on or off. When event ingestion is on, you can upload historical event data to Amazon Fraud Detector and automatically store event data from predictions in real time.
The easiest way to store historical data is by uploading a CSV file and importing the events. Alternatively, you can stream the data into Amazon Fraud Detector using the SendEvent API (see our GitHub repository for sample notebooks). To import the event from a CSV file, complete the following steps:
- Under Import events data, choose New import.
You likely need to create a new IAM role. The import events feature requires both read and write access to Amazon S3.

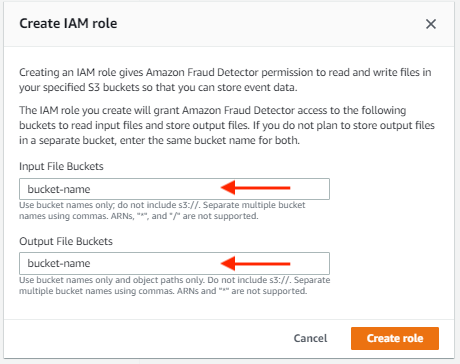
- Create a new IAM role and provide the S3 buckets for input and output files.
The IAM role you create grants Amazon Fraud Detector access to these buckets to read input files and store output files. If you don’t plan to store output files in a separate bucket, enter the same bucket name for both. - Choose Create role.
- Enter the location of the CSV file that contains your event data. This should be the S3 URI you copied earlier.
- Chose Start to start importing the events.
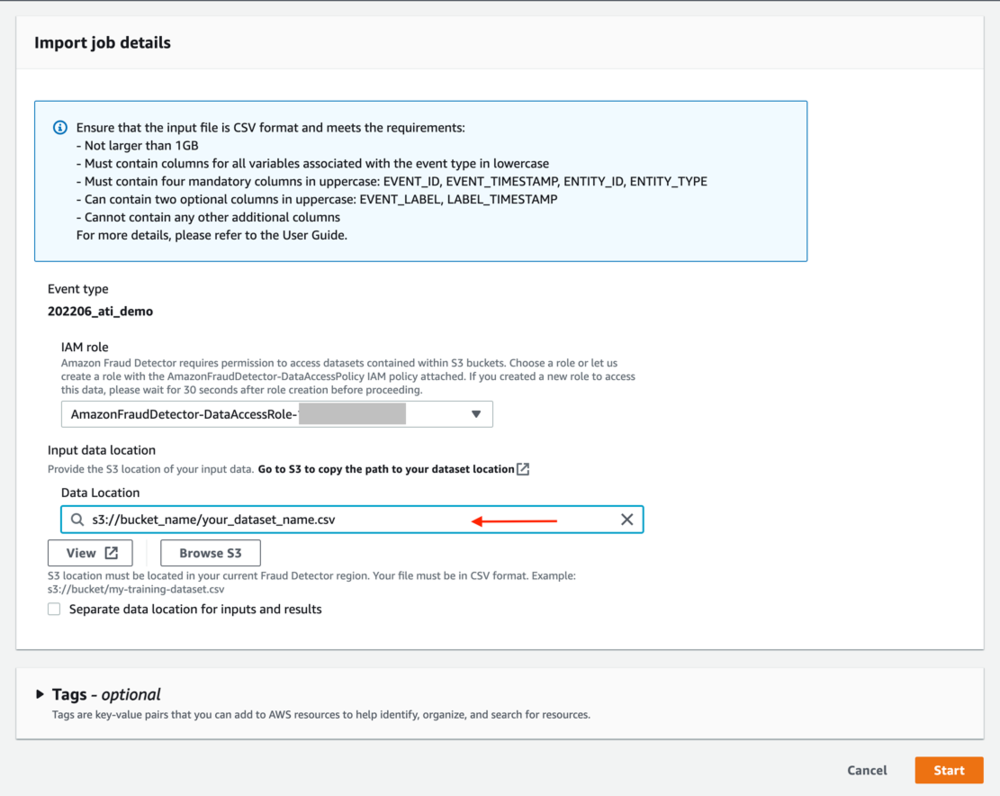
The import time varies based on the number of events you’re importing. For a dataset with 20,000 events, the process takes around 12 minutes, and after you refresh the page, the status changes to Completed. If the status changes to Error, choose the job name to show why the import failed.
Initiate model training
After successfully importing the events, you have all the pieces to initiate model training. To train a model, complete the following steps:
- On the Amazon Fraud Detector console, in the navigation pane, choose Models.
- Choose Add model and select Create model.
- For Model name, enter the desired name for your model
- For Model type, select Takeover Account Insights.
- For Event type, choose the event type you created earlier.
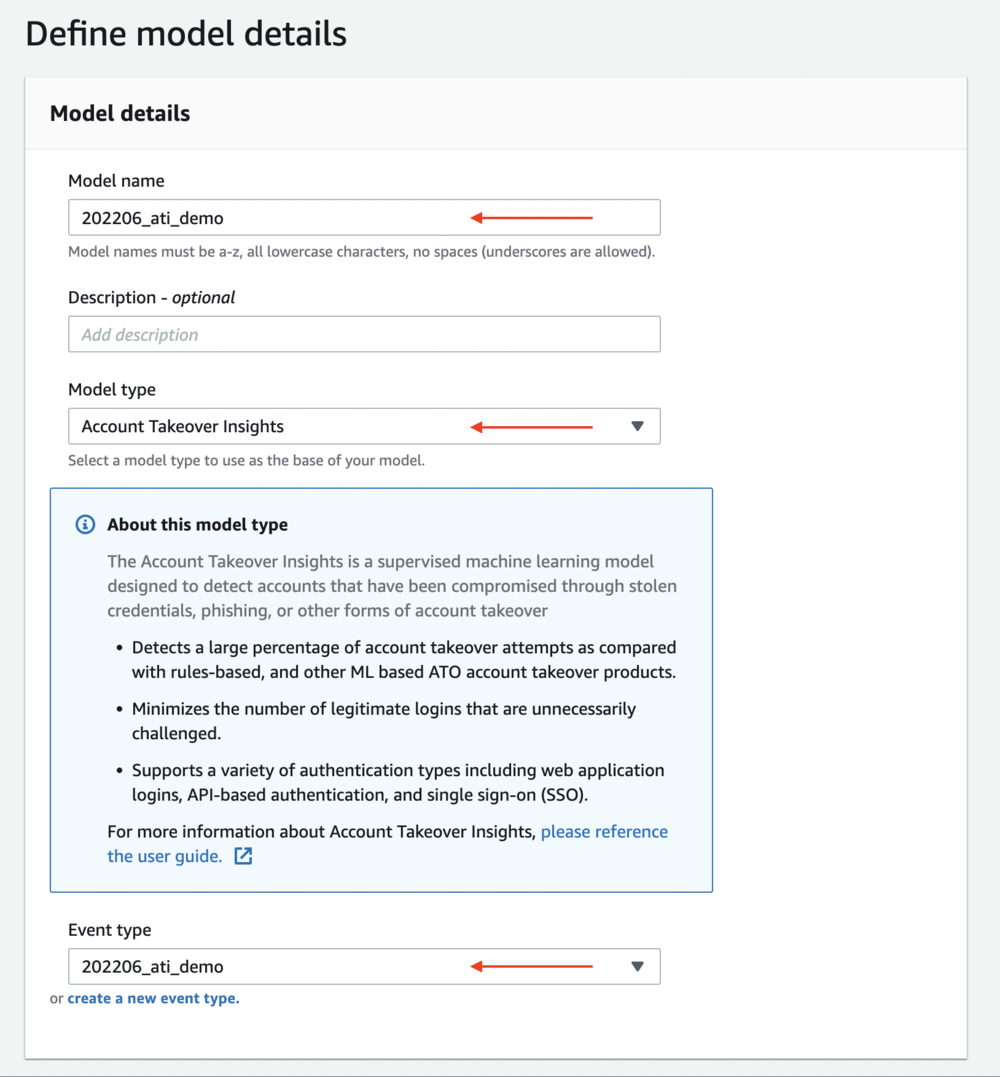
- Under Historical event data, you can specify the date range of events to train the model if needed.
- Choose Next.

- For this post, you configure training by identifying the variables used as inputs to the model.
- After evaluating the variables, choose Next.
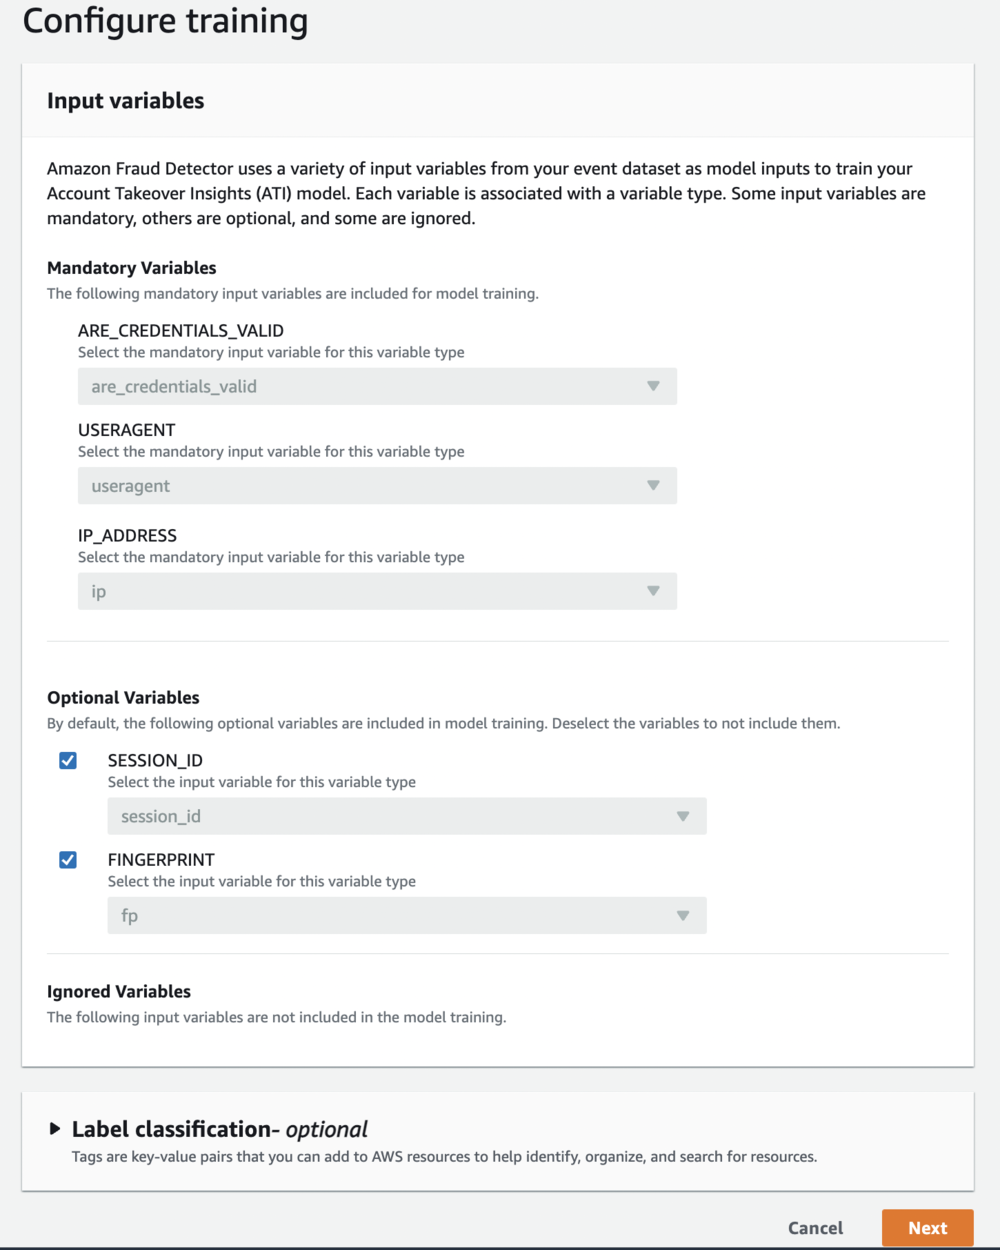
It’s a best practice to include all the available variables, even if you’re unsure about their value to the model. After the model is trained, Amazon Fraud Detector provides a ranked list of each variable’s impact on the model performance, so you can know whether to include that variable in future model training. If labels are provided, Amazon Fraud Detector uses them to evaluate and display model performance in terms of the model’s discovery rate.
If labels aren’t provided, Amazon Fraud Detector uses negative sampling to provide examples or analogous login attempts that help the model distinguish between legitimate and fraudulent activities. This produces precise risk scores that improve the model’s ability to capture incorrectly flagged legitimate activities.
After reviewing the model configured in the first two steps, choose Create and train the model.
You can see the model in training status in the console page. Creating and training the model takes approximately 45 minutes to complete. When the model has stopped training, you can check model performance by choosing the model version.

Evaluate model performance and deploy the model
In this session, we walk through the steps to review and evaluate the model performance.
Amazon Fraud Detector validates model performance using 15% of your data that wasn’t used to train the model and provides performance metrics. You need to consider these metrics and your business objectives to define a threshold that aligns with your business model. For further details on the metrics and how to determine thresholds, see Model performance metrics.
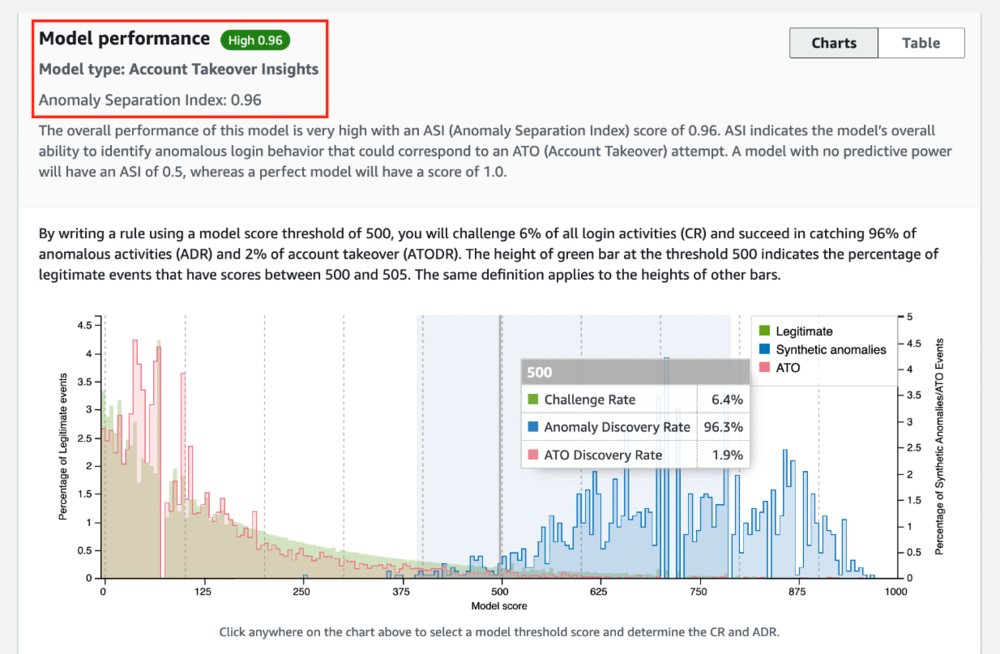
ATI is an anomaly detection model rather than a classification model; therefore, the evaluation metrics differ from classification models. When your ATI model has finished training, you can see the Anomaly Separation Index (ASI), a holistic measure of the model’s ability to identify high-risk anomalous logins. An ASI of 75% or more is considered good, 90% or more is considered high, and below 75% is considered poor.
To assist in choosing the right balance, Amazon Fraud Detector provides the following metrics to evaluate ATI model performance:
- Anomaly Separation Index (ASI) – Summarizes the overall ability of the model to separate anomalous activities from the expected behavior of users. A model with no separability power will have the lowest possible ASI score of 0.5. In contrast, the model with a high separability power will have the highest possible ASI score of 1.0.
- Challenge Rate (CR) – The score threshold indicates the percentage of login events the model would recommend challenging in the form of a one-time password, multi-factor authentication, identify verification, investigation, and so on.
- Anomaly Discovery Rate (ADR) – Quantifies the percentage of anomalies the model can detect at the selected score threshold. A lower score threshold increases the percentage of anomalies captured by the model. Still, it would also require challenging a more significant percentage of login events, leading to higher customer friction.
- ATO Discovery Rate (ATODR) – Quantifies the percentage of account compromise events that the model can detect at the selected score threshold. This metric is only available if 50 or more entities with at least one labeled ATO event are present in the ingested dataset.
In the following example, we have an ASI of 0.96 (high), which indicates a high ability to separate anomalous activities from the normal behavior of users. By writing a rule using a model score threshold of 500, you challenge or create friction on 6% of all login activities catching 96% of anomalous activities.
Another important metric is the model variable importance. Variable importance gives you an understanding of how the different variables relate to the model performance. You can have two types of variables: raw and aggregate variables. Raw variables are the ones that were defined based on the dataset, whereas aggregate variables are a combination of multiple variables that are enriched and have an aggregated importance value.
For more information about variable importance, see Model variable importance.

A variable (raw or aggregate) with a much higher number relative to the rest could indicate that the model might be overfitting. In contrast, variables with relatively lowest numbers could just be noise.
After reviewing the model performance and deciding what model score thresholds align with your business model, you can deploy the model version. For that, on the Actions menu, choose Deploy model version. With the model deployed, we create a detector endpoint and perform real-time prediction.

Create a detector endpoint and define business rules
Amazon Fraud Detector uses detector endpoints to generate fraud prediction. A detector contains detection logic, such as trained models and business rules, for a specific event you want to evaluate for fraud. Detection logic uses rules to tell Amazon Fraud Detector how to interpret the data associated with the model.
To create a detector, complete the following steps:
- On the Amazon Fraud Detector console, in the navigation pane, choose Detectors.
- Choose Create detector.
- For Detector name, enter a name.
- Optionally, describe your detector.
- For Event type, choose the same event type as the model created earlier.
- Choose Next.

- On the Add model (optional) page, choose Add model.
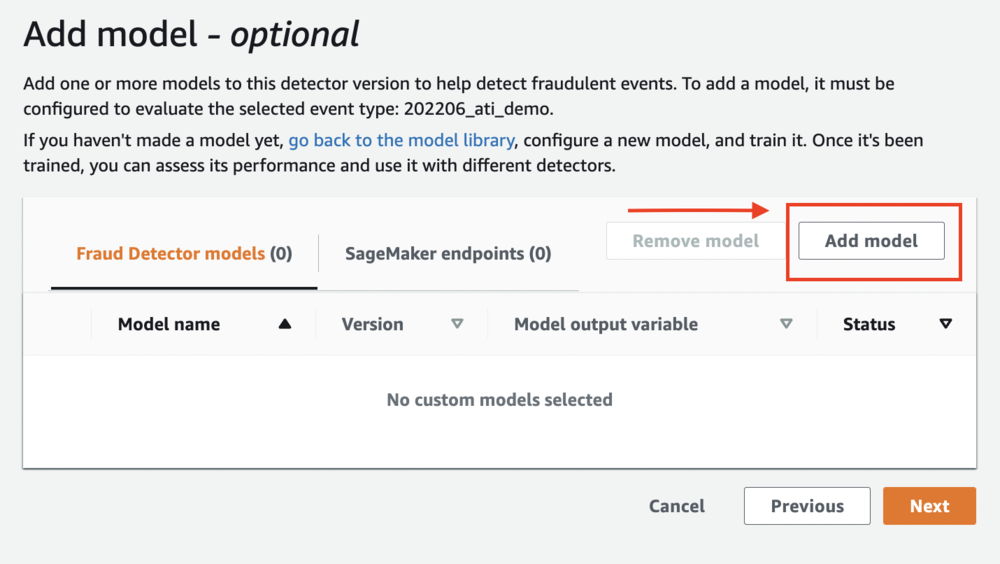
- To add a model, choose the model you trained and published during the model training steps and choose the active version.
- Choose Add model.
As part of the next step, you create the business rules that define an outcome. A rule is a condition that tells Amazon Fraud Detector how to interpret variable values during a fraud prediction. A rule consists of one or more variables, a logic expression, and one or more outcomes. An outcome is the result of a fraud prediction and is returned if the rule matches during an evaluation.
- Define
decline_ruleas$= 950with outcomedeny_login. - Define
friction_ruleas$ your_model_name _insightscore >= 855and$ your_model_name_insightscore >= 950with outcomechallenge_login. - Define
approve_ruleas$account_takeover_model_insightscore < 855with outcomeapprove_login.
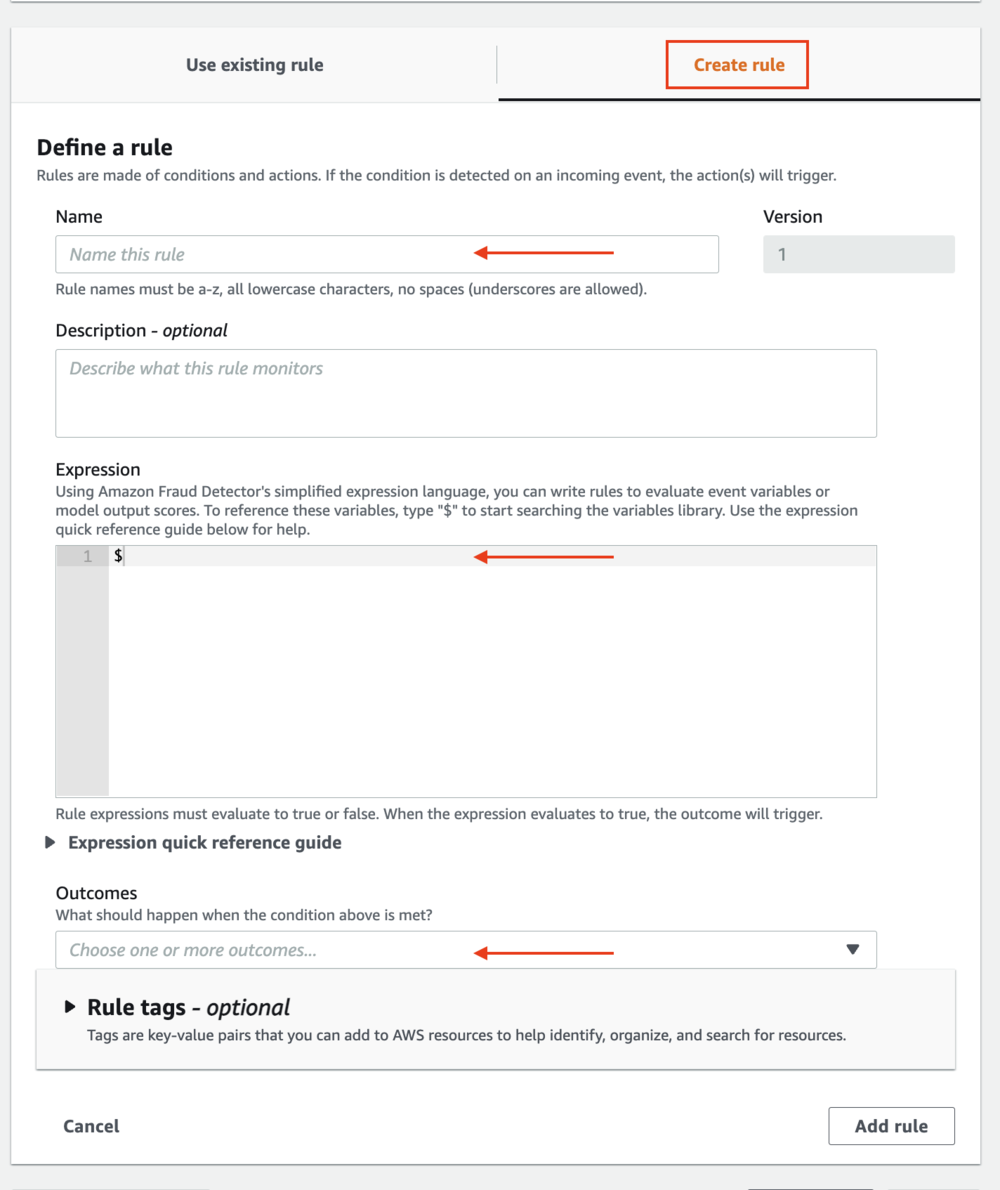
Outcomes are strings returned in the GetEventPrediction API response. You can use outcomes to trigger events by calling applications and downstream systems or to simply identify who is likely to be fraud or legitimate.
- On the Add Rules page, choose Next after you finish adding all your rules.

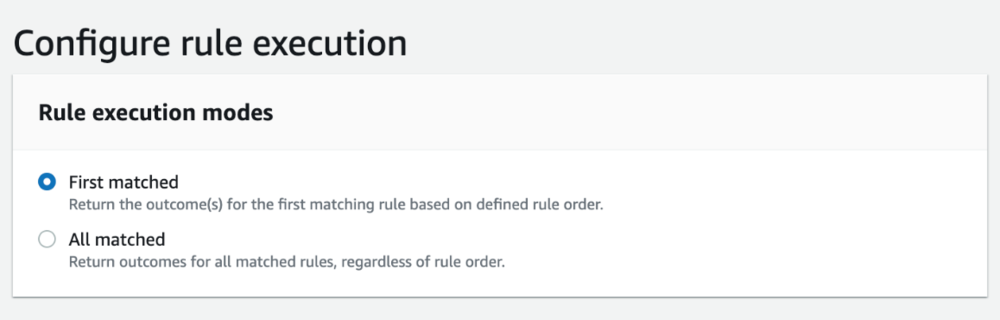
- In the Configure rule execution section, choose the mode for your rules engine.
The Amazon Fraud Detector rules engine has two modes: first matched or all matched. First matched mode is for sequential rule runs, returning the outcome for the first condition met. The other mode is all matched, which evaluates all rules and returns outcomes from all the matching rules. In this example, we use the first matched mode for our detector.
 After this process, you’re ready to create your detector and run some tests.
- To run a test, go to your newly created detector and choose the detector version you want to use.
- Provide the variable values as requested and choose Run test.
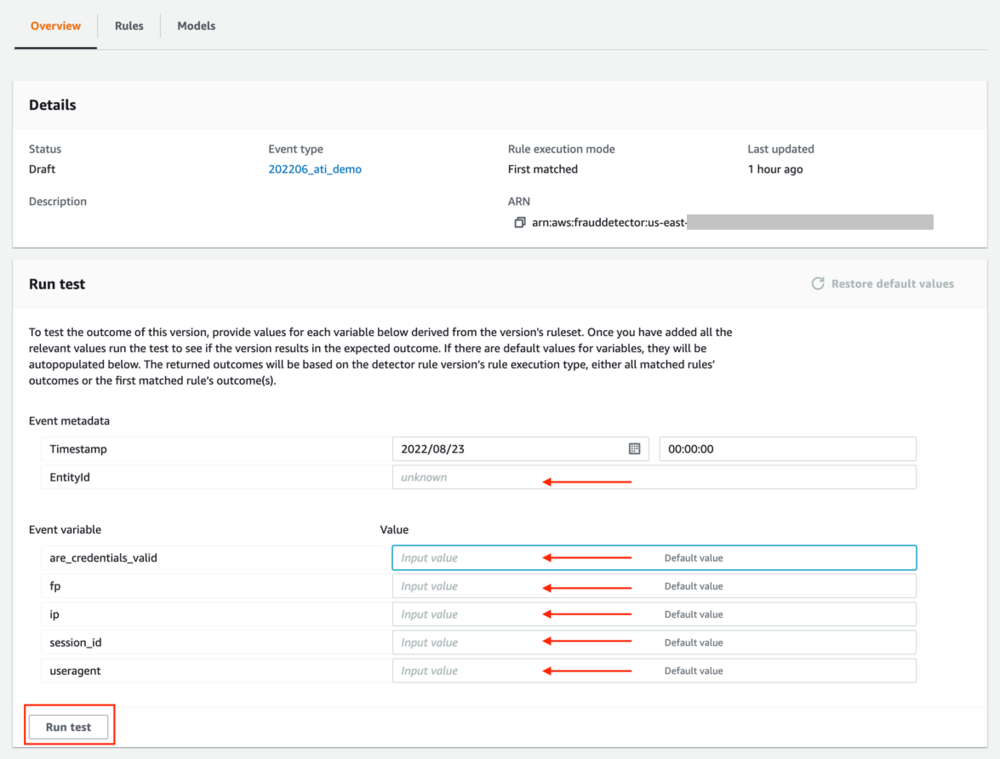
As a result of the test, you receive the risk score and the outcome based on your business rules.
You can also search past predictions by going to the left panel and choosing Search past predictions. The prediction is based on each variable’s contribution to the overall likelihood of a fraudulent event. The following screenshot is an example of a past prediction showing the input variables and how they influenced the fraud prediction score.

Get real-time predictions
To get real-time predictions and integrate Amazon Fraud Detector into your workflow, we need to publish the detector endpoint. Complete the following steps:
- Go to the newly created detector and choose the detector version, which will be version 1.
- On the Actions menu, choose Publish.
You can perform real-time predictions with the published detector by calling the GetEventPrediction API. The following is a sample Python code for calling the GetEventPrediction API:
Conclusion
Amazon Fraud Detector relies on specific models with tailored algorithms, enrichments, and feature transformations to detect fraudulent events across multiple use cases. In this post, you learned how to ingest data, train and deploy a model, write business rules, and publish a detector to generate real-time fraud prediction on potentially compromised accounts.
Visit Amazon Fraud Detector to learn more about Amazon Fraud Detector or our GitHub repo for code samples, notebook, and synthetic datasets.
About the authors
 Marcel Pividal is a Sr. AI Services Solutions Architect in the World-Wide Specialist Organization. Marcel has more than 20 years of experience solving business problems through technology for Fintechs, Payment Providers, Pharma, and government agencies. His current areas of focus are Risk Management, Fraud Prevention, and Identity Verification.
 Mike Ames is a data scientist turned identity verification solution specialist, he has extensive experience developing machine learning and AI solutions to protect organizations from fraud, waste and abuse. In his spare time, you can find him hiking, mountain biking or playing freebee with his dog Max.