Amazon Kendra is a highly accurate and simple-to-use intelligent search service powered by machine learning (ML). Amazon Kendra offers a suite of data source connectors to simplify the process of ingesting and indexing your content, wherever it resides.
Valuable data in organizations is stored in both structured and unstructured repositories. An enterprise search solution should be able to index and search across several structured and unstructured repositories.
Alfresco Content Services provides open, flexible, highly scalable enterprise content management (ECM) capabilities with the added benefits of a content services platform, making content accessible wherever and however you work through easy integrations with the business applications you use every day. Many organizations use the Alfresco content management platform to store their content. One of the key requirements for enterprise customers using Alfresco is the ability to easily and securely find accurate information across all the stored documents.
We are excited to announce that you can now use the new Amazon Kendra Alfresco connector to search documents stored in your Alfresco repositories and sites. In this post, we show how to use the new connector to retrieve documents stored in Alfresco for indexing purposes and securely use the Amazon Kendra intelligent search function. In addition, the ML-powered intelligent search can accurately find information from unstructured documents with natural language narrative content, for which keyword search is not very effective.
What’s new in the Amazon Kendra Alfresco connector
The Amazon Kendra Alfresco connector offers support for the following:
- Basic and OAuth2 authentication mechanisms for the Alfresco On-Premises (On-Prem) platform
- Basic and OAuth2 authentication mechanisms for the Alfresco PaaS platform
- Aspect-based crawling of Alfresco repository documents
Solution overview
With Amazon Kendra, you can configure multiple data sources to provide a central place to search across your document repositories and sites. The solution in this post demonstrates the following:
- Retrieval of documents and comments from Alfresco private sites and public sites
- Retrieval of documents and comments from Alfresco repositories using Amazon Kendra-specific aspects
- Authentication against Alfresco On-Prem and PaaS platforms using Basic and OAuth2 mechanisms, respectively
- The Amazon Kendra search capability with access control across sites and repositories
If you are going to use only one of the platforms, you can still follow this post to build the example solution; just ignore the steps corresponding to the platform that you are not using.
The following is a summary of the steps to build the example solution:
- Upload documents to the three Alfresco sites and the repository folder. Make sure the uploaded documents are unique across sites and repository folders.
- For the two private sites and repository, use document-level Alfresco permission management to set access permissions. For the public site, you don’t need to set up permissions at the document level. Note that permissions information is retrieved by the Amazon Kendra Alfresco connector and used for access control by the Amazon Kendra search function.
- For the two private sites and repository, create a new Amazon Kendra index (you use the same index for both the private sites and the repository). For the public site, create a new Amazon Kendra index.
- For the On-Prem private site, create an Amazon Kendra Alfresco data source using Basic authentication, within the Amazon Kendra index for private sites.
- For the On-Prem repository documents with Amazon Kendra-specific aspects, create a data source using Basic authentication, within the Amazon Kendra index for private sites.
- For the PaaS private site, create a data source using Basic authentication, within the Amazon Kendra index for private sites.
- For the PaaS public site, create a data source using OAuth2 authentication, within the Amazon Kendra index for public sites.
- Perform a sync for each data source.
- Run a test query in the Amazon Kendra index meant for private sites and the repository using access control.
- Run a test query in the Amazon Kendra index meant for public sites without access control.
Prerequisites
You need an AWS account with privileges to create AWS Identity and Access Management (IAM) roles and policies. For more information, see Overview of access management: Permissions and policies. You need to have a basic knowledge of AWS and how to navigate the AWS Management Console.
For the Alfresco On-Prem platform, complete the following steps:
- Create a private site or use an existing site.
- Create a repository folder or use an existing repository folder.
- Get the repository URL.
- Get Basic authentication credentials (user ID and password).
- Make sure authentication are part of the
ALFRESCO_ADMINISTRATORSgroup. - Get the public X509 certificate in .pem format and save it locally.
For the Alfresco PaaS platform, complete the following steps:
- Create a private site or use an existing site.
- Create a public site or use an existing site.
- Get the repository URL.
- Get Basic authentication credentials (user ID and password).
- Get OAuth2 credentials (client ID, client secret, and token URL).
- Confirm that authentication users are part of the
ALFRESCO_ADMINISTRATORSgroup.
Step 1: Upload example documents
Each uploaded document must have 5 MB or less in text. For more information, see Amazon Kendra Service Quotas. You can upload example documents or use existing documents within each site.
As shown in the following screenshot, we have uploaded four documents to the Alfresco On-Prem private site.

We have uploaded three documents to the Alfresco PaaS private site.

We have uploaded five documents to the Alfresco PaaS public site.

We have uploaded two documents to the Alfresco On-Prem repository.

Assign the aspect awskendra:indexControl to one or more documents in the repository folder.

Step 2: Configure Alfresco permissions
Use the Alfresco Permissions Management feature to give access rights to example users for viewing uploaded documents. It is assumed that you have some example Alfresco user names, with email addresses, that can be used for setting permissions at the document level in private sites. These users are not used for crawling the sites.
In the following example for the On-Prem private site, we have provided users My Dev User1 and My Dev User2 with site-consumer access to the example document. Repeat the same procedure for the other uploaded documents.

In the following example for the PaaS private site, we have provided user Kendra User 3 with site-consumer access to the example document. Repeat the same procedure for the other uploaded documents.

For the Alfresco repository documents, we have provided user My Dev user1 with consumer access to the example document.

The following table lists the site or repository names, document names, and permissions.
| Platform | Site or Repository Name | Document Name | User IDs |
| On-Prem | MyAlfrescoSite | ChannelMarketingBudget.xlsx | My Manager User3 |
| On-Prem | MyAlfrescoSite | wellarchitected-sustainability-pillar.pdf | My Dev User1, My Dev User2 |
| On-Prem | MyAlfrescoSite | WorkDocs.docx | My Dev User1, My Dev User2, My Manager User3 |
| On-Prem | MyAlfrescoSite | WorldPopulation.csv | My Dev User1, My Dev User2, My Manager User3 |
| PaaS | MyAlfrescoCloudSite2 | DDoS_White_Paper.pdf | Kendra User3 |
| PaaS | MyAlfrescoCloudSite2 | wellarchitected-framework.pdf | Kendra User3 |
| PaaS | MyAlfrescoCloudSite2 | ML_Training.pptx | Kendra User1 |
| PaaS | MyAlfrescoCloudPublicSite | batch_user.pdf | Everyone |
| PaaS | MyAlfrescoCloudPublicSite | Amazon Simple Storage Service – User Guide.pdf | Everyone |
| PaaS | MyAlfrescoCloudPublicSite | AWS Batch – User Guide.pdf | Everyone |
| PaaS | MyAlfrescoCloudPublicSite | Amazon Detective.docx | Everyone |
| PaaS | MyAlfrescoCloudPublicSite | Pricing.xlsx | Everyone |
| On-Prem | Repo: MyAlfrescoRepoFolder1 | Polly-dg.pdf (aspect awskendra:indexControl) | My Dev User1 |
| On-Prem | Repo: MyAlfrescoRepoFolder1 | Transcribe-api.pdf (aspect awskendra:indexControl) | My Dev User1 |
Step 3: Set up Amazon Kendra indexes
You can create a new Amazon Kendra index or use an existing index for indexing documents hosted in Alfresco private sites. To create a new index, complete the following steps:
- On the Amazon Kendra console, create an index called
Alfresco-Private. - Create a new IAM role, then choose Next.
- For Access Control, choose Yes.
- For Token Type¸ choose JSON.
- Keep the user name and group as default.
- Choose None for user group expansion because we are assuming no integration with AWS IAM Identity Center (successor to AWS Single Sign-On).
- Choose Next.
- Choose Developer Edition for this example solution.
- Choose Create to create a new index.
The following screenshot shows the Alfresco-Private index after it has been created.

- You can verify the access control configuration on the User access control tab.

- Repeat these steps to create a second index called
Alfresco-Public.

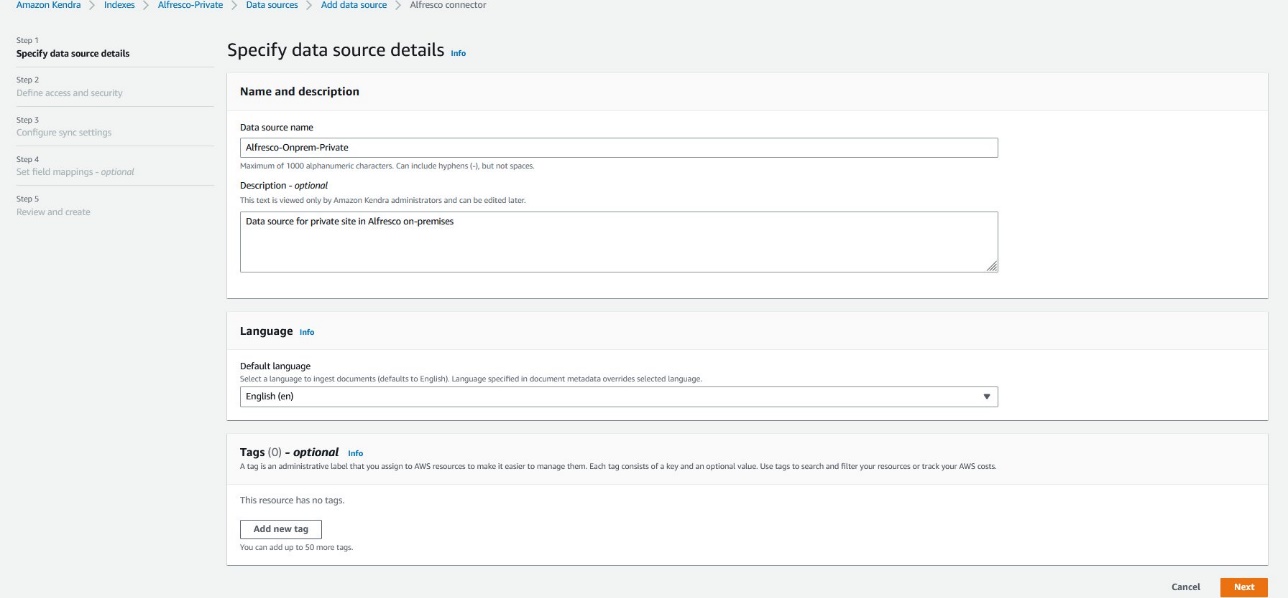
Step 4: Create a data source for the On-Prem private site
To create a data source for the On-Prem private site, complete the following steps:
- On the Amazon Kendra console, navigate to the
Alfresco-Privateindex. - Choose Data sources in the navigation pane.
- Choose Add data source.

- Choose Add connector for the Alfresco connector.

- For Data source name, enter
Alfresco-OnPrem-Private. - Optionally, add a description.
- Keep the remaining settings as default and choose Next.
To connect to the Alfresco On-Prem site, the connector needs access to the public certificate corresponding to the On-Prem server. This was one of the prerequisites.
- Use a different browser tab to upload the .pem file to an Amazon Simple Storage Service (Amazon S3) bucket in your account.
You use this S3 bucket name in the next steps.
- Return to the data source creation page.
- For Source, select Alfresco server.
- For Alfresco repository URL, enter the repository URL (created as a prerequisite).
- For Alfresco user application URL, enter the same value as the repository URL.
- For SSL certificate location, choose Browse S3 and choose the S3 bucket where you uploaded the .pem file.
- For Authentication, select Basic authentication.
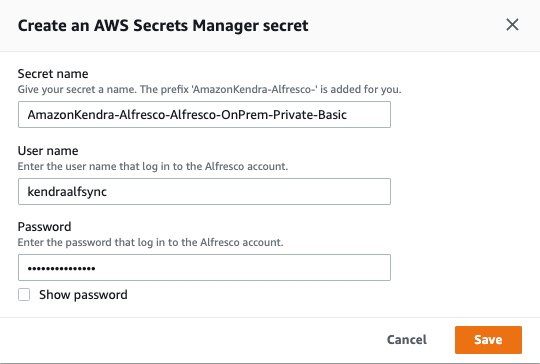
- For AWS Secrets Manager secret, choose Create and add new secret.

A pop-up window opens to create an AWS Secrets Manager secret.
- Enter a name for your secret, user name, and password, then choose Save.
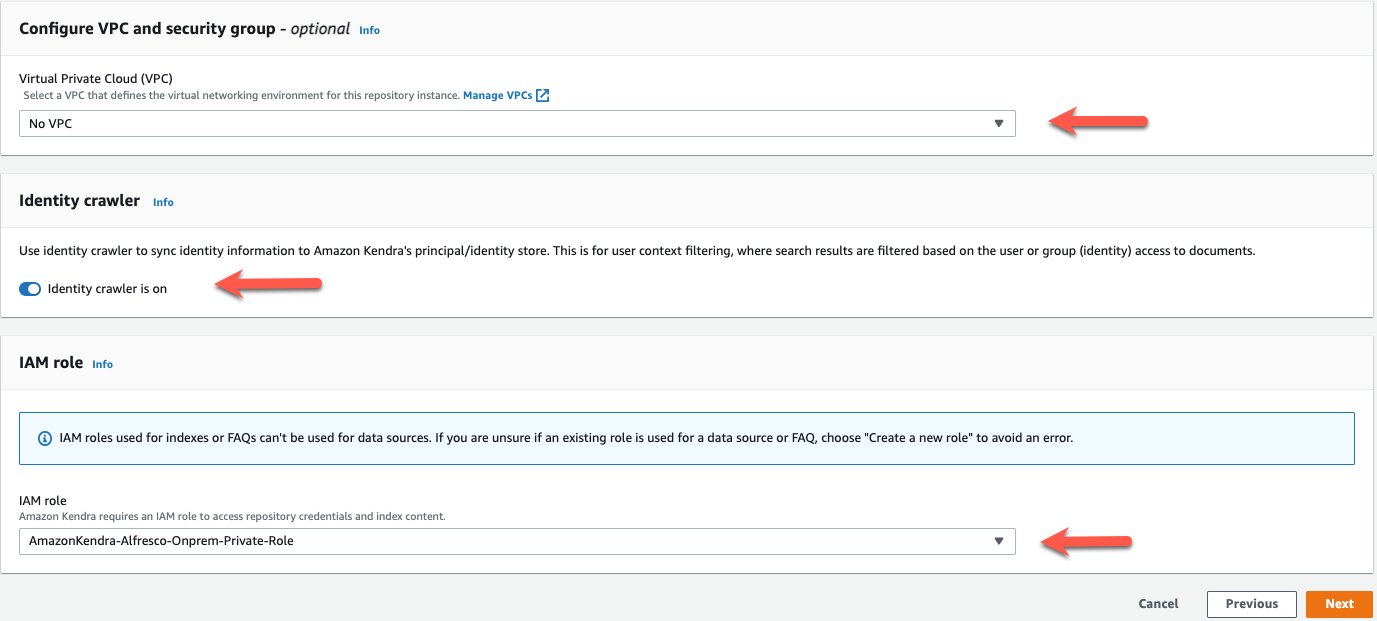
- For Virtual Private Cloud (VPC), choose No VPC.
- Turn the identity crawler on.
- For IAM role, choose Create a new IAM role.
- Choose Next.
You can configure the data source to synchronize contents from one or more Alfresco sites. For this post, we sync to the on-prem private site.
- For Content to sync, select Single Alfresco site sync and choose
MyAlfrescoSite. - Select Include comments to retrieve comments in addition to documents.
- For Sync mode, select Full sync.
- For Frequency, choose Run on demand (or a different frequency option as needed).
- Choose Next.

- Map the Alfresco document fields to the Amazon Kendra index fields (you can keep the defaults), then choose Next.

- On the Review and Create page, verify all the information, then choose Add data source.
After the data source has been created, the data source page is displayed as shown in the following screenshot.

Step 5: Create a data source for the On-Prem repository documents with Amazon Kendra-specific aspects
Similarly to the previous steps, create a data source for the On-Prem repository documents with Amazon Kendra-specific aspects:
- On the Amazon Kendra console, navigate to the
Alfresco-Privateindex. - Choose Data sources in the navigation pane.
- Choose Add data source.
- Choose Add connector for the Alfresco connector.
- For Data source name, enter
Alfresco-OnPrem-Aspects. - Optionally, add a description.
- Keep the remaining settings as default and choose Next.
- For Source, select Alfresco server.
- For Alfresco repository URL, enter the repository URL (created as a prerequisite).
- For Alfresco user application URL, enter the same value as the repository URL.
- For SSL certificate location, choose Browse S3 and choose the S3 bucket where you uploaded the .pem file.
- For Authentication, select Basic authentication.
- For AWS Secrets Manager secret, choose the secret you created earlier.
- For Virtual Private Cloud (VPC), choose No VPC.
- Turn the identity crawler off.
- For IAM role, choose Create a new IAM role.
- Choose Next.
For this scope, the connector retrieves only those On-Prem server repository documents that have been assigned an aspect called awskendra:indexControl.
- For Content to sync, select Alfresco aspects sync.
- For Sync mode, select Full sync.
- For Frequency, choose Run on demand (or a different frequency option as needed).
- Choose Next.
- Map the Alfresco document fields to the Amazon Kendra index fields (you can keep the defaults), then choose Next.
- On the Review and Create page, verify all the information, then choose Add data source.
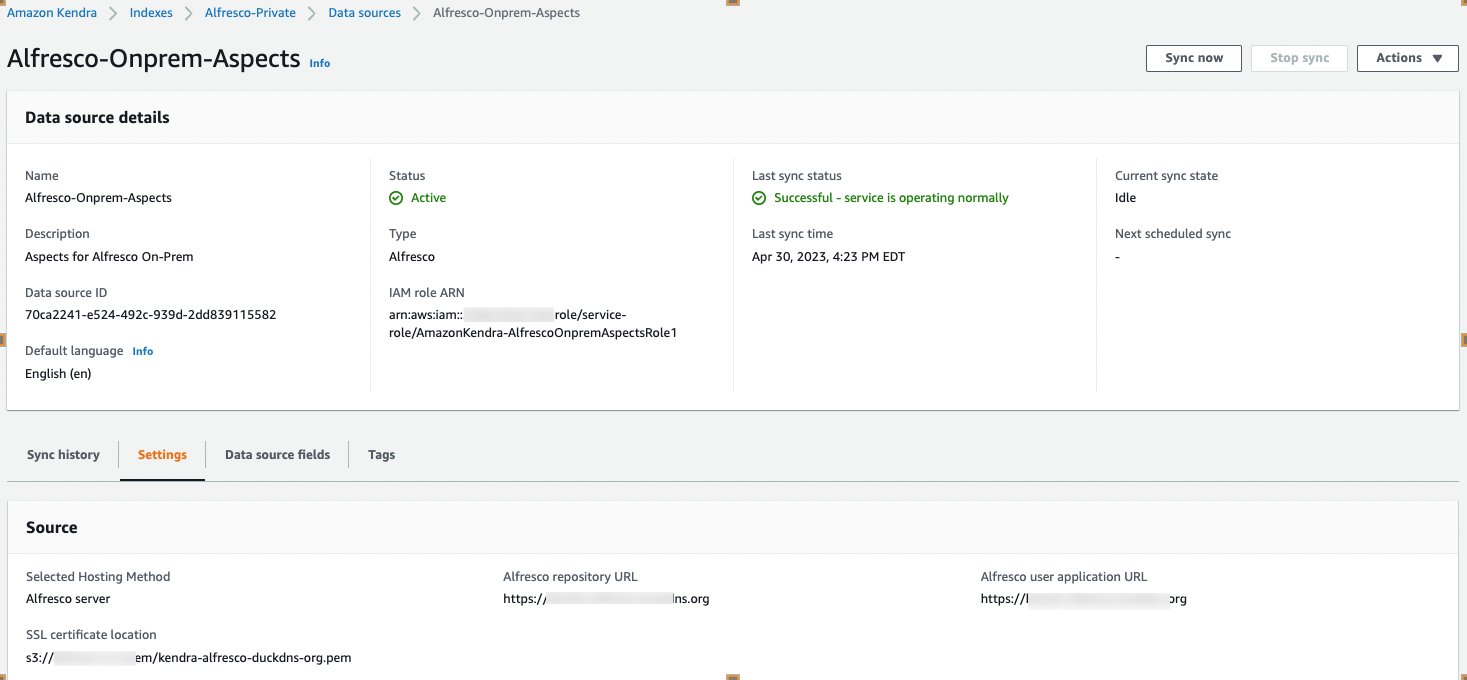
After the data source has been created, the data source page is displayed as shown in the following screenshot.
Step 6: Create a data source for the PaaS private site
Follow similar steps as the previous sections to create a data source for the PaaS private site:
- On the Amazon Kendra console, navigate to the
Alfresco-Privateindex. - Choose Data sources in the navigation pane.
- Choose Add data source.
- Choose Add connector for the Alfresco connector.
- For Data source name, enter
Alfresco-Cloud-Private. - Optionally, add a description.
- Keep the remaining settings as default and choose Next.
- For Source, select Alfresco cloud.
- For Alfresco repository URL, enter the repository URL (created as a prerequisite).
- For Alfresco user application URL, enter the same value as the repository URL.
- For Authentication, select Basic authentication.
- For AWS Secrets Manager secret, choose Create and add new secret.
- Enter a name for your secret, user name, and password, then choose Save.
- For Virtual Private Cloud (VPC), choose No VPC.
- Turn the identity crawler off.
- For IAM role, choose Create a new IAM role.
- Choose Next.
We can configure the data source to synchronize contents from one or more Alfresco sites. For this post, we configure the data source to sync from the PaaS private site MyAlfrescoCloudSite2.
- For Content to sync, select Single Alfresco site sync and choose
MyAlfrescoCloudSite2. - Select Include comments.
- For Sync mode, select Full sync.
- For Frequency, choose Run on demand (or a different frequency option as needed).
- Choose Next.
- Map the Alfresco document fields to the Amazon Kendra index fields (you can keep the defaults) and choose Next.
- On the Review and Create page, verify all the information, then choose Add data source.
After the data source has been created, the data source page is displayed as shown in the following screenshot.

Step 7: Create a data source for the PaaS public site
We follow similar steps as before to create a data source for the PaaS public site:
- On the Amazon Kendra console, navigate to the Alfresco-Public index.
- Choose Data sources in the navigation pane.
- Choose Add data source.
- Choose Add connector for the Alfresco connector.
- For Data source name, enter
Alfresco-Cloud-Public. - Optionally, add a description.
- Keep the remaining settings as default and choose Next.
- For Source, select Alfresco cloud.
- For Alfresco repository URL, enter the repository URL (created as a prerequisite).
- For Alfresco user application URL, enter the same value as the repository URL.
- For Authentication, select OAuth2.0 authentication.
- For AWS Secrets Manager secret, choose Create and add new secret.
- Enter a name for your secret, client ID, client secret, and token URL, then choose Save.
- For Virtual Private Cloud (VPC), choose No VPC.
- Turn the identity crawler off.
- For IAM role, choose Create a new IAM role.
- Choose Next.
We configure this data source to sync to the PaaS public site MyAlfrescoCloudPublicSite.
- For Content to sync, select Single Alfresco site sync and choose
MyAlfrescoCloudPublicSite. - Optionally, select Include comments.
- For Sync mode, select Full sync.
- For Frequency, choose Run on demand (or a different frequency option as needed).
- Choose Next.
- Map the Alfresco document fields to the Amazon Kendra index fields (you can keep the defaults) and choose Next.
- On the Review and Create page, verify all the information, then choose Add data source.
After the data source has been created, the data source page is displayed as shown in the following screenshot.

Step 8: Perform a sync for each data source
Navigate to each of the data sources and choose Sync now. Complete only one synchronization at a time.

Wait for synchronization to be complete for all data sources. When each synchronization is complete for a data source, you see the status as shown in the following screenshot.

You can also view Amazon CloudWatch logs for a specific sync under Sync run history.
Step 9: Run a test query in the private index using access control
Now it’s time to test the solution. We first run a query in the private index using access control:
- On the Amazon Kendra console, navigate to the
Alfresco-Privateindex and choose Search indexed content.

- Enter a query in the search field.
As shown in the following screenshot, Amazon Kendra didn’t return any results.

- Choose Apply token.
- Enter the email address corresponding to the My Dev User1 user and choose Apply.
Note that Amazon Kendra access control works based on the email address associated with an Alfresco user name.

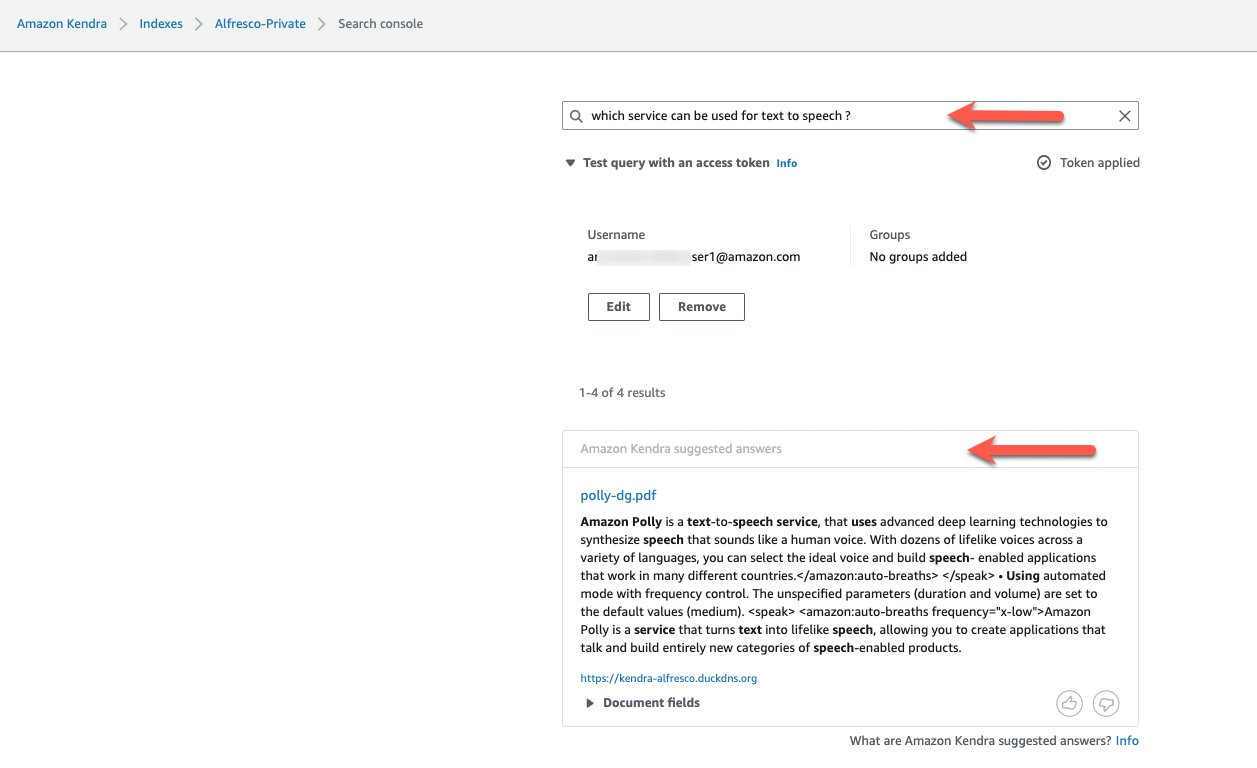
- Run the search again.
The search results in a document list (containing wellarchitected-sustainability-pillar.pdf in the following example) based on the access control setup.

If you run the same query again and provide an email address that doesn’t have access to either of these documents, you should not see these documents in the results list.
- Enter another query to search in the documents based on the aspect
awskendra:indexControl. - Choose Apply token, enter the email address corresponding to My Dev User1 user, and choose Apply.
- Rerun the query.
Step 10: Run a test query in the public index without access control.
Similarly, we can test our solution by running queries in the public index without access control:
- On the Amazon Kendra console, navigate to the Alfresco-Public index and choose Search indexed content.
- Run a search query.
Because this example Alfresco public site has not been set up with any access control, we don’t use an access token.

Clean up
To avoid incurring future costs, clean up the resources you created as part of this solution. Delete newly added Alfresco data sources within the indexes. If you created new Amazon Kendra indexes while testing this solution, delete them as well.
Conclusion
With the new Alfresco connector for Amazon Kendra, organizations can tap into the repository of information stored in their account securely using intelligent search powered by Amazon Kendra.
To learn about these possibilities and more, refer to the Amazon Kendra Developer Guide. For more information on how you can create, modify, or delete metadata and content when ingesting your data from Alfresco, refer to Enriching your documents during ingestion and Enrich your content and metadata to enhance your search experience with custom document enrichment in Amazon Kendra.
About the Authors
 Arun Anand is a Senior Solutions Architect at Amazon Web Services based in Houston area. He has 25+ years of experience in designing and developing enterprise applications. He works with partners in Energy & Utilities segment providing architectural and best practice recommendations for new and existing solutions.
 Rajnish Shaw is a Senior Solutions Architect at Amazon Web Services, with a background as a Product Developer and Architect. Rajnish is passionate about helping customers build applications on the cloud. Outside of work Rajnish enjoys spending time with family and friends, and traveling.
 Yuanhua Wang is a software engineer at AWS with more than 15 years of experience in the technology industry. His interests are software architecture and build tools on cloud computing.
- SEO Powered Content & PR Distribution. Get Amplified Today.
- PlatoData.Network Vertical Generative Ai. Empower Yourself. Access Here.
- PlatoAiStream. Web3 Intelligence. Knowledge Amplified. Access Here.
- PlatoESG. Automotive / EVs, Carbon, CleanTech, Energy, Environment, Solar, Waste Management. Access Here.
- BlockOffsets. Modernizing Environmental Offset Ownership. Access Here.
- Source: https://aws.amazon.com/blogs/machine-learning/index-your-alfresco-content-using-the-new-amazon-kendra-alfresco-connector/