Introduction
In today’s digital age, WhatsApp has emerged as more than just a messaging app; it’s a pivotal communication tool for businesses worldwide. With over two billion active users, WhatsApp’s massive reach and popularity make it an indispensable platform for businesses aiming to connect with their audience effectively.
Understanding this, our objective in this blog is to provide a comprehensive guide on leveraging WhatsApp for sending messages via it’s API. This practice, an essential part of modern business communication strategies, involves reaching numerous customers with important updates, promotional content, or other relevant information. We will learn how to send messages using Whatsapp API in python. We’ll then delve into the intricacies of WhatsApp’s features, particularly focusing on its Business API, which offers advanced capabilities for handling messaging efficiently.
Moreover, we’ll explore the integration of these messaging capabilities with workflow automation. In a business landscape where efficiency and speed are paramount, automating repetitive tasks like message sending can significantly enhance productivity. Tools like Nanonets Workflows play a crucial role in this. They enable businesses to streamline their operations, reducing manual effort and focusing more on strategic tasks.
Whatsapp Business Platform
The WhatsApp Business Platform is designed for medium to large businesses, providing a way to engage with customers on a large scale. It enables quick initiation of conversations, sending notifications about care or purchases, offering personalized services, and supporting customers in their preferred communication channel.
This platform is built around three key APIs:
- Cloud API: This is hosted by Meta and offers a straightforward, maintenance-friendly way for businesses to connect with customers.
- On-Premises API: Businesses need to host this themselves.
- Business Management API: This API is essential for managing your WhatsApp Business Account and message templates.
To communicate with WhatsApp users, businesses have to use either the Cloud API or the On-Premises API. The Cloud API is generally preferred due to its simplicity and lower maintenance requirements. However, no matter which API you choose, the Business Management API is a must for managing your account and templates.
Introduction to Whatsapp Cloud API
WhatsApp’s Cloud API, part of Meta’s Blueprint, allows businesses to communicate with customers on a large scale without the need for hosting their own servers. This service is a cloud-hosted version of the WhatsApp Business Platform, offering easy scaling and implementation.
Overview
The WhatsApp Business API is designed for medium and large businesses to engage in automated and manual communications with customers. It supports integration with various backend systems like CRM and marketing platforms. Businesses can choose between On-Premises and Cloud API options, with the latter generally recommended due to its simplicity.
Default throughput is 80 messages per second (mps), upgradable to 1,000 mps.
Using the API
To send a message, a API call in python looks like this:
import requests url = 'https://graph.facebook.com/v18.0/FROM_PHONE_NUMBER_ID/messages' headers = { 'Authorization': 'ACCESS_TOKEN'
} data = { 'messaging_product': 'whatsapp', 'to': '1650XXXXXXX', 'text': {'body': 'hi'}
} response = requests.post(url, headers=headers, json=data) print(response.text)
Getting Started
To start with Cloud API:

- Click on “Create App”.

- Choose “Other” in the use case section.

- Choose “Business” as App Type.
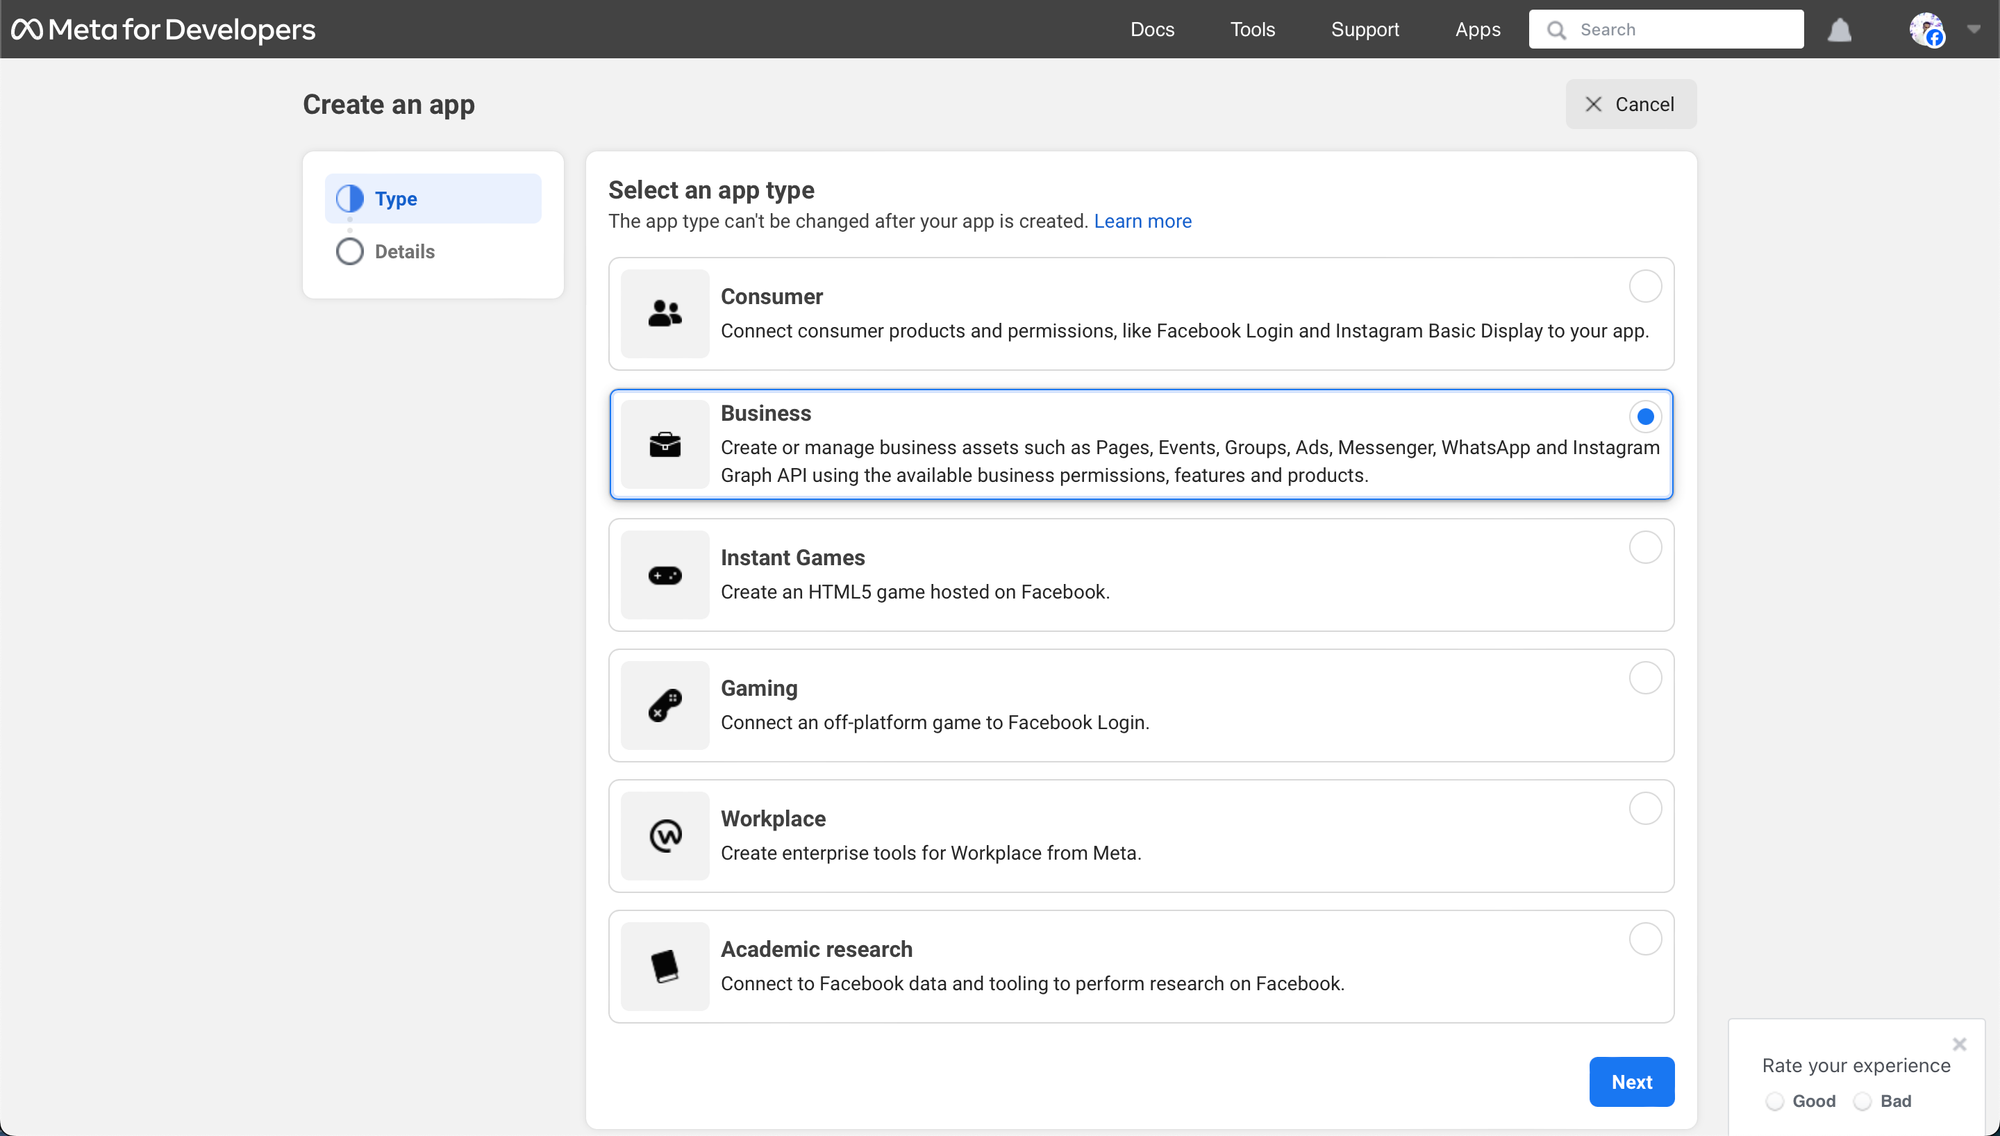
- Add app details and click on “Create App”.

- Scroll down and Click “Set up” on the Whatsapp card.

- Should you have a Meta Business Account (MBA), you’ll be asked to link it during this process. If not, you’ll be guided to create one.

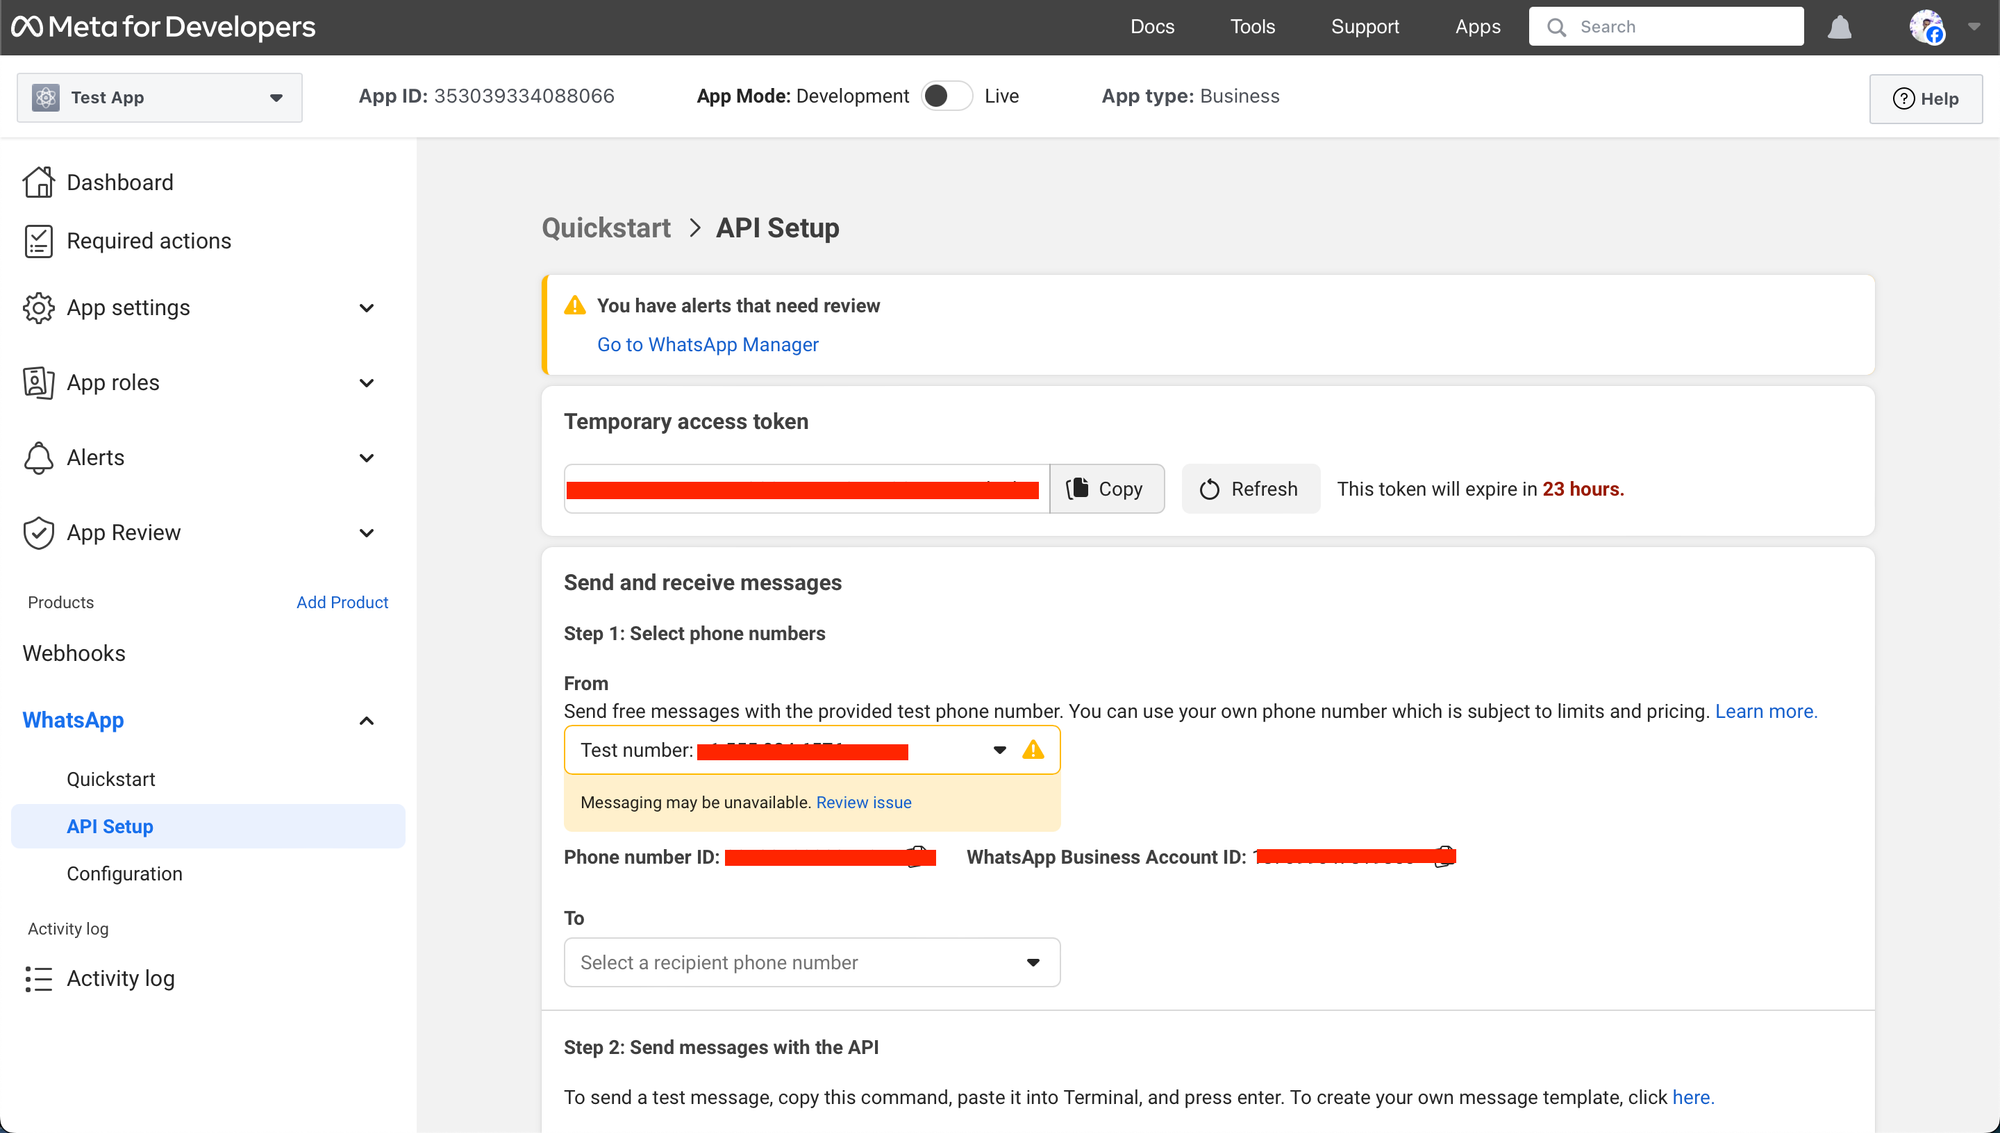
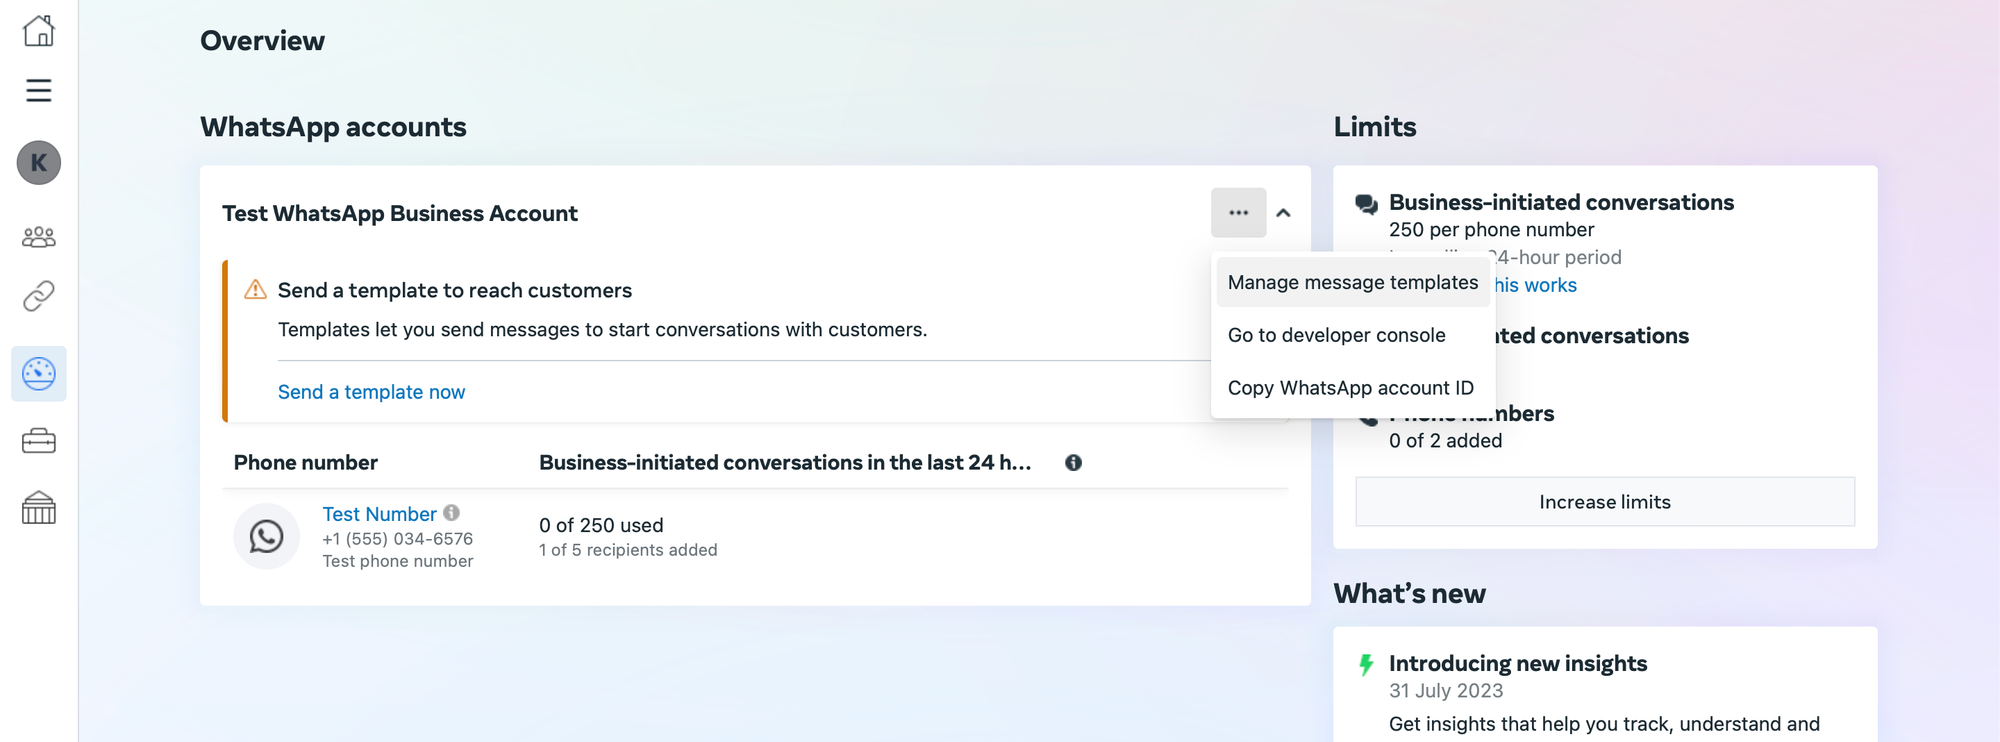
- Once your MBA is linked, you will be guided to a dashboard like below. You can begin testing now.
All this has eventually allowed your app to –
- Set up a Meta Business Account, if you don’t already have one.
- Automatically generate a test WhatsApp Business Account, which is free for sending messages but comes with usage limitations.
- Create a test business phone number linked to your WhatsApp Business Account, enabling you to send free messages to up to five different phone numbers.
- Generate a series of pre-approved messaging templates.
- Add a Recipient Number
To send test messages, you need to add a valid WhatsApp number.
Go to the App Dashboard, navigate to WhatsApp > API Setup, and under the message sending section, look for the ‘To’ field to manage your phone number list.
You can enter any valid WhatsApp number to receive messages. This number will get a confirmation code via WhatsApp for verification.
Once verified, the recipient number will be ready for use. You can add up to five numbers following this method.
- Send a Test Message
To send a test message, use the pre-approved ‘hello_world’ template present on the dashboard.

import requests url = "https://graph.facebook.com/v17.0/206324309221106/messages" headers = { 'Authorization': 'Bearer YOUR_TEMPORARY_ACCESS_TOKEN', 'Content-Type': 'application/json'
} data = { "messaging_product": "whatsapp", "to": "RECEPIENT_PHONE_NUMBER", "type": "template", "template": { "name": "hello_world", "language": { "code": "en_US" } }
} response = requests.post(url, headers=headers, json=data) print(response.text)
In the API Setup under WhatsApp:
- Make sure your test business number is in the ‘From’ field.
- Ensure the desired recipient’s number is chosen in the ‘To’ field. You can send messages to multiple numbers if added.
- Use the API panel to send your message, or alternatively use the provided python code.
The command you’ll use indicates that you’re sending a template message, specifying the ‘hello_world’ template. A message like the one below should appear on the recipient phone number.

- Add a Real Business Number (For Later)
While developing your application, you can use the test business number and account without any cost for sending messages.
When you’re ready to engage with customers, you can add a real business phone number (from which messages will be sent) in the API Setup and create an official WhatsApp Business Account. We will discuss this later.
Essentials of Whatsapp Business Management API
The Business Management API works along with the primary Cloud API (which is used for sending messages etc). It is designed for authentication functionalities and managing WhatsApp business-related assets like WhatsApp Business Accounts and message templates.
Access Tokens
Different types of access tokens are supported:
- System User Access Tokens: These are non-expiring tokens representing your business or organization and are essential for Solution Partners sharing credit lines with onboarded customers.
- Business Integration System User Access Tokens: Ideal for Tech Providers and Solution Partners, these tokens are specific to onboarded customer data and support automated actions without user input or re-authentication.
- User Access Tokens: Generally used for initial app testing, they expire quickly and are less suitable for ongoing development. This token was used in the test message sent above.
System User Access Tokens
System User tokens are categorized into two types:
- Employee System Users: Need access to individual WhatsApp Business Accounts and are suitable for limited account access.
- Admin System Users: Have default full access to all WhatsApp Business Accounts and assets, useful for broader access requirements.
Creating System Users
To create a system user:
- Sign into the Meta Business Suite.
- Locate your business account in the top-left dropdown menu and click its Settings (gear) icon.
- Click Business settings.
- Navigate to Users > System users.
- Click the Add button and create either an admin or employee system user.

Generating System User Access Tokens
To generate a System User access token after creating a system user:
- Sign into the Meta Business Suite.
- Locate your business account in the top-left dropdown menu and click its Settings (gear) icon.
- Click Business settings.
- Navigate to User > System users.
- Select the appropriate system user from the list of system users.
- Click the Generate new token button.
- Select the app that will use the token.
- Select any permissions the app needs to function properly and generate the token.
Business Integration System User Access Tokens
These tokens are generated through Embedded Signup and are scoped to individual onboarded customers. They are crucial for apps performing automated actions on customer WhatsApp Business Accounts. Learn more here.
Rate Limits
The API imposes limits on the number of calls per hour. These limits vary based on the type of call and the status of the WhatsApp Business Account.
Automate Whatsapp messaging campaigns with our AI-driven workflows, designed by Nanonets for you and your teams.
Sending Messages using the Whatsapp Cloud API
You can either send free-form messages or use message templates. Let us explore both.
With the WhatsApp Cloud API, you can send various types of free-form messages, including:
- Text
- Reaction
- Media (images, videos, etc.)
- Location
- Contacts
- Interactive messages
- Address messages
Request Syntax for Sending Messages
To send messages, use the POST request to the WhatsApp Business Phone Number endpoint:
POST /<WHATSAPP_BUSINESS_PHONE_NUMBER>/messages
Message Payload Structure
The message payload has a standard format, with variations depending on the message type:
{ "messaging_product": "whatsapp", "recipient_type": "individual", "to": "<TO>", "type": "<TYPE>", // Specific payload depending on message type
}
<TO>: WhatsApp ID or phone number of the recipient (e.g., +16315551234).<TYPE>: Type of message (e.g., ‘text’, ‘image’, etc.).
The response contains a message id which comes in useful for sending replies/reactions, and for checking for unsuccessful requests via the status code in the response (typical convention where status code 200 signifies a successful call).
{ "messaging_product": "whatsapp", "contacts": [{ "input": "<PHONE_NUMBER>", "wa_id": "<WHATSAPP_ID>", }], "messages": [{ "id": "<wamid.ID>", }]
}
Text Messages
To send a text message:
import requests
import json url = 'https://graph.facebook.com/v18.0/<FROM_PHONE_NUMBER_ID>/messages'
headers = { 'Authorization': 'Bearer <ACCESS_TOKEN>', 'Content-Type': 'application/json'
}
payload = { 'messaging_product': 'whatsapp', 'recipient_type': 'individual', 'to': '<PHONE_NUMBER>', 'type': 'text', 'text': { 'preview_url': False, 'body': '<MESSAGE_CONTENT>' }
} response = requests.post(url, headers=headers, data=json.dumps(payload))
print(response.text)
Reaction Messages
For sending reaction messages:
import requests
import json url = 'https://graph.facebook.com/v18.0/<FROM_PHONE_NUMBER_ID>/messages' headers = { 'Authorization': 'Bearer <ACCESS_TOKEN>', 'Content-Type': 'application/json'
} data = { "messaging_product": "whatsapp", "recipient_type": "individual", "to": "<PHONE_NUMBER>", "type": "reaction", "reaction": { "message_id": "wamid.HBgLM...", "emoji": "uD83DuDE00" }
} response = requests.post(url, headers=headers, data=json.dumps(data)) print(response.text)
Media Messages
Use the typeproperty to indicate the media asset’s type (audio, document, image, sticker, or video) and either the id or link property to indicate its ID (which you must generate) or location on your public server.
If using id, you must first upload your media asset to the Whatsapp servers and capture the returned media ID. If using link, your asset must be on a publicly accessible server or the message will fail to send.
Using Link
import requests url = 'https://graph.facebook.com/v18.0/<FROM-PHONE-NUMBER-ID>/messages' headers = { 'Authorization': 'Bearer <ACCESS_TOKEN>', 'Content-Type': 'application/json',
} data = { 'messaging_product': 'whatsapp', 'recipient_type': 'individual', 'to': '<PHONE-NUMBER>', 'type': 'image', 'image': { 'link': '<IMAGE_URL>' }
} response = requests.post(url, headers=headers, json=data)
print(response.text)
Using ID
import requests url = 'https://graph.facebook.com/v18.0/FROM-PHONE-NUMBER-ID/messages' headers = { 'Authorization': 'Bearer ACCESS_TOKEN', 'Content-Type': 'application/json'
} data = { "messaging_product": "whatsapp", "recipient_type": "individual", "to": "PHONE-NUMBER", "type": "image", "image": { "id": "MEDIA-OBJECT-ID" }
} response = requests.post(url, json=data, headers=headers)
print(response.text)
Location Messages
To send location messages, make a POST call to /PHONE_NUMBER_ID/messages and attach a message object with type=location. Then, add a location object.
import requests url = 'https://graph.facebook.com/v18.0/<FROM_PHONE_NUMBER_ID>/messages'
headers = { 'Authorization': 'Bearer <ACCESS_TOKEN>', 'Content-Type': 'application/json'
}
data = { "messaging_product": "whatsapp", "to": "<PHONE_NUMBER>", "type": "location", "location": { "longitude": <LONG_NUMBER>, "latitude": <LAT_NUMBER>, "name": "<LOCATION_NAME>", "address": "<LOCATION_ADDRESS>" }
} response = requests.post(url, headers=headers, json=data)
print(response.text)
Contacts Messages
To send contacts messages:
import requests
import json url = 'https://graph.facebook.com/v18.0/FROM_PHONE_NUMBER_ID/messages' headers = { 'Authorization': 'ACCESS_TOKEN', 'Content-Type': 'application/json',
} data = { "messaging_product": "whatsapp", "to": "PHONE_NUMBER", "type": "contacts", "contacts": [{ "addresses": [{ "street": "STREET", "city": "CITY", "state": "STATE", "zip": "ZIP", "country": "COUNTRY", "country_code": "COUNTRY_CODE", "type": "HOME" }, { "street": "STREET", "city": "CITY", "state": "STATE", "zip": "ZIP", "country": "COUNTRY", "country_code": "COUNTRY_CODE", "type": "WORK" }], "birthday": "YEAR_MONTH_DAY", "emails": [{ "email": "EMAIL", "type": "WORK" }, { "email": "EMAIL", "type": "HOME" }], "name": { "formatted_name": "NAME", "first_name": "FIRST_NAME", "last_name": "LAST_NAME", "middle_name": "MIDDLE_NAME", "suffix": "SUFFIX", "prefix": "PREFIX" }, "org": { "company": "COMPANY", "department": "DEPARTMENT", "title": "TITLE" }, "phones": [{ "phone": "PHONE_NUMBER", "type": "HOME" }, { "phone": "PHONE_NUMBER", "type": "WORK", "wa_id": "PHONE_OR_WA_ID" }], "urls": [{ "url": "URL", "type": "WORK" }, { "url": "URL", "type": "HOME" }] }]
} response = requests.post(url, headers=headers, data=json.dumps(data))
print(response.text)
Replace <CONTACT_PAYLOAD> with the JSON structure containing contact details.
Interactive Messages
Interactive messages include list messages, reply buttons, and click-to-action URL buttons. To send interactive messages, make a POST call to /PHONE_NUMBER_ID/messages and attach a message object with type=interactive. Then, add an interactive object.
For list messages:
import requests
import json url = 'https://graph.facebook.com/v18.0/FROM_PHONE_NUMBER_ID/messages'
headers = { 'Authorization': 'Bearer ACCESS_TOKEN', 'Content-Type': 'application/json'
}
data = { "messaging_product": "whatsapp", "recipient_type": "individual", "to": "PHONE_NUMBER", "type": "interactive", "interactive": { "type": "list", "header": { "type": "text", "text": "HEADER_TEXT" }, "body": { "text": "BODY_TEXT" }, "footer": { "text": "FOOTER_TEXT" }, "action": { "button": "BUTTON_TEXT", "sections": [ { "title": "SECTION_1_TITLE", "rows": [ { "id": "SECTION_1_ROW_1_ID", "title": "SECTION_1_ROW_1_TITLE", "description": "SECTION_1_ROW_1_DESCRIPTION" }, { "id": "SECTION_1_ROW_2_ID", "title": "SECTION_1_ROW_2_TITLE", "description": "SECTION_1_ROW_2_DESCRIPTION" } ] }, { "title": "SECTION_2_TITLE", "rows": [ { "id": "SECTION_2_ROW_1_ID", "title": "SECTION_2_ROW_1_TITLE", "description": "SECTION_2_ROW_1_DESCRIPTION" }, { "id": "SECTION_2_ROW_2_ID", "title": "SECTION_2_ROW_2_TITLE", "description": "SECTION_2_ROW_2_DESCRIPTION" } ] } ] } }
} response = requests.post(url, headers=headers, data=json.dumps(data))
print(response.text)
For reply buttons:
import requests url = 'https://graph.facebook.com/v18.0/FROM_PHONE_NUMBER_ID/messages'
headers = { 'Authorization': 'Bearer ACCESS_TOKEN', 'Content-Type': 'application/json'
}
data = { "messaging_product": "whatsapp", "recipient_type": "individual", "to": "PHONE_NUMBER", "type": "interactive", "interactive": { "type": "button", "body": { "text": "BUTTON_TEXT" }, "action": { "buttons": [ { "type": "reply", "reply": { "id": "UNIQUE_BUTTON_ID_1", "title": "BUTTON_TITLE_1" } }, { "type": "reply", "reply": { "id": "UNIQUE_BUTTON_ID_2", "title": "BUTTON_TITLE_2" } } ] } }
} response = requests.post(url, headers=headers, json=data)
print(response.text)
For sending messages with CTA URL buttons:

import requests
import json # Replace these variables with your actual data
access_token = '<ACCESS_TOKEN>'
business_phone_number_id = '<BUSINESS_PHONE_NUMBER_ID>'
customer_phone_number = '<CUSTOMER_PHONE_NUMBER>' url = f'https://graph.facebook.com/v18.0/{business_phone_number_id}/messages'
headers = { 'Authorization': f'Bearer {access_token}', 'Content-Type': 'application/json'
}
data = { "messaging_product": "whatsapp", "recipient_type": "individual", "to": customer_phone_number, "type": "interactive", "interactive": { "type": "button", "body": { "text": "BUTTON_TEXT" }, "action": { "buttons": [ { "type": "reply", "reply": { "id": "UNIQUE_BUTTON_ID_1", "title": "BUTTON_TITLE_1" } }, { "type": "reply", "reply": { "id": "UNIQUE_BUTTON_ID_2", "title": "BUTTON_TITLE_2" } } ] } }
} response = requests.post(url, headers=headers, data=json.dumps(data))
print(response.text)
Sending Replies
Sending a message as a response to an earlier message in a conversation is possible by adding the ID of the previous message in the context object. This way, the recipient gets the new message with a contextual bubble showcasing the content of the preceding message.

import requests url = 'https://graph.facebook.com/v18.0/<FROM_PHONE_NUMBER_ID>/messages' headers = { 'Authorization': 'Bearer <ACCESS_TOKEN>', 'Content-Type': 'application/json'
} data = { "messaging_product": "whatsapp", "context": { "message_id": "<MESSAGE_ID>" }, "to": "<PHONE_NUMBER_OR_WA_ID>", "type": "text", "text": { "preview_url": False, "body": "<YOUR_TEXT_MESSAGE_CONTENT>" }
} response = requests.post(url, headers=headers, json=data) print(response.text)
Sending Address Messages
Address Message types are supported in India and Singapore only. Read More here.
Sending Message Templates
WhatsApp message templates are pre-created specific message formats that businesses use to send out notifications or customer care messages to people that have opted in to notifications. Messages can include appointment reminders, shipping information, issue resolution or payment updates.
Before sending a template message, you need to create a template.
- Go to Business Manager and select your business.
- Open Menu and click on WhatsApp Manager.

- Click on “Manage Message Templates”.
Now, you can either use one of the pre-approved templates, or create your template with required framework and get that approved from Meta.
Take a look at the pre approved templates offered here – https://www.facebook.com/business/help/722393685250070
You can start using them directly.
For example –
1. Sending Catalog Template Messages
This section explains how to send catalog templates in a WhatsApp message, assuming you have an inventory in a Meta ecommerce catalog connected to your WhatsApp Business Account.
Requirements
- Inventory uploaded to Meta. You can create it using this guide.
- Ecommerce catalog connected to WhatsApp Business Account.
Setup
The next step is to create a catalog template which will be used to send the messages. Use this guide to create a catalog template in minutes.
Request Syntax
Use the WhatsApp Business Phone Number > Messages endpoint.
Example Request
Let’s say we create a template called intro_catalog_offer.
import requests url = 'https://graph.facebook.com/v17.0/<WHATSAPP_BUSINESS_PHONE_NUMBER_ID>/messages'
headers = { 'Content-Type': 'application/json', 'Authorization': 'Bearer <YOUR_ACCESS_TOKEN>'
}
data = { "messaging_product": "whatsapp", "recipient_type": "individual", "to": "+16505551234", "type": "template", "template": { "name": "intro_catalog_offer", "language": { "code": "en_US" }, "components": [ { "type": "body", "parameters": [ { "type": "text", "text": "100" }, { "type": "text", "text": "400" }, { "type": "text", "text": "3" } ] }, { "type": "button", "sub_type": "CATALOG", "index": 0, "parameters": [ { "type": "action", "action": { "thumbnail_product_retailer_id": "2lc20305pt" } } ] } ] }
} response = requests.post(url, json=data, headers=headers)
print(response.json())
2. Sending Carousel Templates
This section covers the process of sending carousel templates in a WhatsApp message.
Request Syntax
Similar to catalog templates, use the WhatsApp Business Phone Number > Messages endpoint.
Below is a sample request for dispatching a carousel template, incorporating a message bubble which needs input for two distinct variables. It includes two carousel cards, each featuring an image header, and necessitates input for text in the body and variables associated with buttons.
Setup
The next step is to create a carousal template, which will be used to send messages. You can create one within seconds using this guide.
Example Request
import requests
import json url = 'https://graph.facebook.com/v18.0/106540352242922/messages'
headers = { 'Content-Type': 'application/json', 'Authorization': 'Bearer EAAJB...'
}
data = { "messaging_product": "whatsapp", "recipient_type": "individual", "to": "16505555555", "type": "template", "template": { "name": "summer_carousel_promo_2023", "language": { "code": "en_US" }, "components": [ { "type": "BODY", "parameters": [ {"type": "TEXT", "text": "20OFF"}, {"type": "TEXT", "text": "20%"} ] }, { "type": "CAROUSEL", "cards": [ { "card_index": 0, "components": [ { "type": "HEADER", "parameters": [{"type": "IMAGE", "image": {"id": "24230790383178626"}}] }, { "type": "BODY", "parameters": [ {"type": "TEXT", "text": "10OFF"}, {"type": "TEXT", "text": "10%"} ] }, { "type": "BUTTON", "sub_type": "QUICK_REPLY", "index": "0", "parameters": [{"type": "PAYLOAD", "payload": "59NqSd"}] }, { "type": "button", "sub_type": "URL", "index": "1", "parameters": [{"type": "payload", "payload": "last_chance_2023"}] } ] }, { "card_index": 1, "components": [ { "type": "HEADER", "parameters": [{"type": "IMAGE", "image": {"id": "1690627074790615"}}] }, { "type": "BODY", "parameters": [ {"type": "TEXT", "text": "30OFF"}, {"type": "TEXT", "text": "30%"} ] }, { "type": "BUTTON", "sub_type": "QUICK_REPLY", "index": "0", "parameters": [{"type": "PAYLOAD", "payload": "7C4xhY"}] }, { "type": "BUTTON", "sub_type": "URL", "index": "1", "parameters": [{"type": "payload", "payload": "summer_blues_2023"}] } ] } ] } ] }
} response = requests.post(url, headers=headers, json=data)
print(response.text)
Use the below guide to get acquainted more with message templates – https://business.facebook.com/business/help/2055875911147364?id=2129163877102343
Whatsapp Messaging Workflow
In this section, we will take an example of a Whatsapp marketing campaign and try to automate it using the Whatsapp API in python. We will delve into how to automate the process of extracting daily leads from HubSpot via its API and then sending automated messages to these leads through WhatsApp’s API. We’ll use HubSpot fields to create dynamic messages based on various attributes.
Script to Get Daily Leads from HubSpot
To begin, let’s write a Python script to fetch daily leads from HubSpot. This script will use the HubSpot API to get leads based on a custom field, such as Date_Created, to filter leads created in the last 24 hours.
import requests
from datetime import datetime, timedelta # HubSpot API details
HUBSPOT_API_KEY = 'your_hubspot_api_key'
HUBSPOT_CONTACTS_URL = 'https://api.hubapi.com/crm/v3/objects/contacts' # Calculate yesterday's date
yesterday = (datetime.now() - timedelta(days=1)).strftime('%Y-%m-%d') # Query parameters for the API call
params = { 'hapikey': HUBSPOT_API_KEY, 'limit': 100, # Adjust the limit as needed 'properties': ['firstname', 'lastname', 'phone', 'email', 'Date_Created'], 'filters': [{ 'propertyName': 'Date_Created', 'operator': 'GTE', 'value': yesterday }]
} # API call to get contacts
response = requests.get(HUBSPOT_CONTACTS_URL, params=params)
leads = response.json() # Extract relevant information
daily_leads = [{'name': f"{lead['properties']['firstname']} {lead['properties']['lastname']}", 'phone': lead['properties']['phone'], 'email': lead['properties']['email']} for lead in leads['results']] # Print the leads
print(daily_leads)
Sending Automated Messages via WhatsApp API
Once we have the list of daily leads, the next step is to send them personalized messages via WhatsApp. We’ll use the WhatsApp Cloud API and dynamically create messages based on other HubSpot fields, like firstname, lastname, and any other relevant data.
import requests
import json # WhatsApp API details
WHATSAPP_API_URL = 'https://graph.facebook.com/v18.0/YOUR_PHONE_NUMBER_ID/messages'
ACCESS_TOKEN = 'your_whatsapp_access_token' # Function to send message
def send_whatsapp_message(phone_number, message): headers = { 'Authorization': f'Bearer {ACCESS_TOKEN}', 'Content-Type': 'application/json' } payload = { 'messaging_product': 'whatsapp', 'recipient_type': 'individual', 'to': phone_number, 'type': 'text', 'text': {'body': message} } response = requests.post(WHATSAPP_API_URL, headers=headers, json=payload) return response.json() # Loop through the leads and send messages
for lead in daily_leads: # Custom message based on HubSpot fields message = f"Hello {lead['name']}, we have exciting updates for you! Check your email at {lead['email']} for more details." # Send message send_response = send_whatsapp_message(lead['phone'], message) print(f"Message sent to {lead['name']}: {send_response}")
In this script, we first define a function send_whatsapp_message that takes a phone number and a message as inputs and sends the message using the WhatsApp API. Then, we loop through each lead, create a personalized message, and use the function to send the message.
This workflow automates the process of extracting daily leads from HubSpot and then engaging with them via personalized WhatsApp messages. We tailor the messages according to the lead’s information and preferences to ensure effective communication.
Automate Whatsapp messaging campaigns with our AI-driven workflows, designed by Nanonets for you and your teams.
Automate the workflow with Nanonets
You can automate the above workflow within seconds using workflow automation powered by Nanonets.
We provide the requirements of our workflow as a natural language prompt, and the workflow builder spins up the workflow within seconds.
We authenticate our Hubspot and Whatsapp accounts, and then we are ready to deploy the workflow and make it live.
There are numerous useful workflows that both individuals and organizations could create to streamline communication, automate tasks, and enhance productivity. Here are three practical examples of such workflows:
Sales Lead Notification Workflow
- Apps Involved: WhatsApp, Salesforce, Google Sheets
- Workflow:
- Trigger: A potential customer sends a message to a company’s WhatsApp number expressing interest in a product or service.
- Action 1: The lead’s details (name, contact information, interest) are automatically logged into Salesforce under a new lead entry.
- Action 2: The same information is also added to a Google Sheet that tracks all incoming leads for further analysis and follow-up.
- Action 3: An automated introductory message created using a Whatsapp Catalog Template is sent as Whatsapp reply.

Appointment Reminder and Confirmation Workflow
- Apps Involved: WhatsApp, Google Calendar, Trello
- Workflow:
- Trigger: A calendar event (appointment) is approaching in Google Calendar (e.g., 24 hours before the scheduled time).
- Action 1: An automated reminder message is sent to the client’s WhatsApp number, asking for confirmation or rescheduling.
- Action 2: Upon receiving a confirmation reply from the client on WhatsApp, a Trello card is automatically created or updated in the business’s project management board to signify the confirmed appointment.

Customer Support Ticket and Follow-Up Workflow
- Apps Involved: WhatsApp, Zendesk, Slack, Gmail, Trello
- Workflow:
- Trigger: A customer sends a message to a business’s WhatsApp number with a specific keyword present in the message body (e.g., “help” or “support”).
- Action 1: The message triggers the creation of a new support ticket in Zendesk.
- Action 2: The ticket information, along with the customer’s original message, is automatically forwarded to a dedicated Slack channel (e.g., #customer_support) for the support team to view and discuss.
- Action 3: An automated email is generated and sent to the support team’s Gmail account, including the customer’s message and contact details for follow-up. This email also contains a link to the newly created Zendesk ticket.
- Action 4: A Trello card is created in a designated board and list (e.g., ‘New Tickets’ list on a ‘Support’ board), capturing the customer’s issue details. This card is used for tracking the progress of the ticket through various stages of resolution.
- Action 5: Once the support ticket is marked as resolved in Zendesk, an automated message is sent back to the customer through WhatsApp, confirming the resolution of their issue and asking for any further assistance.
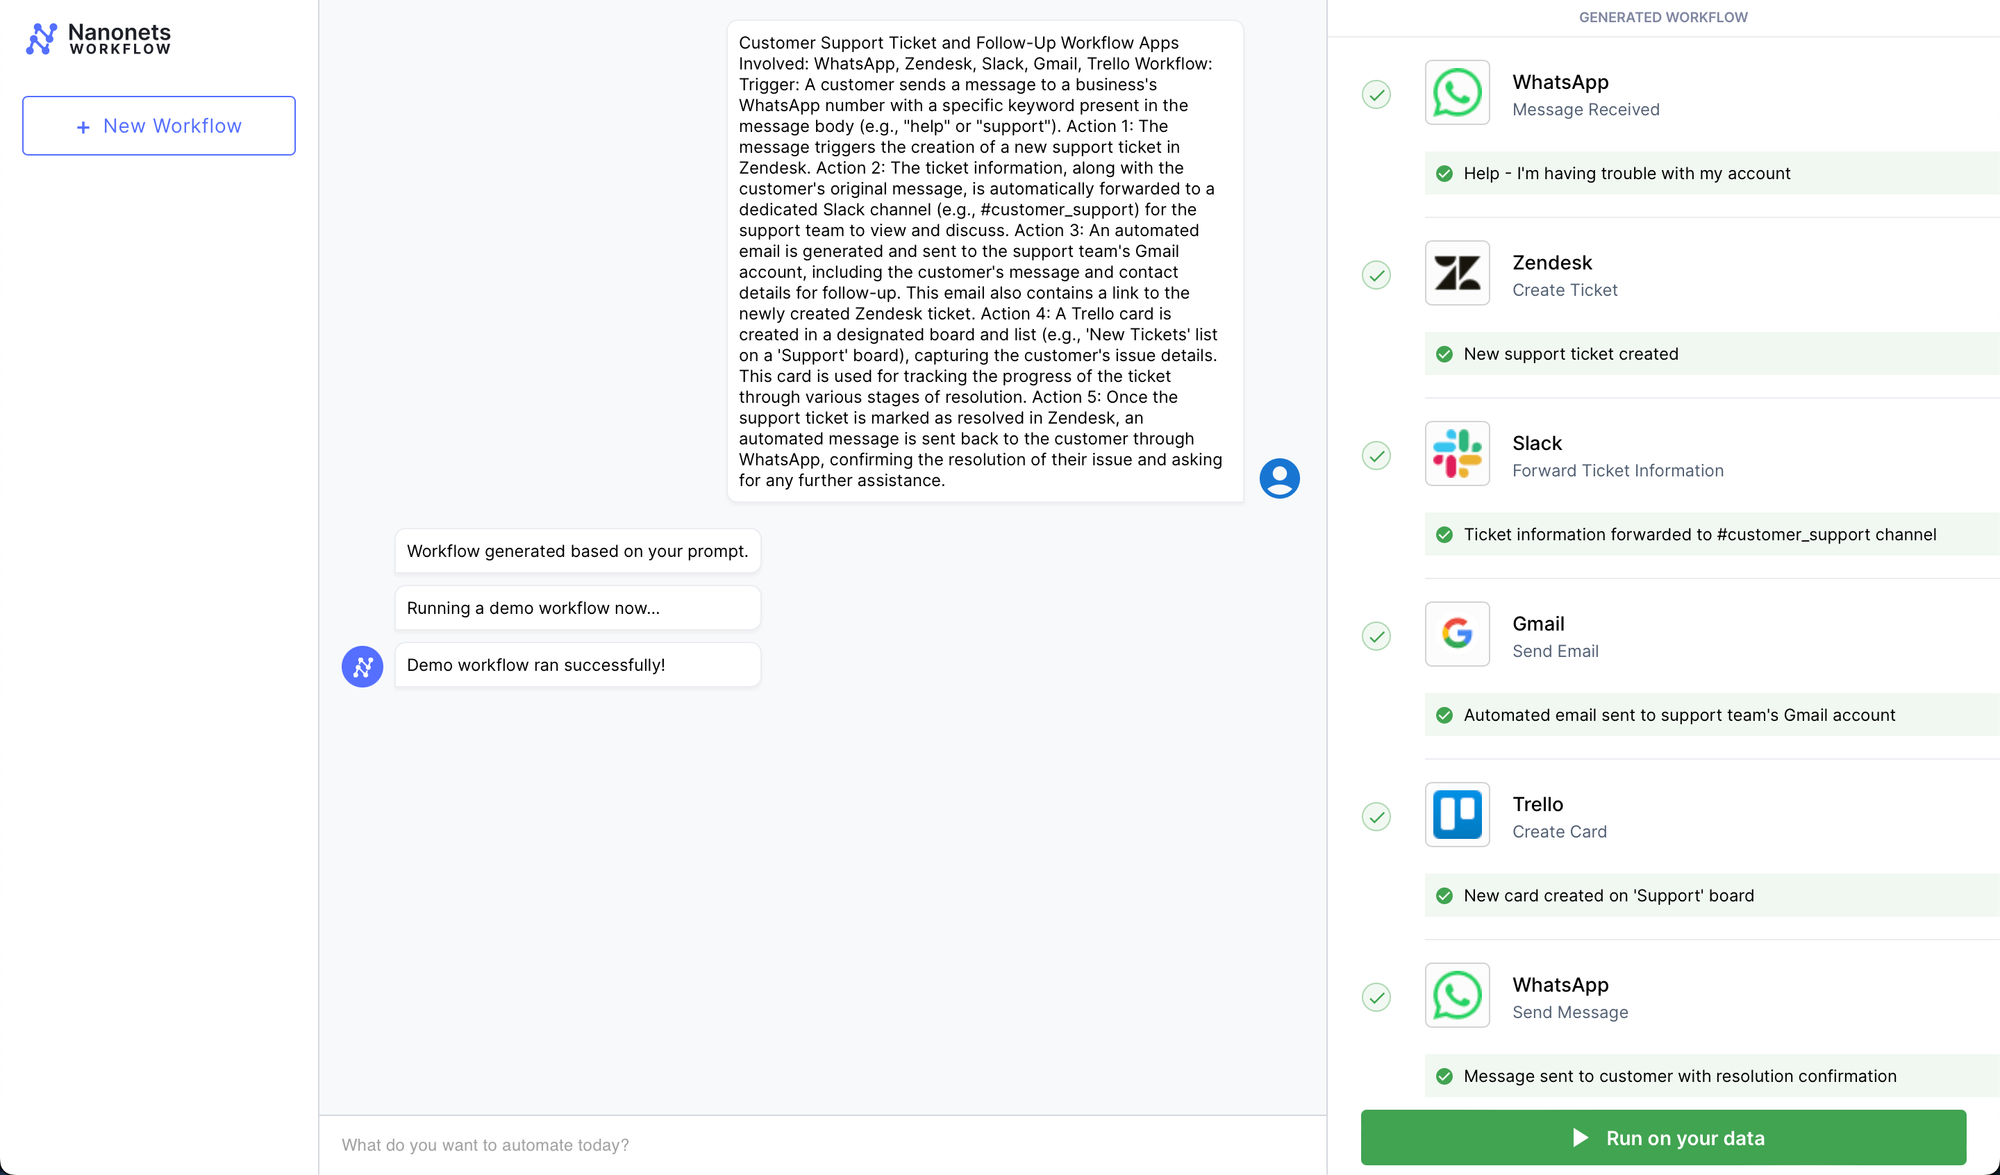
These workflows are designed to enhance communication efficiency, ensure prompt responses, and keep track of important interactions and tasks across different platforms. They can be tailored to specific organizational needs and can significantly streamline various business processes.
Workflow Automation with Nanonets
In today’s fast-paced business environment, workflow automation stands out as a crucial innovation, offering a competitive edge to companies of all sizes. The integration of automated workflows into daily business operations is not just a trend; it’s a strategic necessity. In addition to this, the advent of LLMs has opened even more opportunities for automation of manual tasks and processes.
Welcome to Nanonets Workflow Automation, where AI-driven technology empowers you and your team to automate manual tasks and construct efficient workflows in minutes. Utilize natural language to effortlessly create and manage workflows that seamlessly integrate with all your documents, apps, and databases.
Our platform offers not only seamless app integrations for unified workflows but also the ability to build and utilize custom Large Language Models Apps for sophisticated text writing and response posting within your apps. All the while ensuring data security remains our top priority, with strict adherence to GDPR, SOC 2, and HIPAA compliance standards.
To better understand the practical applications of Nanonets workflow automation, let’s delve into some real-world examples.
- Automated Customer Support and Engagement Process
- Ticket Creation – Zendesk: The workflow is triggered when a customer submits a new support ticket in Zendesk, indicating they need assistance with a product or service.
- Ticket Update – Zendesk: After the ticket is created, an automated update is immediately logged in Zendesk to indicate that the ticket has been received and is being processed, providing the customer with a ticket number for reference.
- Information Retrieval – Nanonets Browsing: Concurrently, the Nanonets Browsing feature searches through all the knowledge base pages to find relevant information and possible solutions related to the customer’s issue.
- Customer History Access – HubSpot: Simultaneously, HubSpot is queried to retrieve the customer’s previous interaction records, purchase history, and any past tickets to provide context to the support team.
- Ticket Processing – Nanonets AI: With the relevant information and customer history at hand, Nanonets AI processes the ticket, categorizing the issue and suggesting potential solutions based on similar past cases.
- Notification – Slack: Finally, the responsible support team or individual is notified through Slack with a message containing the ticket details, customer history, and suggested solutions, prompting a swift and informed response.
- Automated Issue Resolution Process

- Initial Trigger – Slack Message: The workflow begins when a customer service representative receives a new message in a dedicated channel on Slack, signaling a customer issue that needs to be addressed.
- Classification – Nanonets AI: Once the message is detected, Nanonets AI steps in to classify the message based on its content and past classification data (from Airtable records). Using LLMs, it classifies it as a bug along with determining urgency.
- Record Creation – Airtable: After classification, the workflow automatically creates a new record in Airtable, a cloud collaboration service. This record includes all relevant details from the customer’s message, such as customer ID, issue category, and urgency level.
- Team Assignment – Airtable: With the record created, the Airtable system then assigns a team to handle the issue. Based on the classification done by Nanonets AI, the system selects the most appropriate team – tech support, billing, customer success, etc. – to take over the issue.
- Notification – Slack: Finally, the assigned team is notified through Slack. An automated message is sent to the team’s channel, alerting them of the new issue, providing a direct link to the Airtable record, and prompting a timely response.
- Automated Meeting Scheduling Process

- Initial Contact – LinkedIn: The workflow is initiated when a professional connection sends a new message on LinkedIn expressing interest in scheduling a meeting. An LLM parses incoming messages and triggers the workflow if it deems the message as a request for a meeting from a potential job candidate.
- Document Retrieval – Google Drive: Following the initial contact, the workflow automation system retrieves a pre-prepared document from Google Drive that contains information about the meeting agenda, company overview, or any relevant briefing materials.
- Scheduling – Google Calendar: Next, the system interacts with Google Calendar to get available times for the meeting. It checks the calendar for open slots that align with business hours (based on the location parsed from LinkedIn profile) and previously set preferences for meetings.
- Confirmation Message as Reply – LinkedIn: Once a suitable time slot is found, the workflow automation system sends a message back through LinkedIn. This message includes the proposed time for the meeting, access to the document retrieved from Google Drive, and a request for confirmation or alternative suggestions.
- Invoice Processing in Accounts Payable
- Receipt of Invoice – Gmail: An invoice is received via email or uploaded to the system.
- Data Extraction – Nanonets OCR: The system automatically extracts relevant data (like vendor details, amounts, due dates).
- Data Verification – Quickbooks: The Nanonets workflow verifies the extracted data against purchase orders and receipts.
- Approval Routing – Slack: The invoice is routed to the appropriate manager for approval based on predefined thresholds and rules.
- Payment Processing – Brex: Once approved, the system schedules the payment according to the vendor’s terms and updates the finance records.
- Archiving – Quickbooks: The completed transaction is archived for future reference and audit trails.
- Internal Knowledge Base Assistance

- Initial Inquiry – Slack: A team member, Smith, inquires in the #chat-with-data Slack channel about customers experiencing issues with QuickBooks integration.
- Automated Data Aggregation – Nanonets Knowledge Base:
- Ticket Lookup – Zendesk: The Zendesk app in Slack automatically provides a summary of today’s tickets, indicating that there are issues with exporting invoice data to QuickBooks for some customers.
- Slack Search – Slack: Simultaneously, the Slack app notifies the channel that team members Patrick and Rachel are actively discussing the resolution of the QuickBooks export bug in another channel, with a fix scheduled to go live at 4 PM.
- Ticket Tracking – JIRA: The JIRA app updates the channel about a ticket created by Emily titled “QuickBooks export failing for QB Desktop integrations,” which helps track the status and resolution progress of the issue.
- Reference Documentation – Google Drive: The Drive app mentions the existence of a runbook for fixing bugs related to QuickBooks integrations, which can be referenced to understand the steps for troubleshooting and resolution.
- Ongoing Communication and Resolution Confirmation – Slack: As the conversation progresses, the Slack channel serves as a real-time forum for discussing updates, sharing findings from the runbook, and confirming the deployment of the bug fix. Team members use the channel to collaborate, share insights, and ask follow-up questions to ensure a comprehensive understanding of the issue and its resolution.
- Resolution Documentation and Knowledge Sharing: After the fix is implemented, team members update the internal documentation in Google Drive with new findings and any additional steps taken to resolve the issue. A summary of the incident, resolution, and any lessons learned are already shared in the Slack channel. Thus, the team’s internal knowledge base is automatically enhanced for future use.
The Future of Business Efficiency
Nanonets Workflows is a secure, multi-purpose workflow automation platform that automates your manual tasks and workflows. It offers an easy-to-use user interface, making it accessible for both individuals and organizations.
To get started, you can schedule a call with one of our AI experts, who can provide a personalized demo and trial of Nanonets Workflows tailored to your specific use case.
Once set up, you can use natural language to design and execute complex applications and workflows powered by LLMs, integrating seamlessly with your apps and data.

Supercharge your teams with Nanonets Workflows allowing them to focus on what truly matters.
Automate Whatsapp messaging campaigns with our AI-driven workflows, designed by Nanonets for you and your teams.
- SEO Powered Content & PR Distribution. Get Amplified Today.
- PlatoData.Network Vertical Generative Ai. Empower Yourself. Access Here.
- PlatoAiStream. Web3 Intelligence. Knowledge Amplified. Access Here.
- PlatoESG. Carbon, CleanTech, Energy, Environment, Solar, Waste Management. Access Here.
- PlatoHealth. Biotech and Clinical Trials Intelligence. Access Here.
- Source: https://nanonets.com/blog/use-whatsapp-api-to-send-messages/