Amazon Q is a new generative AI-powered application that helps users get work done. Amazon Q can become your tailored business expert and let you discover content, brainstorm ideas, or create summaries using your company’s data safely and securely. You can use Amazon Q to have conversations, solve problems, generate content, gain insights, and take action by connecting to your company’s information repositories, code, data, and enterprise systems. For more information, see Introducing Amazon Q, a new generative AI-powered assistant (preview).
In this post, we show you how to bring Amazon Q, your business expert, to users in Microsoft Teams. (If you use Slack, refer to Deploy a Slack gateway for Amazon Q, your business expert.)
You’ll be able converse with Amazon Q business expert using Teams direct messages (DMs) to ask questions and get answers based on company data, get help creating new content such as email drafts, summarize attached files, and perform tasks.
You can also invite Amazon Q business expert to participate in your Teams channels. In a channel, users can ask Amazon Q business expert questions in a new message, or tag it in an existing thread at any point, to provide additional data points, resolve a debate, or summarize the conversation and capture the next steps.
Solution overview
Amazon Q business expert is amazingly powerful. Check out the following demo—seeing is believing!
In the demo, our Amazon Q business expert application is populated with some Wikipedia pages. You can populate your Amazon Q business expert application with your own company’s documents and knowledge base articles, so it will be able to answer your specific questions!
Everything you need is provided as open source in our GitHub repo.
In this post, we walk you through the process to deploy Amazon Q business expert in your AWS account and add it to Microsoft Teams. When you’re done, you’ll wonder how you ever managed without it!
The following are some of the things it can do:
- Respond to messages – In DMs, it responds to all messages. In channels, it responds only to @mentions and responds in a conversation thread.
- Render answers containing markdown – This includes headings, lists, bold, italics, tables, and more.
- Track sentiment – It provides thumbs up and thumbs down buttons to track user sentiment.
- Provide source attribution – It provides references and hyperlinks to sources used by Amazon Q business expert.
- Understand conversation context – It tracks the conversation and responds based on the context.
- Stay aware of multiple users – When it’s tagged in a thread, it knows who said what, and when, so it can contribute in context and accurately summarize the thread when asked.
- Process attached files – It can process up to five attached files for document question answering, summaries, and more.
- Start new conversations – You can reset and start new conversations in DM chats by using
/new_conversation.

In the following sections, we show how to deploy the project to your own AWS account and Teams account, and start experimenting!
Prerequisites
You need to have an AWS account and an AWS Identity and Access Management (IAM) role and user with permissions to create and manage the necessary resources and components for this application. If you don’t have an AWS account, see How do I create and activate a new Amazon Web Services account?
You also need to have an existing, working Amazon Q business expert application. If you haven’t set one up yet, see Creating an Amazon Q application.
Lastly, you need a Microsoft account and a Microsoft Teams subscription to create and publish the app using the steps outlined in this post. If you don’t have these, see if your company can create sandboxes for you to experiment, or create a new account and trial subscription as needed to complete the steps.
Deploy the solution resources
We’ve provided pre-built AWS CloudFormation templates that deploy everything you need in your AWS account.
If you’re a developer and you want to build, deploy, or publish the solution from code, refer to the Developer README.
Complete the following steps to launch the CloudFormation stack:
- Log in to the AWS Management Console.
- Choose one of the following Launch Stack buttons for your desired AWS Region to open the AWS CloudFormation console and create a new stack.
| Region | Launch Stack |
|---|---|
N. Virginia (us-east-1) |
|
Oregon (us-west-2) |
- For Stack name, enter a name for your app (for example,
AMAZON-Q-TEAMS-GATEWAY). - For AmazonQAppId, enter your existing Amazon Q business expert application ID (for example,
80xxxxx9-7xx3-4xx0-bxx4-5baxxxxx2af5). You can copy it from the Amazon Q business expert console. - For AmazonQRegion, choose the Region where you created your Amazon Q business expert application (us-east-1 or us-west-2).
- For AmazonQUserId, enter an Amazon Q business expert user ID email address (leave blank to use a Teams user email as the user ID).
- For ContextDaysToLive, enter the length of time to keep conversation metadata cached in Amazon DynamoDB (you can leave this as the default).
When your CloudFormation stack status is CREATE_COMPLETE, choose the Outputs tab, and keep it open—you’ll need it in later steps.
Register a new app in the Microsoft Azure portal
Complete the following steps to register a new app in the Microsoft Azure portal:
- Go to the Azure Portal and log in with your Microsoft account.
- Choose New registration.
- For Name, provide the name for your app. You can keep things simple by using the stack name you used for the CloudFormation stack.
- For Who can use this application or access this API?, choose Accounts in this organizational directory only (AWS only – Single tenant).
- Choose Register.
- Note down the Application (client) ID value and the Directory (tenant) ID from the Overview page. You’ll need them later when asked for
MicrosoftAppIdandMicrosoftAppTenantId.
- Choose Select API permissions in the navigation pane.
- Choose Add a permission.
- Choose Microsoft Graph.
- Choose Application permissions.
- Select User.Read.All.
- Select ChannelMessage.Read.All.
- Select Team.ReadBasic.All.
- Select Files.Read.All.
- Choose Add permissions. This permission allows the app to read data in your organization’s directory about the signed-in user.
- Use the options menu (three dots) on the right to choose Remove permission.
- Remove the original User.Read – Delegated permission.
- Choose Grant admin consent for Default Directory.
- Choose Certificates & secrets in the navigation pane.
- Choose New client secret.
- For Description, provide a value, such as
description of my client secret. - Choose a value for Expires. Note that in production, you’ll need to manually rotate your secret before it expires.
- Choose Add.
- Note down the value for your new secret. You’ll need it later when asked for
MicrosoftAppPassword.
- Optionally, choose Owners to add any additional owners for the application.
Register your new app in the Microsoft Bot Framework
Complete the following steps to register your app in the Microsoft Bot Framework:
- Go to the Microsoft Bot Framework and log in with your Microsoft account.
- Optionally, you can create and upload a custom icon for your new Amazon Q business expert bot. For example, we created the following using Amazon Bedrock image playground.

- Enter your preferred display name, bot handle, and description.
- For Messaging endpoint, copy and paste the value of
TeamsEventHandlerApiEndpointfrom your stack Outputs tab. - Do not select Enable Streaming Endpoint.
- For App type, choose Single Tenant.
- For Paste your app ID below to continue, enter the
MicrosoftAppIdvalue you noted earlier. - For App Tenant ID, enter the
MicrosoftAppTenantIdvalue you noted earlier. - Leave the other values as they are, agree to the terms, and choose Register.
- On the Channels page, under Add a featured channel, choose Microsoft Teams.
- Choose Microsoft Teams Commercial (most common), then choose Save.
- Agree to the Terms of Service and choose Agree.
Configure your secrets in AWS
Let’s configure your Teams secrets in order to verify the signature of each request and post on behalf of your Amazon Q business expert bot.
In this example, we are not enabling Teams token rotation. You can enable it for a production app by implementing rotation via AWS Secrets Manager. Create an issue (or, better yet, a pull request) in the GitHub repo if you want this feature added to a future version.
Complete the following steps to configure a secret in Secrets Manager:
- On the AWS CloudFormation console, navigate to your stack Outputs tab and choose the link for
TeamsSecretConsoleUrlto be redirected to the Secrets Manager console. - Choose Retrieve secret value.
- Choose Edit.
- Replace the values of
MicrosoftAppId,MicrosoftAppPassword, andMicrosoftAppTenantIdwith the values you noted in the previous steps.

Deploy your app into Microsoft Teams
Complete the following steps to deploy the app to Teams:
- Go to the Developer Portal for Teams and log in with your Microsoft Teams user account.
- Choose Apps in the navigation pane, then choose New app.
- For Name, enter your bot name.
- Enter a name for Full name and both short and full descriptions (you can use the bot name for them all if you want, just don’t leave them empty).
- Enter values for Developer information and App URLs. For testing, you can make up values, and URLs like
https://www.anycompany.com/. Use real ones for production. - For Application (client) ID*, enter the value of
MicrosoftAppIdfrom earlier. - Choose Save.
- Under Branding, you can upload AI-generated icons, or different icons, or none at all, it’s up to you. The following are some examples:
- Under App features, choose Bot.
- Select Enter a bot ID, and enter the
MicrosoftAppIdvalue from the earlier steps. - Under What can your bot do?, select Upload and download files.
- Under Select the scopes in which people can use this command, select Personal, Team, and Group chat.
- Choose Save.
- Select Enter a bot ID, and enter the
- Choose Publish.
- Choose Download the app package to download a .zip file to your computer.
- Choose Preview in Teams to launch Microsoft Teams (work or school) app.
- In the navigation pane, choose Apps, then Manage your apps, then Upload an app.
- Choose Upload an app to your orgs app catalog, and select the .zip file you downloaded. This adds the app to Teams.
- Select the card for your new app, choose Add, and wait for it to complete (10–20 seconds).
Add your bot to one or more teams
Complete the following step to add your bot to a team:
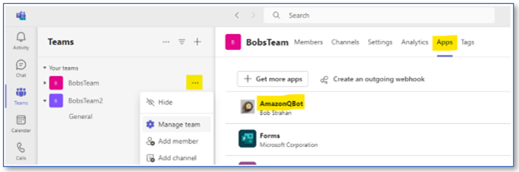
- In the Teams app, select your team and choose Manage team.
- On the Apps tab, choose the new Amazon Q business expert app, and choose Add.
Now you can test your bot in Microsoft Teams!
Start using Amazon Q business expert
Complete the following steps to start using Amazon Q business expert in Teams:
- Open your Teams client.
- Under Apps, add your new Amazon Q business expert app to a chat.
- Optionally, add your Amazon Q business expert app to one or more Teams channels.
- In the app DM chat, enter
Hello.
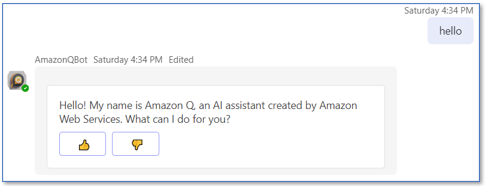
You have now deployed a powerful new AI assistant into your sandbox Teams environment.
Play with it, try all the features discussed in this post, and copy the things you saw in the demo video. Most importantly, you can ask about topics related to the documents that you have ingested into your own Amazon Q business expert application. But don’t stop there. You can find additional ways to make it useful, and when you do, let us know by posting a comment.
Once you are convinced how useful it is, talk to your Teams admins (show them this post) and work with them to deploy it in your company’s Teams organizations. Your fellow employees will thank you!
Clean up
When you’re finished experimenting with this solution, delete your app in Microsoft Teams, Bot Framework, and Azure portal. Then clean up your AWS resources by opening the AWS CloudFormation console and deleting the AMAZON-Q-TEAMS-GATEWAY stack that you deployed. This deletes the resources that you created by deploying the solution.
Conclusions
The sample Amazon Q business expert Teams application discussed in this post is provided as open source—you can use it as a starting point for your own solution, and help us make it better by contributing back fixes and features via GitHub pull requests. Explore the code, choose Watch in the GitHub repo to be notified of new releases, and check back for the latest updates. We’d also love to hear your suggestions for improvements and features.
For more information on Amazon Q business expert, refer to the Amazon Q (For Business Use) Developer Guide.
About the Authors
 Gary Benattar is a Senior Software Development Manager in AWS HR. Gary started at Amazon in 2012 as an intern, focusing on building scalable, real-time outlier detection systems. He worked in Seattle and Luxembourg and is now based in Tel Aviv, Israel, where he dedicates his time to building software to revolutionize the future of Human Resources. He co-founded a startup, Zengo, with a focus on making digital wallets secure through multi-party computation. He received his MSc in Software Engineering from Sorbonne University in Paris.

Bob Strahan is a Principal Solutions Architect in the AWS Language AI Services team.
- SEO Powered Content & PR Distribution. Get Amplified Today.
- PlatoData.Network Vertical Generative Ai. Empower Yourself. Access Here.
- PlatoAiStream. Web3 Intelligence. Knowledge Amplified. Access Here.
- PlatoESG. Carbon, CleanTech, Energy, Environment, Solar, Waste Management. Access Here.
- PlatoHealth. Biotech and Clinical Trials Intelligence. Access Here.
- Source: https://aws.amazon.com/blogs/machine-learning/deploy-a-microsoft-teams-gateway-for-amazon-q-your-business-expert/