Every organization has its own set of standards and practices that provide security and governance for their AWS environment. Amazon SageMaker is a fully managed service to prepare data and build, train, and deploy machine learning (ML) models for any use case with fully managed infrastructure, tools, and workflows. SageMaker provides a set of templates for organizations that want to quickly get started with ML workflows and DevOps continuous integration and continuous delivery (CI/CD) pipelines.
The majority of enterprise customers already have a well-established MLOps practice with a standardized environment in place—for example, a standardized repository, infrastructure, and security guardrails—and want to extend their MLOps process to no-code and low-code AutoML tools as well. They also have a lot of processes that need to be adhered to before promoting a model to production. They’re looking for a quick and easy way to graduate from the initial phase to a repeatable, reliable, and eventually scalable operating phase, as outlined in the following diagram. For more information, refer to MLOps foundation roadmap for enterprises with Amazon SageMaker.

Although these companies have robust data science and MLOps teams to help them build reliable and scalable pipelines, they want to have their low-code AutoML tool users produce code and model artifacts in a manner that can be integrated with their standardized practices, adhering to their code repo structure and with appropriate validations, tests, steps, and approvals.
They are looking for a mechanism for the low-code tools to generate all the source code for each step of the AutoML tasks (preprocessing, training, and postprocessing) in a standardized repository structure that can provide their expert data scientists with the capability to view, validate, and modify the workflow per their needs and then generate a custom pipeline template that can be integrated into a standardized environment (where they have defined their code repository, code build tools, and processes).
This post showcases how to have a repeatable process with low-code tools like Amazon SageMaker Autopilot such that it can be seamlessly integrated into your environment, so you don’t have to orchestrate this end-to-end workflow on your own. We demonstrate how to use CI/CD the low-code/no-code tools code to integrate it into your MLOps environment, while adhering with MLOps best practices.
Solution overview
To demonstrate the orchestrated workflow, we use the publicly available UCI Adult 1994 Census Income dataset to predict if a person has an annual income of greater than $50,000 per year. This is a binary classification problem; the options for the income target variable are either over $50,000 or under $50,000.
The following table summarizes the key components of the dataset.
| Data Set Characteristics | Multivariate | Number of Instances | 48842 | Area | Social |
| Attribute Characteristics: | Categorical, Integer | Number of Attributes: | 14 | Date Donated | 1996-05-01 |
| Associated Tasks: | Classification | Missing Values? | Yes | Number of Web Hits | 2749715 |
The following table summarizes the attribute information.
| Column Name | Description |
| Age | Continuous |
| Workclass | Private, Self-emp-not-inc, Self-emp-inc, Federal-gov, Local-gov, State-gov, Without-pay, Never-worked |
| fnlwgt | continuous |
| education | Bachelors, Some-college, 11th, HS-grad, Prof-school, Assoc-acdm, Assoc-voc, 9th, 7th-8th, 12th, Masters, 1st-4th, 10th, Doctorate, 5th-6th, Preschool. |
| education-num | continuous |
| marital-status | Married-civ-spouse, Divorced, Never-married, Separated, Widowed, Married-spouse-absent, Married-AF-spouse. |
| occupation | ech-support, Craft-repair, Other-service, Sales, Exec-managerial, Prof-specialty, Handlers-cleaners, Machine-op-inspct, Adm-clerical, Farming-fishing, Transport-moving, Priv-house-serv, Protective-serv, Armed-Forces |
| relationship | Wife, Own-child, Husband, Not-in-family, Other-relative, Unmarried. |
| race | White, Asian-Pac-Islander, Amer-Indian-Eskimo, Other, Black |
| sex | Female, Male |
| capital-gain | Continuous |
| capital-loss | Continuous |
| hours-per-week | Continuous |
| native-country | United-States, Cambodia, England, Puerto-Rico, Canada, Germany, Outlying-US(Guam-USVI-etc), India, Japan, Greece, South, China, Cuba, Iran, Honduras, Philippines, Italy, Poland, Jamaica, Vietnam, Mexico, Portugal, Ireland, France, Dominican-Republic, Laos, Ecuador, Taiwan, Haiti, Columbia, Hungary, Guatemala, Nicaragua, Scotland, Thailand, Yugoslavia, El-Salvador, Trinadad&Tobago, Peru, Hong, Holand-Netherlands. |
| class | Income class, either <=50K or >=50K |
In this post, we showcase how to use Amazon SageMaker Projects, a tool that helps organizations set up and standardize environments for MLOps with low-code AutoML tools like Autopilot and Amazon SageMaker Data Wrangler.
Autopilot eliminates the heavy lifting of building ML models. You simply provide a tabular dataset and select the target column to predict, and Autopilot will automatically explore different solutions to find the best model. You then can directly deploy the model to production with just one click or iterate on the recommended solutions to further improve the model quality.
Data Wrangler provides an end-to-end solution to import, prepare, transform, featurize, and analyze data. You can integrate a Data Wrangler data preparation flow into your ML workflows to simplify and streamline data preprocessing and feature engineering using little to no coding. You can also add your own Python scripts and transformations to customize workflows. We use Data Wrangler to perform preprocessing on the dataset before submitting the data to Autopilot.
SageMaker Projects helps organizations set up and standardize environments for automating different steps involved in an ML lifecycle. Although notebooks are helpful for model building and experimentation, a team of data scientists and ML engineers sharing code need a more scalable way to maintain code consistency and strict version control.
To help you get started with common model building and deployment paradigms, SageMaker Projects offers a set of first-party templates (1P templates). The 1P templates generally focus on creating resources for model building and model training. The templates include projects that use AWS-native services for CI/CD, such as AWS CodeBuild and AWS CodePipeline. SageMaker Projects can support custom template offerings, where organizations use an AWS CloudFormation template to run a Terraform stack and create the resources needed for an ML workflow.
Organizations may want to extend the 1P templates to support use cases beyond simply training and deploying models. Custom project templates are a way for you to create a standard workflow for ML projects. You can create several templates and use AWS Identity and Access Management (IAM) policies to manage access to those templates on Amazon SageMaker Studio, ensuring that each of your users are accessing projects dedicated for their use cases.
To learn more about SageMaker Projects and creating custom project templates aligned with best practices, refer to Build Custom SageMaker Project Templates – Best Practices.
These custom templates are created as AWS Service Catalog products and provisioned as organization templates on the Studio UI. This is where data scientists can choose a template and have their ML workflow bootstrapped and preconfigured. Projects are provisioned using AWS Service Catalog products. Project templates are used by organizations to provision projects for each of their teams.
In this post, we showcase how to build a custom project template to have an end-to-end MLOps workflow using SageMaker projects, AWS Service Catalog, and Amazon SageMaker Pipelines integrating Data Wrangler and Autopilot with humans in the loop in order to facilitate the steps of model training and deployment. The humans in the loop are the different personas involved in an MLOps practice working collaboratively for a successful ML build and deploy workflow.
The following diagram illustrates the end-to-end low-code/no-code automation workflow.

The workflow includes the following steps:
- The Ops team or the Platform team launches the CloudFormation template to set up the prerequisites required to provision the custom SageMaker template.
- When the template is available in SageMaker, the Data Science Lead uses the template to create a SageMaker project.
- The SageMaker project creation will launch an AWS Service Catalog product that adds two seed codes to the AWS CodeCommit repositories:
- The seed code for the model building pipeline includes a pipeline that preprocesses the UCI Machine Learning Adult dataset using Data Wrangler, automatically creates an ML model with full visibility using Autopilot, evaluates the performance of a model using a processing step, and registers the model into a model registry based on the model performance.
- The seed code for model deployment includes a CodeBuild step to find the latest model that has been approved in the model registry and create configuration files to deploy the CloudFormation templates as part of the CI/CD pipelines using CodePipeline. The CloudFormation template deploys the model to staging and production environments.
- The first seed code commit starts a CI/CD pipeline using CodePipeline that triggers a SageMaker pipeline, which is a series of interconnected steps encoded using a directed acyclic graph (DAG). In this case, the steps involved are data processing using a Data Wrangler flow, training the model using Autopilot, creating the model, evaluating the model, and if the evaluation is passed, registering the model.
For more details on creating SageMaker pipelines using Autopilot, refer to Launch Amazon SageMaker Autopilot experiments directly from within Amazon SageMaker Pipelines to easily automate MLOps workflows.
- After the model is registered, the model approver can either approve or reject the model in Studio.
- When the model is approved, a CodePipeline deployment pipeline integrated with the second seed code is triggered.
- This pipeline creates a SageMaker serverless scalable endpoint for the staging environment.
- There is an automated test step in the deployment pipeline that will be tested on the staging endpoint.
- The test results are stored in Amazon Simple Storage Service (Amazon S3). The pipeline will stop for a production deployment approver, who can review all the artifacts before approving.
- Once approved, the model is deployed to production in the form of scalable serverless endpoint. Production applications can now consume the endpoint for inference.
The deployment steps consist of the following:
- Create the custom SageMaker project template for Autopilot and other resources using AWS CloudFormation. This is a one-time setup task.
- Create the SageMaker project using the custom template.
In the following sections, we proceed with each of these steps in more detail and explore the project details page.
Prerequisites
This walkthrough includes the following prerequisites:
Create solution resources with AWS CloudFormation
You can download and launch the CloudFormation template via the AWS CloudFormation console, the AWS Command Line Interface (AWS CLI), the SDK, or by simply choosing Launch Stack:
![]()
The CloudFormation template is also available in the AWS Samples GitHub Code repository. The repository contains the following:
- A CloudFormation template to set up the custom SageMaker project template for Autopilot
- Seed code with the ML code to set up SageMaker pipelines to automate the data processing and training steps
- A project folder for the CloudFormation template used by AWS Service Catalog mapped to the custom SageMaker project template that will be created
The CloudFormation template takes several parameters as input.
The following are the AWS Service Catalog product information parameters:
- Product Name – The name of the AWS Service Catalog product that the SageMaker project custom MLOps template will be associated with
- Product Description – The description for the AWS Service Catalog product
- Product Owner – The owner of the Service Catalog product
- Product Distributor – The distributor of the Service Catalog product
The following are the AWS Service Catalog product support information parameters:
- Product Support Description – A support description for this product
- Product Support Email – An email address of the team supporting the AWS Service Catalog product
- Product Support URL – A support URL for the AWS Service Catalog product
The following are the source code repository configuration parameters:
- URL to the zipped version of your GitHub repository – Use the defaults if you’re not forking the AWS Samples repository.
- Name and branch of your GitHub repository – These should match the root folder of the zip. Use the defaults if you’re not forking the AWS Samples repository.
- StudioUserExecutionRole – Provide the ARN of the Studio user execution IAM role.
After you launch the CloudFormation stack from this template, you can monitor its status on the AWS CloudFormation console.
When the stack is complete, copy the value of the CodeStagingBucketName key on the Outputs tab of the CloudFormation stack and save it in a text editor to use later.

Create the SageMaker project using the new custom template
To create your SageMaker project, complete the following steps:
- Sign in to Studio. For more information, see Onboard to Amazon SageMaker Domain.
- In the Studio sidebar, choose the home icon.
- Choose Deployments from the menu, then choose Projects.
- Choose Create project.
- Choose Organization templates to view the new custom MLOps template.
- Choose Select project template.

- For Project details, enter a name and description for your project.
- For MLOpsS3Bucket, enter the name of the S3 bucket you saved earlier.

- Choose Create project.
A message appears indicating that SageMaker is provisioning and configuring the resources.

When the project is complete, you receive a success message, and your project is now listed on the Projects list.
Explore the project details
On the project details page, you can view various tabs associated with the project. Let’s dive deep into each of these tabs in detail.
Repositories
This tab lists the code repositories associated with this project. You can choose clone repo under Local path to clone the two seed code repositories created in CodeCommit by the SageMaker project. This option provides you with Git access to the code repositories from the SageMaker project itself.
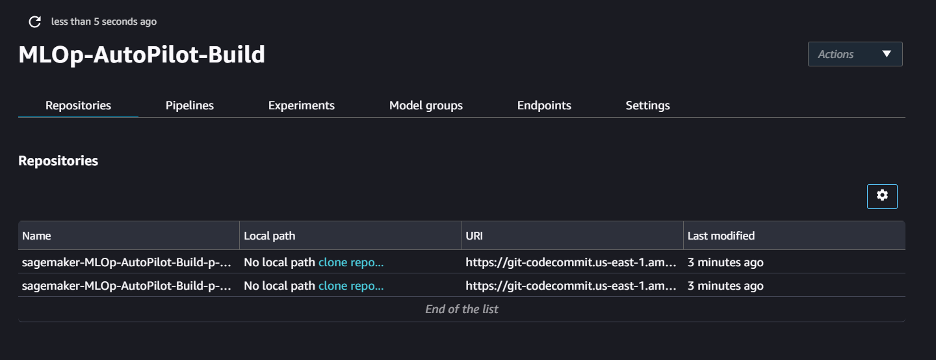
When the clone of the repository is complete, the local path appears in the Local path column. You can choose the path to open the local folder that contains the repository code in Studio.

The folder will be accessible in the navigation pane. You can use the file browser icon to hide or show the folder list. You can make the code changes here or choose the Git icon to stage, commit, and push the change.

Pipelines
This tab lists the SageMaker ML pipelines that define steps to prepare data, train models, and deploy models. For information about SageMaker ML pipelines, see Create and Manage SageMaker Pipelines.

You can choose the pipeline that is currently running to see its latest status. In the following example, the DataProcessing step is performed by using a Data Wrangler data flow.

You can access the data flow from the local path of the code repository that we cloned earlier. Choose the file browser icon to show the path, which is listed in the pipelines folder of the model build repository.

In the pipelines folder, open the autopilot folder.

In the autopilot folder, open the preprocess.flow file.

It will take a moment to open the Data Wrangler flow.
In this example, three data transformations are performed between the source and destination. You can choose each transformation to see more details.

For instructions on how to include or remove transformations in Data Wrangler, refer to Transform Data.
For more information, refer to Unified data preparation and model training with Amazon SageMaker Data Wrangler and Amazon SageMaker Autopilot – Part 1.
When you’re done reviewing, choose the power icon and stop the Data Wrangler resources under Running Apps and Kernel Sessions.

Experiments
This tab lists the Autopilot experiments associated with the project. For more information about Autopilot, see Automate model development with Amazon SageMaker Autopilot.
Model groups
This tab lists groups of model versions that were created by pipeline runs in the project. When the pipeline run is complete, the model created from the last step of the pipeline will be accessible here.

You can choose the model group to access the latest version of the model.

The status of the model version in the following example is Pending. You can choose the model version and choose Update status to update the status.

Choose Approved and choose Update status to approve the model.

After the model status is approved, the model deploy CI/CD pipeline within CodePipeline will start.

You can open the deployed pipeline to see the different stages in the repo.

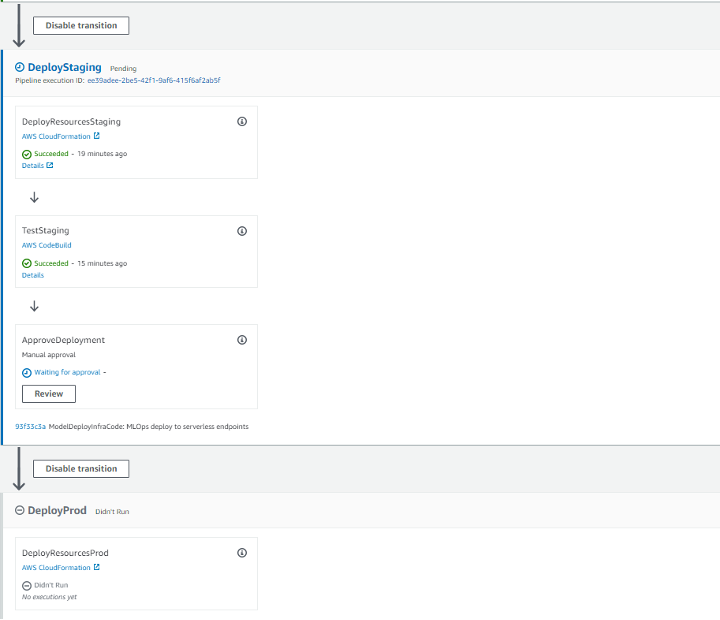
As shown in the preceding screenshot, this pipeline has four stages:
- Source – In this stage, CodePipeline checks the CodeCommit repo code into the S3 bucket.
- Build – In this stage, CloudFormation templates are prepared for the deployment of the model code.
- DeployStaging – This stage consists of three sub-stages:
- DeployResourcesStaging – In the first sub-stage, the CloudFormation stack is deployed to create a serverless SageMaker endpoint in the staging environment.
- TestStaging – In the second-sub stage, automated testing is performed using CodeBuild on the endpoint to check if the inference is happening as expected. The test results will be available in the S3 bucket with the name
sagemaker-project-<project ID of the SageMaker project>.
You can get the SageMaker project ID on the Settings tab of the SageMaker project. Within the S3 bucket, choose the project name folder (for example, sagemaker-MLOp-AutoP) and within that, open the TestArtifa/ folder. Choose the object file in this folder to see the test results.

You can access the testing script from the local path of the code repository that we cloned earlier. Choose the file browser icon view the path. Note this will be the deploy repository. In that repo, open the test folder and choose the test.py Python code file.

You can make changes to this testing code as per your use case.
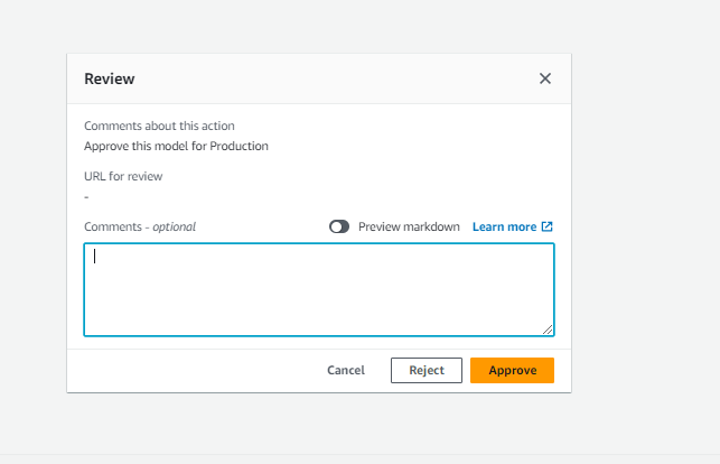
- ApproveDeployment – In the third sub-stage, there is an additional approval process before the last stage of deploying to production. You can choose Review and approve it to proceed.
- DeployProd – In this stage, the CloudFormation stack is deployed to create a serverless SageMaker endpoint for the production environment.
Endpoints
This tab lists the SageMaker endpoints that host deployed models for inference. When all the stages in the model deployment pipeline are complete, models are deployed to SageMaker endpoints and are accessible within the SageMaker project.

Settings
This is the last tab on the project page and lists settings for the project. This includes the name and description of the project, information about the project template and SourceModelPackageGroupName, and metadata about the project.
Clean up
To avoid additional infrastructure costs associated with the example in this post, be sure to delete CloudFormation stacks. Also, ensure that you delete the SageMaker endpoints, any running notebooks, and S3 buckets that were created during the setup.
Conclusion
This post described an easy-to-use ML pipeline approach to automate and standardize the training and deployment of ML models using SageMaker Projects, Data Wrangler, Autopilot, Pipelines, and Studio. This solution can help you perform AutoML tasks (preprocessing, training, and postprocessing) in a standardized repository structure that can provide your expert data scientists with the capability to view, validate, and modify the workflow as per their needs and then generate a custom pipeline template that can be integrated to a SageMaker project.
You can modify the pipelines with your preprocessing and pipeline steps for your use case and deploy our end-to-end workflow. Let us know in the comments how the custom template worked for your respective use case.
About the authors
 Vishal Naik is a Sr. Solutions Architect at Amazon Web Services (AWS). He is a builder who enjoys helping customers accomplish their business needs and solve complex challenges with AWS solutions and best practices. His core area of focus includes Machine Learning, DevOps, and Containers. In his spare time, Vishal loves making short films on time travel and alternate universe themes.
 Shikhar Kwatra is an AI/ML specialist solutions architect at Amazon Web Services, working with a leading Global System Integrator. He has earned the title of one of the Youngest Indian Master Inventors with over 500 patents in the AI/ML and IoT domains. Shikhar aids in architecting, building, and maintaining cost-efficient, scalable cloud environments for the organization, and supports the GSI partner in building strategic industry solutions on AWS. Shikhar enjoys playing guitar, composing music, and practicing mindfulness in his spare time.
 Janisha Anand is a Senior Product Manager in the SageMaker Low/No Code ML team, which includes SageMaker Canvas and SageMaker Autopilot. She enjoys coffee, staying active, and spending time with her family.
- SEO Powered Content & PR Distribution. Get Amplified Today.
- EVM Finance. Unified Interface for Decentralized Finance. Access Here.
- Quantum Media Group. IR/PR Amplified. Access Here.
- PlatoAiStream. Web3 Data Intelligence. Knowledge Amplified. Access Here.
- Source: https://aws.amazon.com/blogs/machine-learning/bring-sagemaker-autopilot-into-your-mlops-processes-using-a-custom-sagemaker-project/